How to Cancel Dropbox in 8 Steps
Do you want to cancel your individual Dropbox account?
Before you commit to this decision, first ask yourself whether you want to downgrade to the Free Dropbox plan or completely delete your Dropbox account?
No matter the answer, today we’ll help you with both.
Just follow the step-by-step processes listed in this post to resolve any issues you’re currently facing.
Let’s start off with an 8 step process on how to Cancel your Dropbox account.
How to Cancel Your Dropbox Account in 8 Simple Steps
Canceling your Dropbox plan is not the same as deleting it.
If you cancel your paid subscription plan, you’ll be automatically downgraded to the Free Dropbox option.
Then it’s up to you, whether you want to delete it entirely or keep using the free plan.
Follow these steps if you want to cancel your subscription plan.
Step #1 Go into your online account on dropbox.com
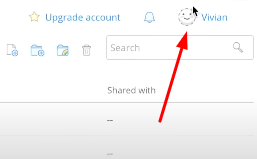
Step #2 Click your Avatar profile picture in the top right corner of the screen.
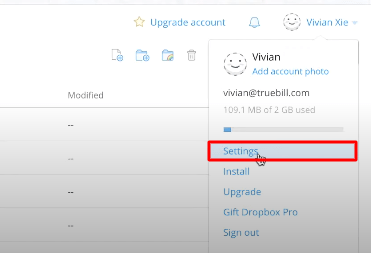
Step #3 Go to Settings
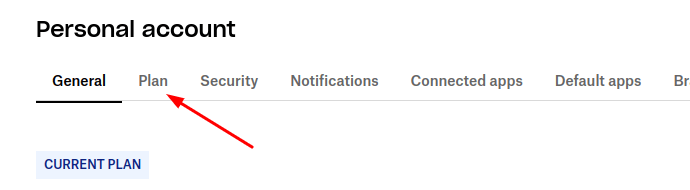
Step #4 Next, go to Plan
Step #5 Find the Cancel plan button at the bottom of the page
You’ll be asked to select a reason for canceling. Choose the one that fits your situation.
Step #6 Choose a reason for canceling your plan
Step #7 Then click Continue Canceling
Step #8 Wait for an Email Confirmation
Wait for a confirmation email saying you successfully canceled your Dropbox account.
This email should have this subject line -Dropbox Plan will not renew-.
To make sure everything went smoothly, go to the Dropbox billing tab.
You can find that in the account settings. Then click the Change or Change Billing button.
This is the message you’re hoping to see ‘plan downgrade scheduled’.
Now if you want to permanently delete your Dropbox account, follow the steps below.
How to Delete Your Dropbox Account in 4 Quick Steps
Disclaimer: there’s no going back after you do this.
Deleting your Dropbox account will lead to all of your files being permanently deleted together with your account.
That means you’ll no longer be able to log into your dropbox.com account.
All of your devices will stop being synced to your dropbox.
You wouldn’t be able to edit files in shared folders.
All of the files you have shared with other members will still be accessible to them but not to you.
And lastly, all of your personal files will be permanently deleted from the Dropbox servers.
Do you still want to delete your account?
If the answer is yes, then follow this guide to delete your Dropbox account.
Step #1 Go into your online account on dropbox.com
Step #2 Click your Avatar profile picture in the top right corner of the screen.
Step #3 Go to Settings
Step #4 Under the General tab, click Delete account
When you complete this step, Dropbox will automatically launch a deleting process of your files after exactly 30 days.
These steps work for individual users. There’s a completely different process for people using Family or Business plans.
And many people are not entirely sure what happens with their files once they delete their Dropbox account.
Do they still exist in Dropbox’s online servers?
Can anyone access them in the future?
Let’s answer these questions right now to prevent your data from being stolen.
What Happens to Your Files When You Cancel or Delete your Dropbox account
Many people store personal information and valuable files and/or folders in their Dropbox account.
You don’t want to delete your account and then finding out that someone has access to the files you deleted.
So before canceling and completely deleting your Dropbox account, it’s a good practice to check your files and personally delete the ones you might be worried about.
After you delete your Dropbox account, the files will still exist for at least 30 more days on Dropbox’s servers.
To prevent any data from being stolen or used against you, here’s a step-by-step process on how to delete your personal files from your Dropbox:
Step #1 Go into your online account on dropbox.com.
Step #2 Go to All files in the left sidebar.
Step #3 Click the “…” next to the file’s name.
Step #4 Click the Delete button and then Delete again.
If you want to do it through your desktop app, the quickest way to do it is to drag a file from your Dropbox folder into your recycle bin.
This is not all!
Step #4 will delete your files but Dropbox has the feature to recover deleted files.
If you want to PERMANENTLY delete a file/folder, follow the rest of the steps.
Step #5 Got to Deleted files in the left sidebar of your online dropbox account.
Step #6 Mark the checkbox next to each file you want to permanently delete.
Step #7 Click Permanently delete and then Permanently delete once again.
For business teams, to permanently delete files or folders, the team admin must allow members to do it.
Some things to note about permanent deletion:
- You can’t permanently delete items in shared folders. You can only delete files that you personally added and you can do it only exactly after adding them.
- Dropbox Business admins are the only people that can permanently delete files or folders
- You can only delete your files. If you shared a file with someone and he copied it to his dropbox account, then you can’t delete his version of the file.
- Deleted files don’t get accounted for in your storage limit. So permanently deleting an item from your deleted files section will not free up additional space for you.
Now that we know this, let’s move on to how to remove Dropbox from all of your devices, starting with how to remove Dropbox from your phone.
How to Remove Dropbox from Your Phone
Removing Dropbox from your phone follows the same process you would use to remove any other app from your phone.
There are only 2 exceptions to this rule.
- You can’t delete or uninstall your Dropbox if it came pre-packaged in your Android Phone.
- Don’t uninstall Dropbox from your phone if you’re using a paid subscription plan and paying it through your phone.
For number 2, you shouldn’t delete Dropbox if you’re still paying your subscription plan.
You can cancel your paid subscription plan from your App Store.
You should receive an email notification if the cancel process was successful.
If you don’t get an email, you should contact your App Store through their email support.
After you’re done canceling your plan, you can safely delete and uninstall the app as you would any other app from your phone.
How to Uninstall the Dropbox App From Your Desktop
Uninstalling your Dropbox desktop app will completely remove Dropbox from your computer.
Once you do it, you’ll no longer see Dropbox in your menu bar and your computer will stop syncing with your Dropbox account.
Keep in mind that this process will not delete your Dropbox account or remove files from your Dropbox.
To delete your account, you should follow the process we shared earlier in this post.
Uninstall Dropbox on Windows:
Uninstalling Dropbox on Windows is simple.
It follows the process of uninstalling any other program from your computer.
Here’re 6 quick steps to break down the process from A to Z.
#1 Click your Start Menu (bottom left corner of your screen).
#2 Use the search bar to find Control Panel and click it.
#3 Select Uninstall a program, located under Programs.
#4 Find and select Dropbox from the list of programs you see.
#5 Then click Uninstall.
#6 Restart your computer and you’re done.
This process works for uninstalling any program from your computer so it’s a good practice to remember the steps for the next time you need them.
If you’re still having problems with uninstalling Dropbox on Windows, then you might have an outdated version of Dropbox on your computer.
To fix this issue, you’ll have to upgrade to the latest version of Dropbox and then uninstall it again.
Make sure you completely close your Dropbox when you try to uninstall it.
An easy way to do this is to click ctrl + alt + delete and then select your Task Manager.
Then find Dropbox in files or processes, select it, and click End Process.
This should sort all of your potential issues when uninstalling Dropbox on Windows.
Now let’s move on to how to uninstall Dropbox on your Mac computer.
Uninstall Dropbox on Mac:
Uninstalling Dropbox on Mac is a little harder but once again, here’s a straightforward process on how to do it:
#1 Click your Dropbox icon in the menu bar.
#2 Click on your Avatar picture and select Preferences.
#3 Go to the Account tab.
#4 Click Sign out or Unlink, depending on your account.
#5 Click your Dropbox icon in the menu bar once again.
#6 Click on your Avatar picture and select Quit Dropbox.
#7 Open your Application folder in Finder.
#8 Drag your Dropbox app file from Applications to the Trash.
This process will complete the uninstallation process of your Dropbox.
Your Dropbox folder will remain untouched. If you want to delete it as well, you can throw it in the Trash as well.
Of course, this action will delete your Local Dropbox folder and any unsynced files will be lost and never to be found in your online Dropbox account.
So only delete your folder if you’re completely sure that the files you still need are synced with your online account.
If you’re having trouble uninstalling your Dropbox app from your Mac computer, it may be because you have Dropbox running in the background.
You can not uninstall a program that’s currently running, so the prevent this issue from happening, follow these steps
#1 Open your Activity Monitor usually found in the “Applications” folder.
#2 Find the lines that say Dropbox in your Activity Monitor.
#3 Select a line that says Dropbox.
#4 Click the X which will force quit the process.
#5 Repeat steps #3 and #4 for each line that says Dropbox.
#6 Try to uninstall Dropbox following the previous process once again.
This should eliminate any issues or troubles when uninstalling Dropbox from your Mac computer.
And now for the last topic, we’re going to cover today, how to uninstall Dropbox on Linux.
Uninstall Dropbox on Linux:
And now we find ourselves in the deepest waters as we have to uninstall Dropbox on Linux.
It is relatively harder than doing it on Windows or Mac but there’s nothing to worry about.
Just follow the process we’ve outlined for you and you shouldn’t encounter any problems.
One quick disclaimer before we begin…
Some of the commands listed below might not work when inputted into your terminal window depending on your operating system and package used during the installation process.
Of course, that’s nothing to worry about.
Just copy and paste all of the following commands into your Terminal Window one-by-one.
You should press Enter after each command.
By the end of the list, you’ll have the Dropbox app completely uninstalled from your computer:
dropbox stop
(press enter)
dropbox status # Should report “not running”
(press enter)
rm -rf ~/.dropbox-dist
(press enter)
rm -rf /var/lib/dropbox
(press enter)
rm -rf ~/.dropbox*
(press enter)
sudo apt-get remove nautilus-dropbox
(press enter)
sudo apt-get remove dropbox
(press enter)
rm /etc/apt/source.d/dropbox
(press enter)
And if you want to remove all of the files in your Dropbox folder from your Linux computer, enter the following command after the others.
rm -rv ~/Dropbox
(press enter)
This command will delete your Local Dropbox folder and any unsynced files will be permanently lost as you wouldn’t be able to find them in your online Dropbox account anymore.
If you want to keep your files in the online drive then you should sync all of them so you don’t lose any.
Today we shared with you how to cancel your Dropbox subscription and how to completely delete Dropbox from all of your devices.
We hope this guide helped you a ton and if you have any questions, don’t hesitate to reach out.

