The Ultimate Manual to Bitbucket Repository
Bitbucket offers a central platform to store your source code and collaborate with others. You can also perform various actions needed to create different project versions. In this guide, we’ll be discussing everything you need to know about using Bitbucket repositories.
Let’s Start By Defining What A Git Repository is.
A Git repository is simply a folder where developers can save and track all changes made to files in a project. However, a repository is quite different from the typical folder you use to save files on your desktop.
Rather than your typical folder that only stores your files, a Git repository is a version control system. Here, a developer can store the source code for a project. But, more than that, they can see all the changes made to the source code, who made the changes, when the changes were made, and why.
So, if you looked into a Git repository, you’d see a collection of files representing different versions of the project at various stages. You can even roll back to a previous version of the software or app if there’s a problem with recent changes made to the source code.
This functionality is the essence of version control that repositories make possible. A repository appears as .git or the .git/ folder. If you delete this folder, you also get rid of the project’s entire history.
There are two main types of repositories:
Local Repository: A local repository is stored on your computer. This is where the actual work on source code takes place. No one else can see what you’re doing on your local repository. You don’t even need an internet connection or a network connection to do your work. You have all the tools you need right in Git on your computer.
You can perform different operations to create different versions of your project, including creating new repositories, adding files, and committing actions.
Remote Repository: The remote repository is much like your local version, except it is online, hosted on a server. This repository is also accessible to other team members with the appropriate permissions. However, the remote repository doesn’t offer a working copy for you to work with.
Instead, you upload changes from your local repository to the remote repository. You can think of a remote repository as a place to exchange and share code with other developers rather than a platform for working on code.
Bitbucket is an excellent example of a remote repository. Other examples of remote repositories include GitHub and GitLab.
How A Bitbucket Repository Works
Bitbucket is much more than a Git repository. This platform is a version control hosting platform. As such, it provides multiple tools to enhance how you use version control systems, specifically Git. Bitbucket’s main selling point lets you collaborate with other developers on your source code.
The platform allows you to create a master repository. Then, you can choose who has access to the master repository. Team members with access can pull down code from the Bitbucket master repository to their local repositories to make changes. Then, they can transfer their code changes back to the master repository on Bitbucket.
This way, you have a single source of truth when multiple developers are working on the same project. You know exactly who made changes, when these changes were made, and so on. In addition, each contributor has access to the project’s complete history, including its improvements and versions, the author of the changes, the date of editing, and the purpose of the changes made from the original project.
Example 1: Using Bitbucket Repos for Distributed Version Control
Say, for example, you have an open-source project. Naturally, more than one developer might want to make changes to specific parts of the source code. Or, you could be the one responsible for improving the software.
But, working on the official source code could introduce bugs to the software. Moreover, with each developer working independently, there’s no way to guarantee that each contributor’s changes will improve the code.
However, with Bitbucket, each developer can download the central project repository to their local machine. With branching, the developers can safely change the code without affecting the main code. As a result, the original version of the software continues to work undisturbed, despite the work going on behind the scenes.
All the while, contributors have access to the entire history of changes made to the code. They can even collaborate and share ideas as they work on the code. Finally, once they’ve tested their version and confirmed that it works, the developers can merge it back to the primary source code.
It is even possible to revert to the old version or ‘undo’ changes, just in case everything doesn’t go as planned.
Example 2: Bitbucket Repository Access Control
Just because you’re hosting your repository on the cloud doesn’t mean you have no control over access. Bitbucket offers tremendous control for admins, allowing them to monitor who has access to their repository.
For example, Bitbucket allows you to invite members to your workspace. A workspace is where you create repositories and collaborate on your projects. You can invite collaborators with just an email address. Members who don’t already have a Bitbucket account will be prompted to create one when you send the invite.
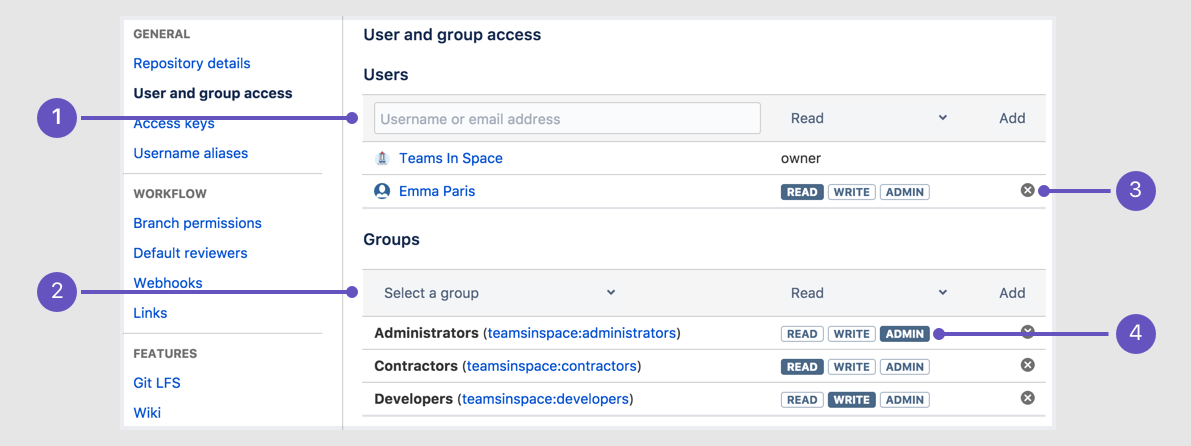
Furthermore, you can also create groups, complete with specific access permissions. For example, Read access allows users to view, fork, and clone code in the repository. However, they cannot edit wiki pages, create issues, or even comment on issues. Finally, Admin access is the highest level of access, giving users the same right as the repository owner.
Lastly, you can also grant access at the individual level. For example, certain group members may have Write access, which allows members to push changes directly to the repository. Other members may only have Read access and one or two Admins with absolute rights. You can even determine which IP addresses can access your repository.
How to Get Started With Your First Bitbucket Repository
Git sounds complicated to a lot of people. But, the learning curve isn’t as steep as you may first expect. You’ll also be using many of the same commands and performing the same actions regularly. So, you only need to learn these once.
Finally, Bitbucket has done a great job of making its platform accessible to newbies. People who have used Git hosting services like GitHub will also find that the Bitbucket interface is quite familiar.
Here’s how to get started creating your first repository on Bitbucket:
Step 1 – Download Git
First off, you’ll need to have Git installed locally on your computer. It’s easy to install, and it’s free. After that, you’ll primarily work on your local Git repository and then push your changes to the Bitbucket repository.
However, I highly recommend installing Git with Atlassian Sourcetree. Sourcetree is, Atlassian’s bundled version of Git to use with Bitbucket. The client is available for Windows, Mac, and Linux.
Finally, you can also use Sourcetree to perform crucial actions like cloning your repository, pulling changes from your Bitbucket repository, and merging branches.
Step 2 – Sign Up for Bitbucket
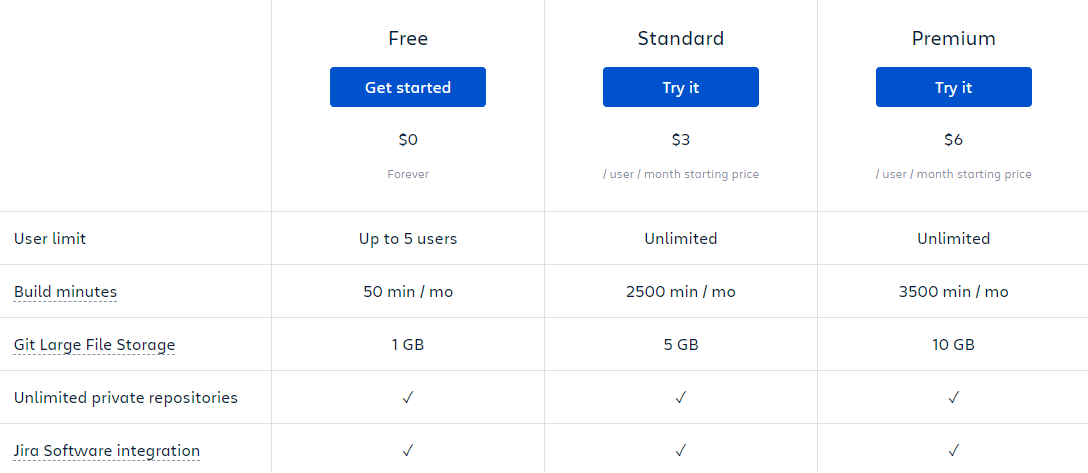
Go to the Bitbucket website to create your account. The platform is free for up to five users. There are also two paid plans to choose from. These are the Standard and Premium plans.
The Standard plan costs $3 per user per month and comes with everything you need for your Git workflow. The Premium plan is suitable for people who need more stringent access and permissions control. Finally, Bitbucket Premium costs $6 per user per month.
Head over to the Pricing page at the top of the website to review your options. Alternatively, scroll to the bottom of the home page to choose your package.
I recommend the Standard plan for most people. You can always upgrade to the Premium version later if needed. You’ll be able to use Bitbucket immediately after you sign up and make your payment.
Step 3 – Create Your Git Repository
Your Bitbucket repository acts as the central repository for your source code and files. You can collaborate with others by permitting them to access your repository. You’ll also be copying a version of the central repository to your local computer where you’ll be working.
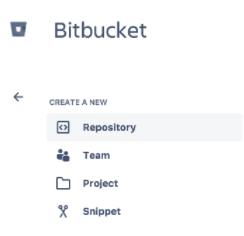
You’ll need to log into your Bitbucket account to create your first repository. Then:
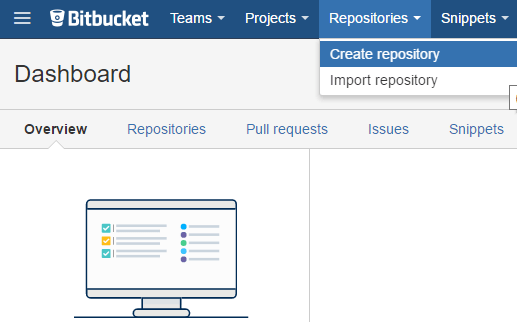
Click the + icon on the sidebar. Then, click Repository
You’ll be presented with a dialog to set up your repository. Enter the repository name. You’ll also need to specify whether you wish to create a private or public repository. Checking the private repository box means that it will only be available to you and your team members with permission.
Unchecking the box means that the repository is available to the public. Finally, leave Git as the Repository type. Either way, you’ll be able to change all this information later if required. But, you won’t be able to change the repository type once you’ve created it.
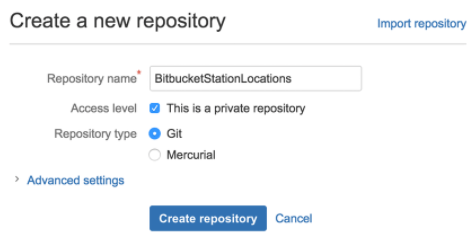
Finally, click Create repository. Bitbucket immediately makes your new repository available on the Overview page.
Step 4 – Copy the Repository to Your Computer
You now have a central place to store, manage, and collaborate on your project files. But, you still need to get the repository on your local computer. This process is known as ‘Cloning’ in Git. It entails copying your Bitbucket repository to your computer, where you’ll be working on your projects.
Also, cloning essentially connects the Bitbucket server and your computer. This way, you can move files back and forth flawlessly. To copy your Bitbucket repository to your machine:
Open your Git terminal window and a browser from your computer. Then, navigate to the home directory using this command:
![]()
Next, create a directory that will contain all your repositories. You only have one repo now, but this is bound to change as you work. The directory will make it easier to manage all your repositories in one place.
Use the following command to create your directory
![]()
Then, head over to your Bitbucket account. Navigate to the repository you created previously.
Click the + icon on the sidebar and choose Clone this repository.
You’ll see a clone command highlighted in a dialog box. Copy the command and head back to your terminal window.
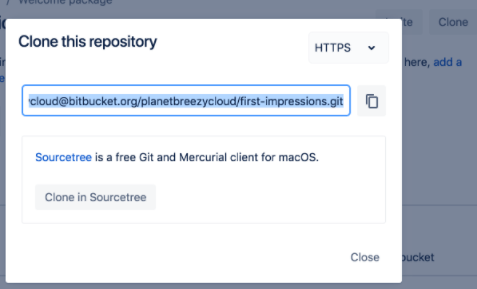
Simply paste the command and click Return. Finally, enter your password to clone the repository on your machine.
Step 5 – Add Files to Your Repository
You’ll have noticed that your repository is empty. So, it’s time to add files and start working. It makes sense to start with a file for all your locations. This way, you can keep track of all your space station locations.
From your terminal window, go to the top level of your local repository.

Then, create a new file with the following line:
![]()
You’ll know you have successfully created the file if nothing shows up in the command line.
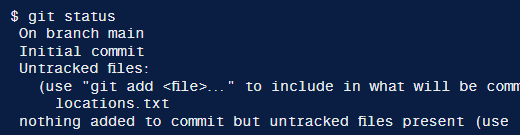
Next, use the git status command to see the status of your local repository. You’ll be able to see the new file that you created. You’ll also notice that it is untracked.
So, you’ll need to track the new file using the git add command. This command moves your changes to the staging area.
![]()
Now is an excellent time to check the status of your file, just to make sure everything looks good.
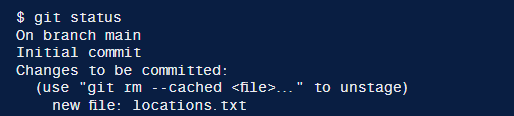
You’ll notice that your file has been staged. Staged simply means that the file has been added and is ready to commit.
Finally, issue the git commit command to commit the file to the project history. Don’t forget to add a commit message.

You have successfully created a file in your repository. But, this file only exists in your local repository. You want to update it in your Bitbucket repository as well. So, you’ll need to push the changes to Bitbucket.
Head to your local terminal window and issue the git push origin main command. This command means that you are pushing changes to the Bitbucket main branch. Additionally, origin indicates that you are pushing changes to the Bitbucket server.
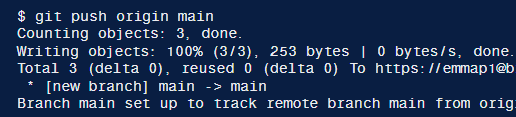
You have successfully updated the new file on Bitbucket. This file now exists in your local repository and your Bitbucket repository. Simply repeat this process to create more files.

