The Ultimate Manual to Bitbucket Pipelines
Bitbucket Pipelines allows you to test and then deploy code based on a configuration file found in your repository. Software developers across the globe can benefit significantly from using Bitbucket Pipelines, but there can be confusion on how to get started with it. Our guide will show you how.
What Are Bitbucket Pipelines Anyway?
Bitbucket Pipelines is a valuable feature built into Bitbucket. It allows developers to create, test, and deploy their code in a safe and flexible space, similar to how they might do so via their local machine. The advantage being the system gets configured to your exact needs.
The service is what’s known as an integrated CI/CD service. More simply, it’s a set of best practices and methodology that helps teams realize their business goals while maintaining a good level of security and high code quality. CI/CD is a method of introducing automation into various stages of development and includes continuous integration, continuous delivery, and continuous deployment.
How Bitbucket Pipelines Work
By now, you know that Bitbucket Pipelines is a service for developers built into Bitbucket. But let’s dive a little deeper.
As an integrated CI/CD service, developers can automatically build and test their code based on a configuration file in their repository with Bitbucket Pipelines. Containers get created in the cloud, and inside them, you effectively run commands from there. It’s a helpful service because it enables developers to run unit tests on all changes made in that repository. In other words, it makes it easier to ensure your code is safe and that it meets your requirements.
Not only that but using Bitbucket Pipelines assures you are scaling your tests appropriately because the pipeline executes on each commit—with each new commit, a new docker image gets created. Your pipelines will grow as your requirements do, and you won’t be restricted based on the power of your hardware. Add to that an easy setup with templates ready to go, and the value of Bitbucket Pipelines speaks for itself.
Example 1: You Want To Test and Deploy Code at Speed
Let’s say you want to get up and running as quickly as possible and don’t want to go through a build agent set up or integration with an external CI tool—after all, it takes time that you could otherwise use for coding. With Bitbucket Pipelines, you can get started straight away without the need for a lengthy setup; there’s no need to switch between multiple tools.
What’s more, using the service offers fast feedback loops because the development workflow is managed, in its entirety, within Bitbucket’s Cloud. Everything is taken care of from code right through to deployment in one place. The build status is displayed on all commits, pull requests, and branches, and you can see precisely where a command may have broken your latest build.
If you need to simplify the development process for your software team and need a reliable solution, it’s a great option.
Example 2: You Need a Secure Place To Work on Your Code
Today security online is more important than ever, especially when developing new software that creates all sorts of opportunities for cybercrime—there’s been a 250% increase in open-source vulnerabilities alone over the past three years. That’s where cloud security comes into play and gives you peace of mind and flexibility, so you spend less time worrying and more time coding.
While using Pipelines, your code is safe because of top-notch security features such as IP allowlisting and two-factor authentication. The Cloud Premium plan even offers custom security settings for assigning safe, pre-defined IP addresses, and all repositories are encrypted with AES-256 and encrypted in transit with TLS 1.2+.
The service comes with a SOC 2 Type II certification—the most comprehensive certification within the Systems and Organization Controls protocol that protects your data and stops others from getting hold of it. On top of that, by adding a few lines to your Pipelines builds configuration, you can also scan dependencies for vulnerabilities automatically.
How To Get Started With Bitbucket Pipelines
Here are some key steps to follow to get the most out of using Bitbucket Pipelines:
Step 1: Understand What Build Minutes Are and How Many You Get
Before you get started with Bitbucket Pipelines, it’s important to understand that you can’t indefinitely build and test your code. Instead, Bitbucket decides how long you get to play around with your code based on the number of build minutes you have. But what are build minutes anyway?
Primarily, build minutes are like the name suggests: the number of minutes you get to develop, test, and deploy your code. They’re the minutes counted when executing a pipeline for any of those purposes. However, they exclude the time acquiring a runner—they’re only the minutes when your pipeline status is “In progress.”
Across the three main Bitbucket plans, your build minutes vary. For example, you’ll only get a restricted 50 minutes per month on the Free plan. The Standard plan drastically increases this to 2500 minutes per month and comes in at $3 per user per month. The final plan, Premium, provides you with 3500 minutes per month and costs $6 per user. The first plan is entirely free, and the latter two you can try out for free, although this is limited.

You can check out your team’s build minutes for the month by going to Avatar, choosing a workspace > Settings > Plan details. It’s best to watch how many minutes you have left, as this could catch you out during key development moments. Using Pipelines, smaller teams with faster builds tend to use around 200 to 600 minutes a month.
But what about if you need more build minutes but have run out of your monthly limit? The good news is that you can increase or top up your minutes through what’s known as “build packs.” You can buy build packs that add an extra 1000 build minutes in $10 increments. Once a credit card is stored, Bitbucket will automatically increase your minutes if you run over too.
Lastly, be aware that unintentionally triggering your build pipelines can rapidly use up your build minutes. To help avoid this, pipelines with pushes that involve more than five tags, bookmarks, or branches don’t count—as in, they don’t run.
Step 2: Know What Integrations Are Possible
You can integrate Bitbucket Pipelines with many different tools in a plug-and-play style. From Jira to Opsgenie to SonarQube, there’s a healthy line-up to choose from, with some being more useful than others.
For instance, using SonarQube enables you to view additional metrics, including issues and code coverage, all within Bitbucket’s pull requests. You can apply merge checks using SonarQube’s quality gates to find technical debt or duplicated codes as well.
The integration with Jira is also significant and allows you to automatically see which repositories your team is working on within the code in Jira view alone. It works by including an issue key in a commit, branch name, or PR summary from Bitbucket, and, from there, it will automatically update in Jira—more than handy.
That’s without mentioning Docker Hub to see build statuses, npm to view metadata, or using SVN Mirror to import and mirror SVN repositories to Git.
Step 3: See How Easy Bitbucket Pipelines Is To Set Up
It’s easy to get started with Bitbucket Pipelines, and it shouldn’t take more than a few minutes. The whole process consists of four straightforward steps. Let’s take a look at them.
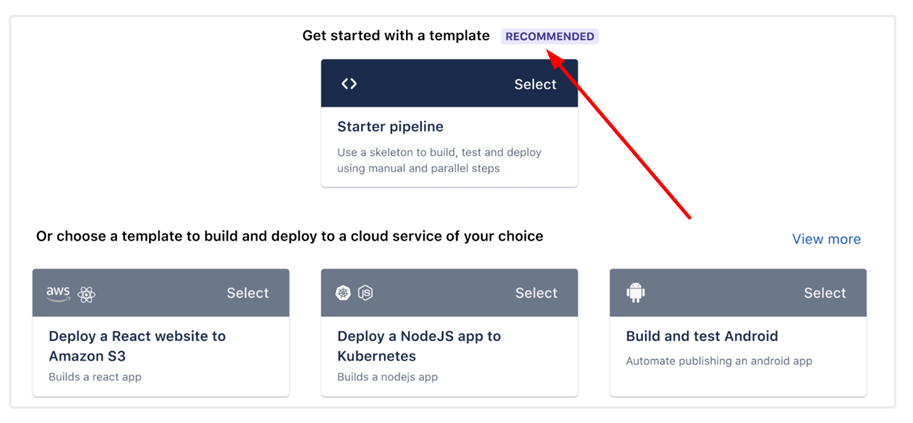
The first thing to do is to navigate over to your repository and select Pipelines in Bitbucket. From there, click Create your first pipeline, which will then scroll down to the template section.
Choose one of the available templates; if you’re struggling to pick, you can use the Recommended starter template like so:
Once you have chosen a template, you’ll find yourself in the YAML editor, where you can configure your pipeline as you wish. That’s it!
If you feel like you need to change your template, that’s easy to do as well. You can change it by clicking on the dropdown menu and selecting a different template, as shown below:
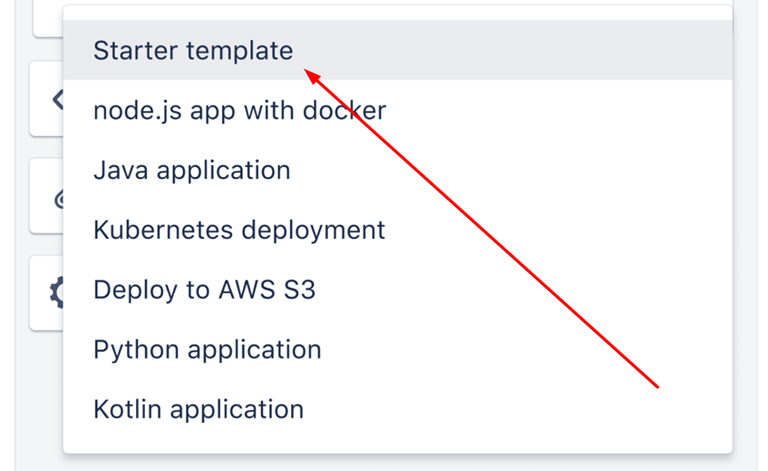
It’s worth remembering that when you choose a new template, it will override your existing one, including its content, so be wary of that.
Lastly, you can add more steps by moving over to the options in the steps panel and by copying the code snippet and adding it to the editor as needed. You can also add custom variables. To do so, fill in the name, the value, decide whether you want to encode it by clicking the box, and then click Add.
Step 4: Know Your Bitbucket Pipelines Best Practices
Setting up and using Bitbucket Pipelines is easy, as you’ve just seen. But as with anything, countless things are worth knowing that can save time and a lot of stress. We’ve listed some key best practices below for you:
- A feature known as “Pipes” provides you with a straightforward way to configure a pipeline. The feature is a particularly good option for working with third-party tools and other integrations. All you need to do is paste the pipe into the YAML file and fill in a few pieces of information. To use a pipe, you need to select the pipe you want to use. There are many pipes, so it’s more than worth trying each of them out to see what’s best for you.
- When using Pipelines, you can deploy automatically to Test on each commit within the main branch. Pipelines has a manual step you can use to deploy to Staging, and this is activated when integrated features get manually tested in the test environment. The staging upgrade itself helps verify that any pre-deployment scripts will work effectively in the production. It makes the entire process smoother and eliminates the chance of problems.
- While Bitbucket is a secure and trusted platform, security difficulties are always possible and create serious problems. It’s best to require two-factor authentication on every contributor account, as well as making sure that any laptops or other devices with access to your source code are adequately secured first. With cybercrime on the rise, you don’t want to create opportunities.
- Bitbucket accounts themselves may be personal accounts, and as such, they do not disappear when users leave a company. That’s why it’s vital to revoke access from Bitbucket users who no longer work for you. It’s an overlooked step and easy to forget but can create vulnerabilities that could become a real hassle. Ensure that repository admins manage team access to data, too—only give contributors access to the information they need.
- There are a lot of great applications you can add to the service, but it’s worth being somewhat cautious here. It’s best not to give applications more access rights than they need and always question why an app requires access, certainly if it doesn’t seem like it would need it. A high level of access can open up all sorts of problems, so check that the app’s author has credibility before giving them free rein over your repositories and code.
- On Bitbucket, all your builds run using a “Docker” image of your choosing. You can use a different image for each part of your build, and each new step will run a new container. You’ll need to manage any artifacts you want to keep between your steps, like choosing not to compile your code for each one. Before charging ahead, it’s worth giving this some thought.
- Parallel steps help you to build and test faster because you run a set of steps all at the same time. The number of build minutes used by any of your pipelines doesn’t change if you make your steps parallel. Also, the maximum number of steps you can use is 100, and this is true whether they are running in serial or parallel—you can indent the steps to define which of them runs concurrently.

