The Ultimate Manual to Bitbucket Pages
Bitbucket is a website that allows Git coders to manage their codes and collaborate with one another in real time.
One of the main features of Bitbucket is Bitbucket pages, which are repositories where users can store and share their codes, work on the codes as a team, and visually see their products. Not only that, but Bitbucket users can convert their repositories into static websites for anyone to be able to access.
What Are Bitbucket Pages Anyway?
At its core, Bitbucket is a Git-based hosting and collaboration tool. The main goal of the website is to allow for team collaboration, which is part of the reason why Bitbucket also comes with Jira and Trello integrations. This makes it easier than ever to work with others, and even allows co-workers to comment back and forth on one another’s work.
Bitbucket pages can be created with the push of just a few buttons, and will allow users to store their Git code, as well as collaborate with others. Not only that, but with a few more steps those pages can be converted into fully functioning websites.
How Bitbucket Pages Work
Bitbucket pages allow users to collaborate and advance their coding. These pages can be public or private. They can be created to work on in real time with other members of your organization. Or they can be established once, turned into a Bitbucket website, and then static for as long as you want and free for anyone to see online.
Example 1: Project Page
One kind of Bitbucket page is a project page. With these types of pages, users can streamline communication between multiple people on their team and create high-quality codes.
With Bitbucket, multiple users can access the same repository. People can merge their codes and chat back and forth, which is excellent for both business communication and building camaraderie within the team.
In addition, people can leave comments on sections of code, make recommendations to one another, and work together in real time. With remote work being more important than ever, these features are an amazing addition to have and will keep your collaboration up and running, whether you’re working from home or in an office.
These pages can also be managed when it comes to which members have what kinds of permissions. For example, one of the features of Bitbucket is the ability to merge branches. This basically means that two independent lines of development will be turned into one.
This can be a very important choice for users to make. So instead of every single member of the team having that kind of power, those abilities can be delegated to ensure only the right people are modifying, accessing, or merging the code.
In addition, BItbucket allows users to choose between creating private or public projects and individual repositories.
Private projects can only contain private repositories. So, every single repository within that private project will also need to be private. Only those with permission will be able to see the repository, along with their wiki and issue tracker. Even minor details, like the title of the project, will only be available to team members who are a part of your workspace or those who have access to a repository in the project.
On the other hand, public projects are visible to anyone. There are still some securities when it comes to these projects, though. Users can choose to hide the individual repositories within the public project. In addition, this option allows users to host public issue trackers and wikis. Neither option is necessarily optimal, it just depends on what you need from your project.
Example 2: Static Websites
The other option for users is to turn your repository into a static website. Essentially, you’ll be able to have a website of coded HTML pages with fixed content that you can come back to at any time and that anyone can see online. Just keep in mind that users can only host one website on bitbucket.io for their workspace. If you wanted another one, you’d have to create another workspace.
When turning your repository into a static website, you’ll need to keep a few factors in mind. By going through this process, Bitbucket will automatically employ a few features. For example, the website will be using the repository’s root as the web root. Because of this, HTTPS is required for security. In addition, this server will not support cookies or server-side scripts and code. Also keep in mind that special characters, such as capital letters or symbols, are not permitted on these pages. This will be especially important in the naming process of creating the website.
However, these pages do have a lot of great features, despite some of the requirements and limitations. On your static website, you’ll be able to embed images and other kinds of media, like video content. In addition, you can even support blog comments on the website. The Bitbucket support page recommends using Disqus for this feature, which will require extra set-up.
This feature is a smooth way to transition from a simple repository to a fully functioning webpage. You’ll be able to keep all your content in one place and easily share it with others.
Not only that, but by using Bitbucket for your website, you’ll also automatically get a rum.js script injected into it so you’ll be able to access your web analytics. With this, you’ll be able to see all kinds of different factors pertaining to your website’s success and be able to pivot over time to create the most flourishing site possible.
How to Get Started With Bitbucket Pages
There are many steps in order to create your first Bitbucket page. However, the process is pretty user-friendly. Once you understand the jargon of the website and create your first repository, the other steps will follow suit in no time. The learning curve for Bitbucket can be sharp, but with a few hours of focus it will start making sense, even for those with very limited experience.
Create a Bitbucket Account
First, users will need to head over to Bitbucket.org to establish an account.
There are a few different options for pricing packages on Bitbucket, ranging from free packages to premium ones.
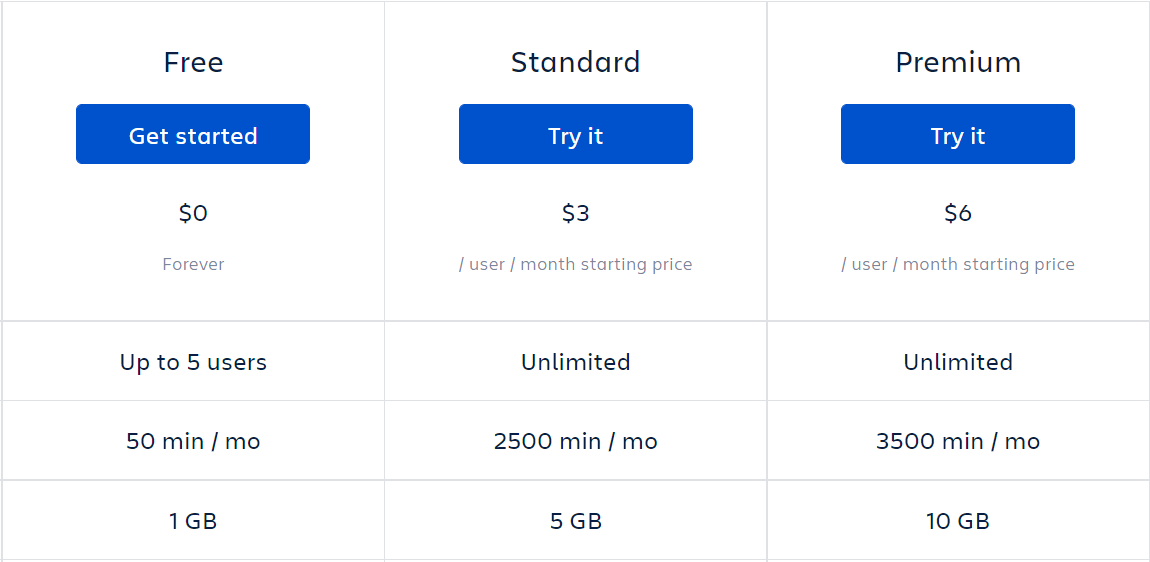
The first option is the Free package, which will be most suitable for those who are just looking to test out Bitbucket or create some smaller-scale projects.
This package maxes out on 5 users and 1 GB of storage. Not only that, but users get just 50 minutes per month to build, test, and deploy Bitbucket Pipelines.
For just $3 a month per user, the package can be bumped up to Standard. Suddenly, there can be unlimited users and 5 GB of storage. Not only that, but the amount of build minutes ricochets up to 2500 per month. These users also get unlimited code insights, 50 deploy environments, and better customer support than the free package.
Finally, those who want a really robust account can get Premium, which costs just $6 per user every month. The only difference between Premium and Standard is that users get 3500 build minutes and 10 GB of storage. Click here for the complete list of features and comparison chart.
Once you’ve decided which package is best for you, click the blue buttons that say Get started or Try it. From here, you’ll be able to make an account with just the push of a few buttons. In addition, the Free version requires absolutely no credit card information.
Create a Repository
Now that your account is established, you can begin the process of creating your Bitbucket page. One of the main advantages of Bitbucket over Github is that it does not charge based on the number of repositories you create, but instead charges the number of users or team members. This means that while you use Bitbucket, you’ll be able to make as many repositories as you’d like.
Once you log into your account, you should see a screen that looks like this.
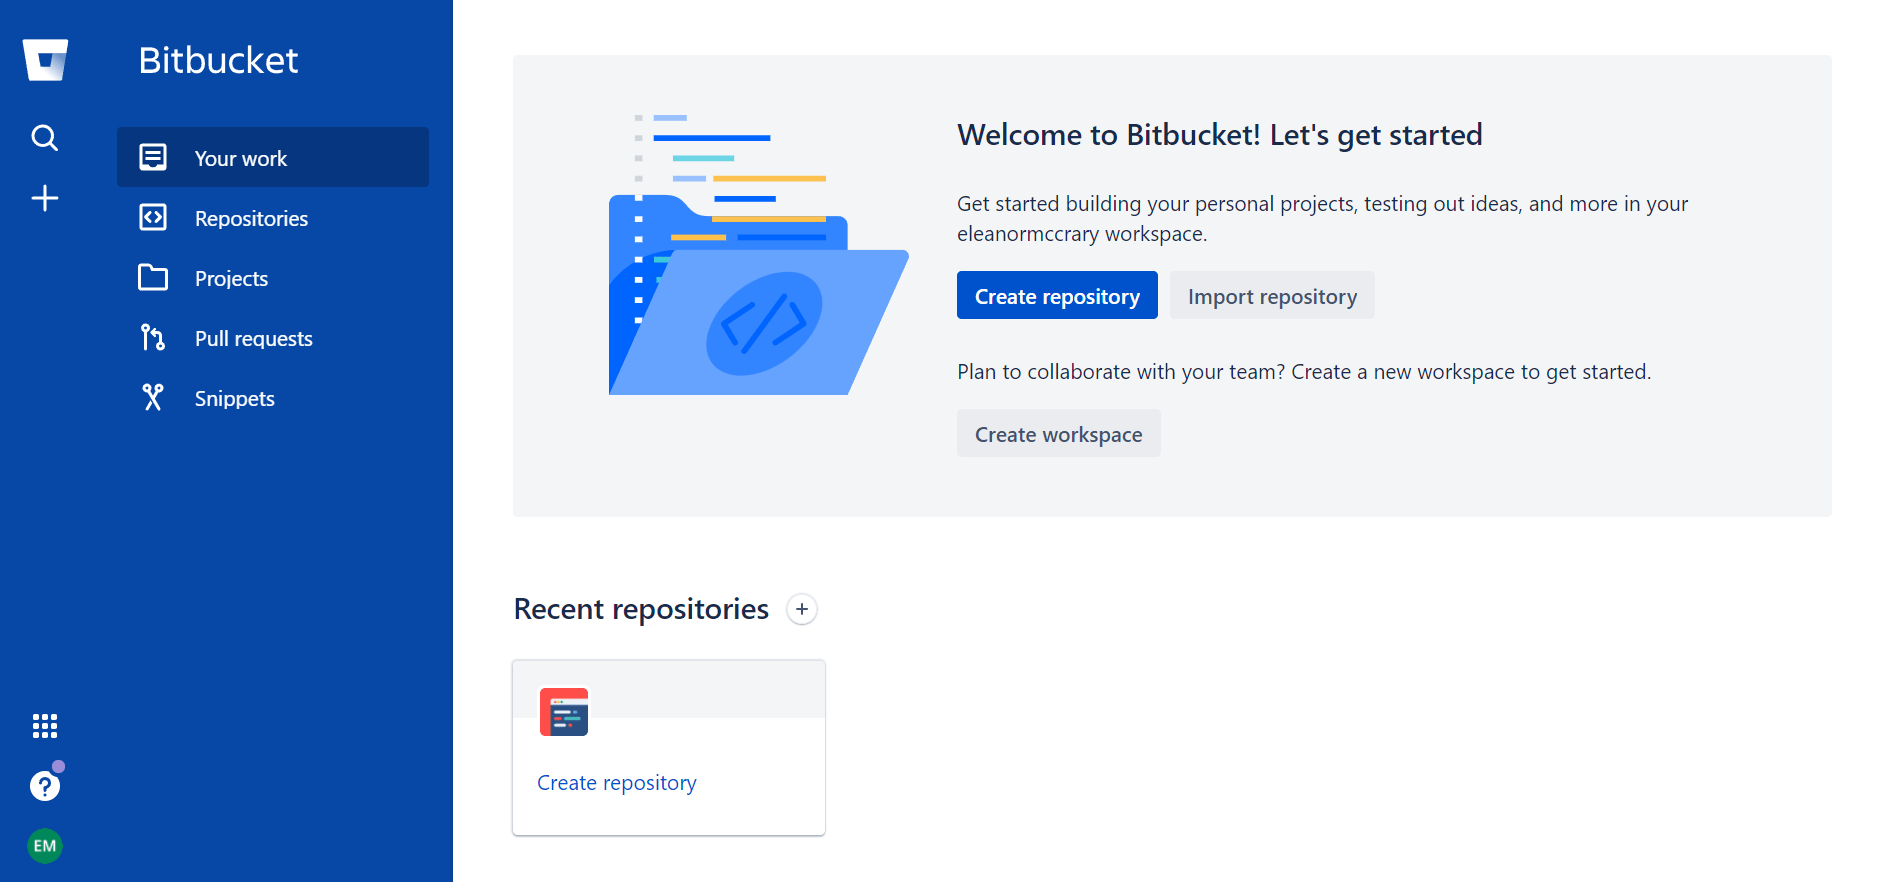
Begin by clicking on the blue button in the center of the screen that says Create repository.
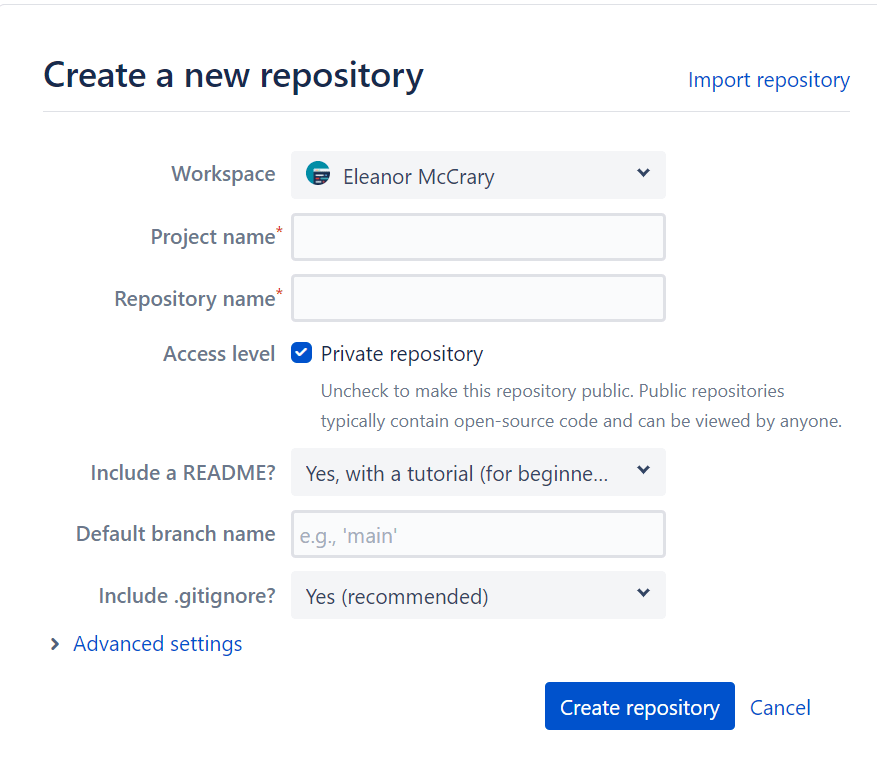
From here, you’ll be directed to a screen that will prompt you to decide on a project name and a repository name. Whatever you enter for the repository name field will be in the URL.
For example, if someone named Jane Doe had a repository called “first” then the full URL would look something like this: http://bitbucket.org/jane_doe/first.
Enter these and the default branch name and press the Create repository button. In addition, keep in mind that if you desire, you will be able to change some of these settings, such as the project name.
Explore the Repository
Now that you’ve created your very first repository, it’s time to delve right in and explore. After pressing the Create repository button, you should be taken to a new screen that shows you the overview of your repository.
From here, you can click the + button on the left-hand toolbar. Once you press this button, you’ll immediately get to see some of the most common features and options you’ll have access to on your page. This includes cloning, creating a branch, submitting a pull request, and more.
If these words sound foreign to you, fear not. Bitbucket has designed a handy glossary to explain some of the most common terms on the website.
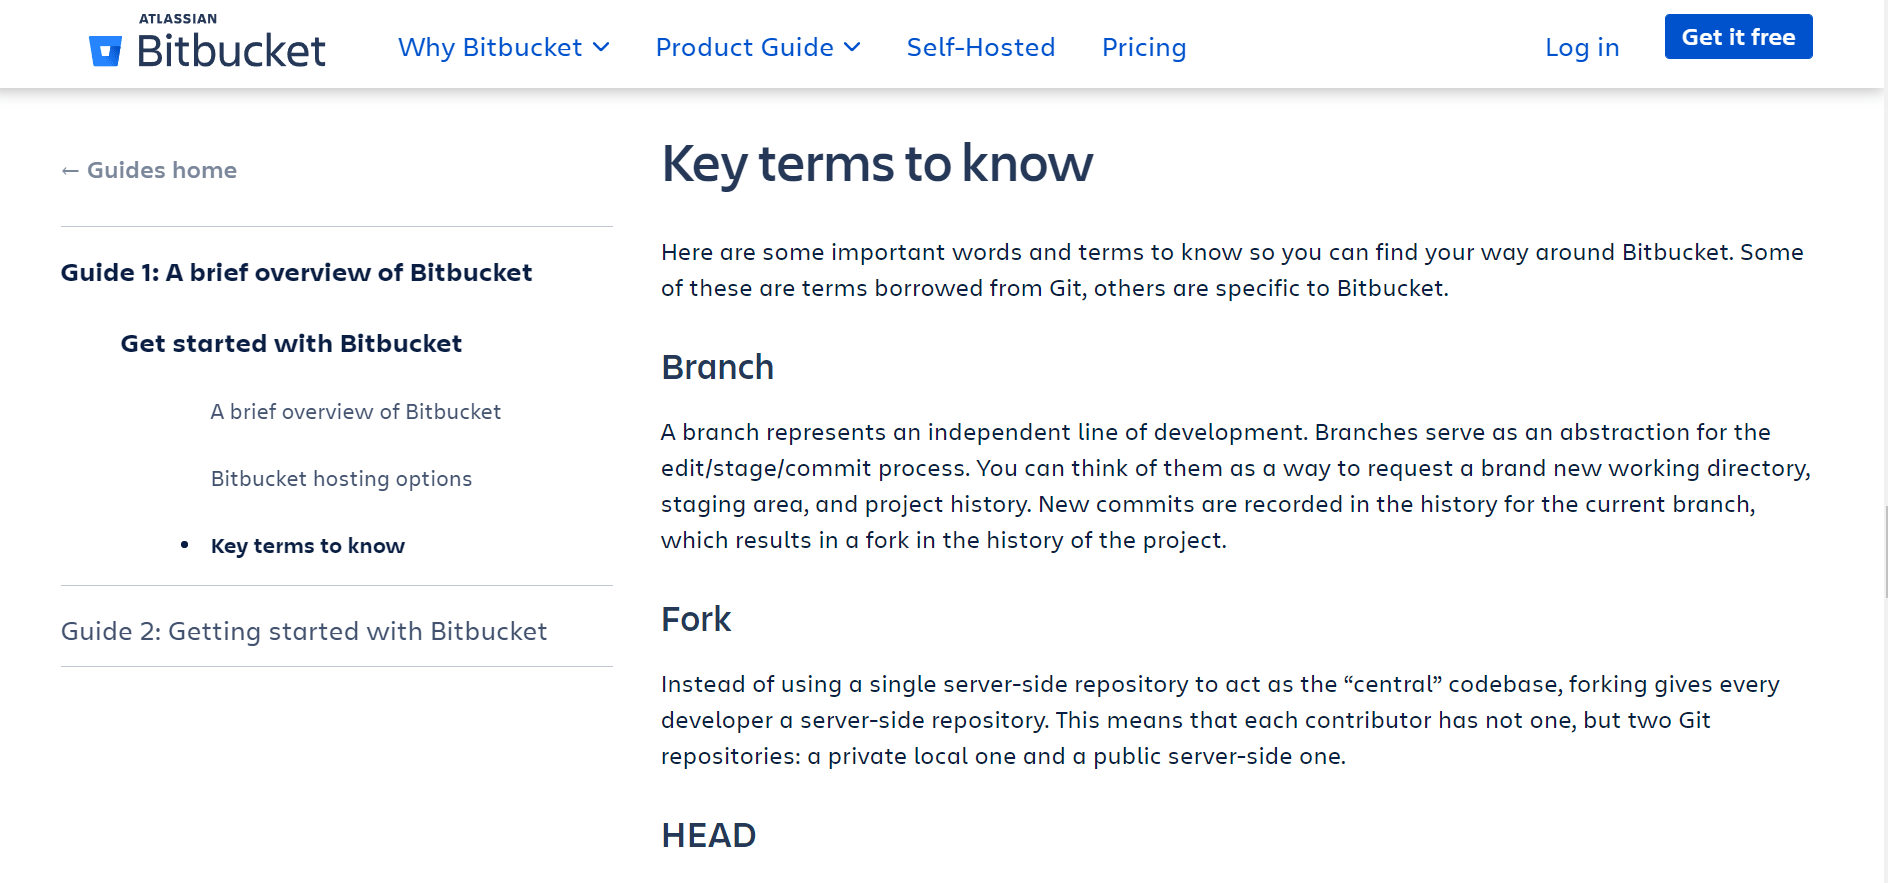
Simply go to Guide 1: A brief overview of Bitbucket and scroll down to the “Key terms to know” section.
Convert the Repository into a Website
For some people, creating their own repositories for individual and collaborative projects will be enough. However, as we discussed before, there is also the option to convert individual repositories into full-fledged static websites. This will be done through the Bitbucket Cloud.
To do this, you’ll start by creating a new repository. When you get to the section where you can enter the repository name, you’ll want to enter your workplace ID. Your workplace ID is essentially the name you choose for your account. Keep in mind that you can change this ID, but that it will change it for all of the repositories, snippets, and static websites associated with the workspace, so make the name applicable for all of them.
Let’s say that the name of your workplace ID is mybusiness. To indicate that you want to make a static website, you’ll enter “.bitbucket.io” in the repository name section of the creation process.
Then, you’ll clone the repository to your local system. To do this, go to your account, click the Overview button and then press Clone. There should be a box that pops up. You should see a line of data next to the “HTTPS” button. Copy it.
From here, go back to the terminal window and paste the command onto the command line. Press enter, and you should be set.
After that, create a file in the repository root directory. You’ll need to name this file “index.html” with no capitalization or special characters. Bitbucket does not allow for uppercase letters or those characters because the file names are case-sensitive.
Then, create a file with the same name in the repository itself. Add whatever content you’d like and when you’re done, commit the change. From here, you’ll then need to manually push the change to Bitbucket.
At this point, your website should be ready to work. All you’ll have to do from here is navigate to the URL. Once again, this will be based on your workplace ID. So, if your ID was “mybusiness” you would have to look up the URL http://mybusiness.bitbucket.io.
Remember that once you publish this, the website will be open to the public for anyone to see. Make sure that you’re aware that it can be accessed by anyone. However, you can still make the Bitbucket repository itself private and have a static website, if you’d like to ensure that not everyone can see your code.

