The Ultimate Manual to Asana Time Tracking
If you’re wondering how to use Asana time tracking for your projects, this article has all the answers for you.
Asana is among the world’s leading project management applications for agile software teams, startups, and remote organizations. It allows individuals and teams to manage, track, and delegate tasks efficiently and get things done faster.
Despite being a top project management app, Asana doesn’t offer native time tracking features. But you can still enable time tracking in Asana using various applications.
What is Time Tracking Anyway?
Time tracking is exactly what it sounds like–keeping track of the exact time spent on each task in a project. It gives you a precise picture of how much time your team members consume in accomplishing various tasks. This allows you to determine the total project time and calculate its cost based on your team’s per-hour rate.
But that’s just the beginning.
Here are some of the main benefits of time tracking.
Create Benchmarks
Every organization is unique because of its work culture, processes, and priorities. This is why it’s critical for project managers to create duration benchmarks for various tasks and projects in their companies. With Asana time tracking, you can record the duration of all your activities and develop benchmarks by using the average time required to complete a task.
For example, a web design company can use time tracking to create benchmarks for various components of a web design and branding project such as logo design, homepage header, template design, PSD to HTML conversion, etc.
You can then use these benchmarks for evaluating your team’s performance and efficiency.
Find Project Bottlenecks
Time tracking allows you to record the duration of all the tasks in a project. This will enable you to optimize your project duration by addressing the tasks consuming more time than usual. As a result, you don’t need to play guesswork or do a complete project postmortem to find bottlenecks.
Create Better Project Estimations
Having clear duration benchmarks allows you to create accurate project estimations and plan your work more efficiently. You can confidently plan ahead knowing that you have things under control. Plus, it significantly reduces planning errors due to which your team isn’t stressed all the time. As a result, your team’s overall productivity goes up.
Manage Workload More Efficiently
One of the biggest advantages of time tracking is that it allows you to discover your team’s working capacity. When you track everything, you can quickly identify your most efficient employees who get things done even faster than your benchmarks. Similarly, you can identify the low-performers who take longer than usual to complete tasks. This enables you to manage your workload more efficiently and assign tasks to the right resources based on their past performances.
Deliver Better Customer Experiences
Accurate project time tracking allows you to deliver memorable customer experiences to both your internal and external customers. Knowing exactly how much time it takes to complete a project enables you to communicate accurate project deadlines to your customers and always deliver on time.
How Asana Time Tracking Works
Despite so many benefits of time tracking in project management, Asana does not offer native time tracking features.
Thankfully, Asana integrates with dozens of different time tracking apps. One of them is Harvest, which is already included as part of your Asana account.
To start using Harvest for time tracking in Asana, you need to create an account and integrate it with Asana.
Once Harvest is enabled in your Asana account, you can start time tracking for any task in your Asana projects.
But Harvest isn’t the only time tracking application that integrates with Asana. Here’s a list of some of the most popular Asana time tracking apps.
- Everhour
- Hourstack
- Tick
- TMetric
- Harvest
- TSheets
- Timely
- Hubstaff
- Outplanr
- PomoDone
- TimeCamp
- ProfitTable
- Toggle
- Time Doctor
- Timeneye
- Velocity
- Zistemo
- DueFocus
- Kosmotime (Time-blocking)
Each of these applications comes with unique features and time tracking capabilities. So it’s not possible to cover all the functions you can perform by integrating them with Asana.
However, here are some of the core Asana time tracking features you’ll get with most of these apps.
Enable Time Tracking For Tasks
Time tracking apps allow you to log your activity time in Asana. You can automate the time tracking process by enabling it for all new tasks or manually track time by enabling it when starting a task. Similarly, you can also manually enter a task’s duration if it wasn’t recorded in your time tracking app for any reason.
Most time tracking apps also allow you to track project duration by consolidating the related task data. Similarly, you can enter the estimated task duration to measure against the actual time it takes to complete a task.
In short, most time tracking apps give you complete control over your Asana tasks and give you all the features you need to accurately record task duration.
Track Team Activities
Time tracking apps enable you to log the duration of your team’s activities in Asana. You can add participants to every project/task and start recording their activity time. Once you stop logging time, Asana’s time tracking apps add the relevant time duration to every participant’s record.
This gives you a clear picture of your team’s workload and allows you to manage your resources more efficiently. It also gives you a complete breakdown of every team member’s contribution to a project. As a result, you can easily calculate your project costs based on the hourly expense of an employee.
Track Time Across Devices
Time tracking apps in Asana help you track time across devices. This means that you can track time without any issues whether you’re using Asana on your desktop computer or a mobile device.
To make this work, you need to download the mobile app of the relevant time tracking tool and integrate it with your Asana mobile app.
All your time tracking data is stored and managed in the cloud, which means that all activity logs are added to your main account that you can access using a desktop or mobile device.
Track Billable Hours
Time tracking apps in Asana allow you to differentiate between billable and non-billable hours. A billable hour is the time you charge your clients for your services. A non-billable hour is the time you or your team spends in business development activities like sales pitches, client meetings, creating proposals, etc., that do not pay off until a client signs off a project. Non-billables can also include internal administrative or management work that the client is not liable to pay for.
Tracking this difference is important because it has a direct impact on your pricing. In time tracking apps like Harvest, Clockify, and most others, you can assign a dollar value to every hour and mark activities as billable or non-billable.
So when you start tracking time for an activity in Asana, it clearly highlights whether you can bill for it or not.
Use Reports And Dashboards For Analysis
Time tracking tools in Asana offer comprehensive reports and dashboards. These reports allow you to view various time tracking details such as total man-hours of a project, total hours per employee, time spent on a project, average time on a specific project type, project cost, most profitable projects per hour, etc.
Most Asana time tracking tools also allow you to create custom dashboards and reports from your time logs. Additionally, you can export these reports as CSV, PDF, or XLSX files in most tools.
Timesheets And Calendar Views
Asana time tracking tools also offer timesheets and calendar views to help you visualize and organize your time. The calendar view maps your tracked activities on a calendar and shows you if there’s any overlapping.
Timesheets give you a standard activity view from where you can enable or disable time tracking for different tasks/projects.
Example 1: Personal Time Tracking In Asana
You can use Asana time tracking features to log the duration of your individual tasks and projects. You can easily do this by integrating Asana with any supported time tracking application.
Once you enable the application, you can start time tracking by clicking the tracking button in the task settings in Asana. Some apps also add a tracking icon next to every task in Asana’s To-Do list from where you can enable or disable tracking.
You can access your time logs from your app’s reports section or click on an individual task in Asana to see its recorded time.
Example 2: Asana Time Tracking For Team Projects
Just like time tracking for individual tasks, team projects and activities can also be recorded with Asana time tracking apps.
You can use Harvest or any other time tracking app in Asana and enable it for your team projects. Once the app is enabled, your team members can track their task time which is added to the relevant project in Asana.
How to Get Started With Asana Time Tracking
As I mentioned earlier in this article, Asana does not offer native time tracking features. But it has built-in integration with Harvest, a popular time tracking tool. You can use any other time tracking app as well. But for this article, we’ll use Harvest as an example.
Here’s how you can use Harvest for time tracking in Asana.
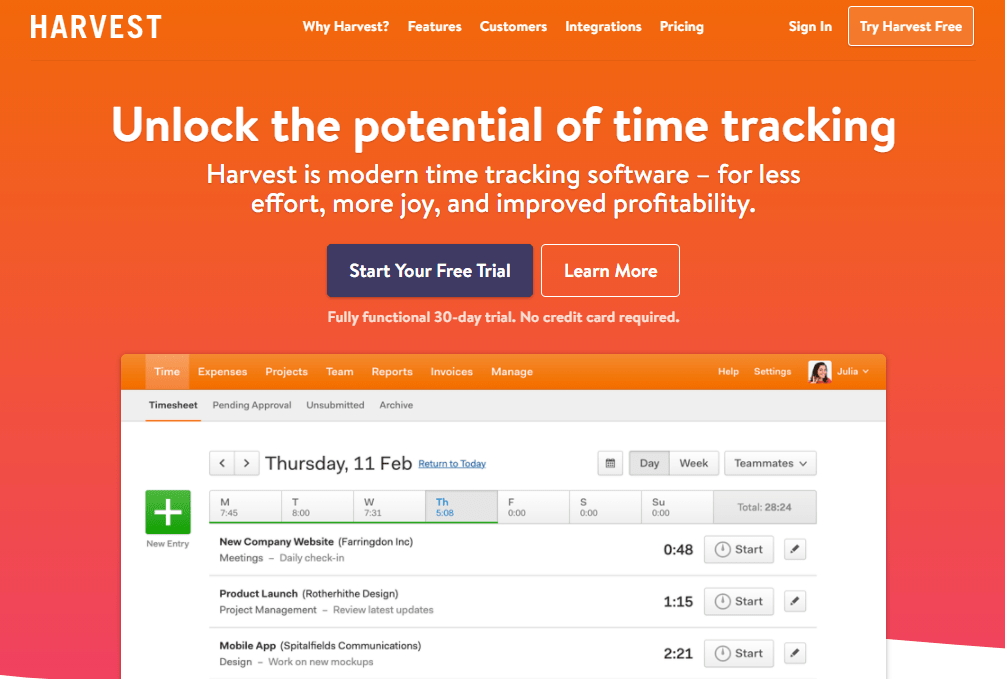
Sign Up For A Harvest Account
Step 1: Go to Harvest’s website
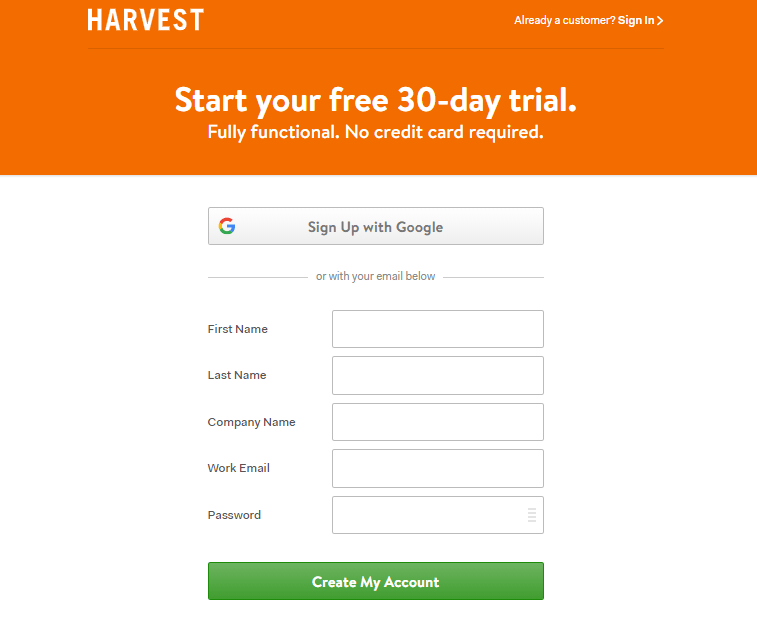
Step 2: Click Start Your Free Trial
Step 3: Enter your credentials and click Create My Account.
Step 4: On the next screen, choose Me and My Team as Harvest users.
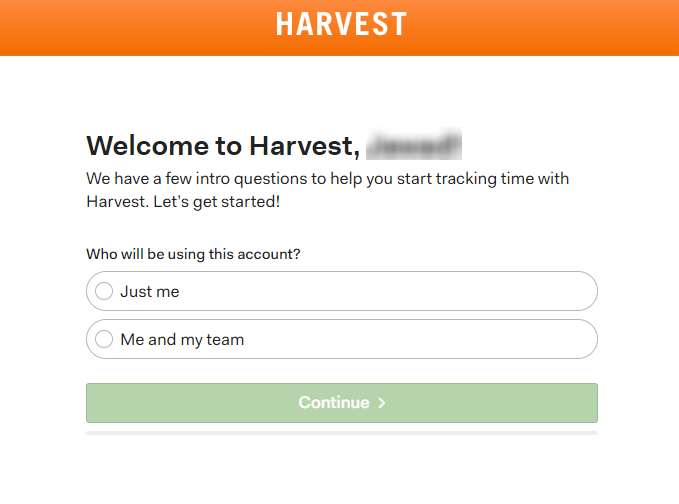
Step 6: Click Continue.
Step 7: Complete or skip the remaining onboarding steps to finish the signup process.
Your Harvest free trial account is now ready for use. Once you integrate it with Asana, you can use it for up to 30 days. After the trial, you need to sign up for a paid plan to continue using its features.
Integrate Harvest With Asana
Step 1: Log in to your Asana account.
Step 2: Click on your profile picture to open an options menu.
Step 3: Click Profile Settings.
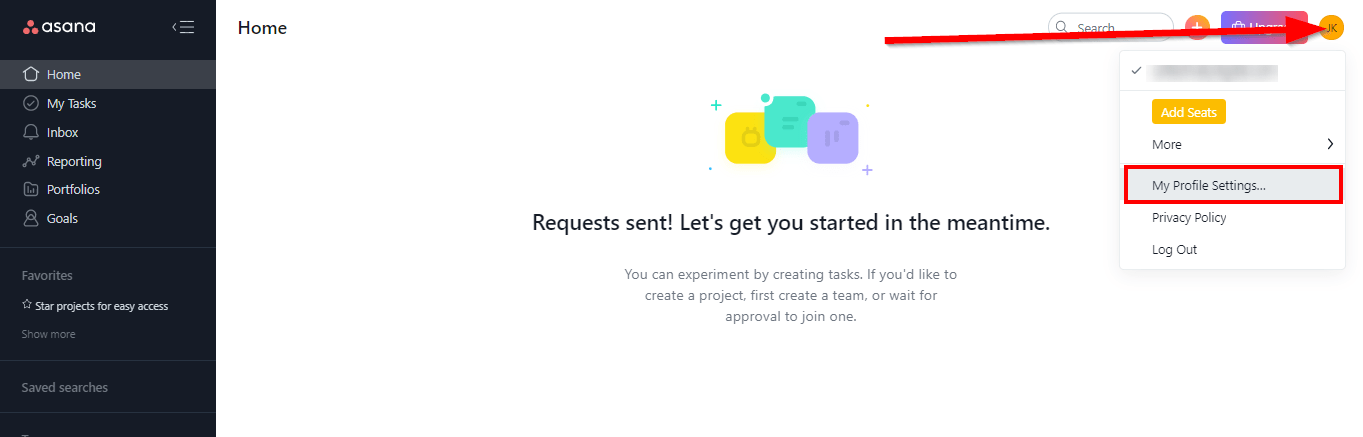
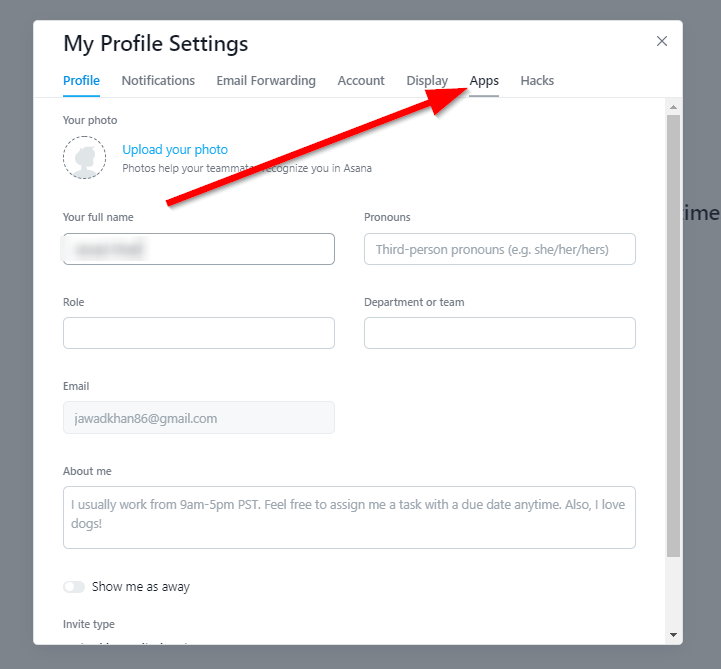
Step 4: In Profile Settings, go to the Apps section.
Step 5: Click the Activate switch to enable time tracking in Asana with Harvest.
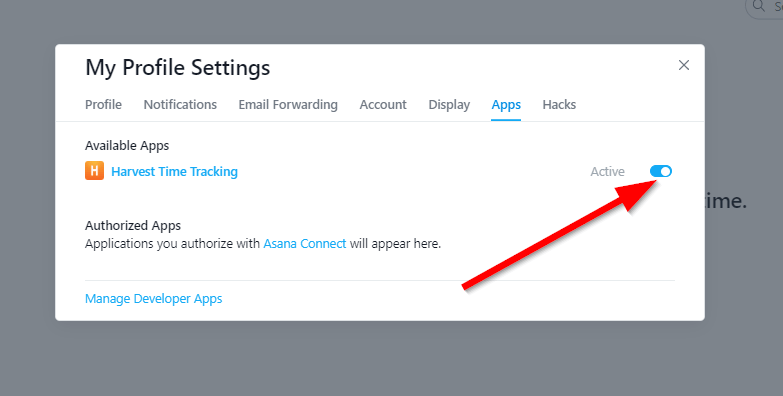
You’ve successfully integrated Harvest time tracking features with Asana. Now, you’re ready to track the duration of your individual and group tasks.
Use Asana Time Tracking For Tasks
Step 1: Log in to your Asana account.
Step 2: Go to My Tasks from the panel in your account dashboard.
Step 3: Click on a task from your To-Do list.
Step 4: Click on Harvest’s clock icon to open the time tracking pop-up.
Step 5: Choose your project from the drop-down. These projects are fetched from your Harvest account and do not reflect in Asana. But you can use them to organize your tasks under projects in Harvest.
Step 6: Click the Start Timer button to log task time.
Step 7: To stop the timer, go to the Harvest timer for the relevant task again and click Stop Timer.
Your task time duration has been successfully recorded in your Asana account.
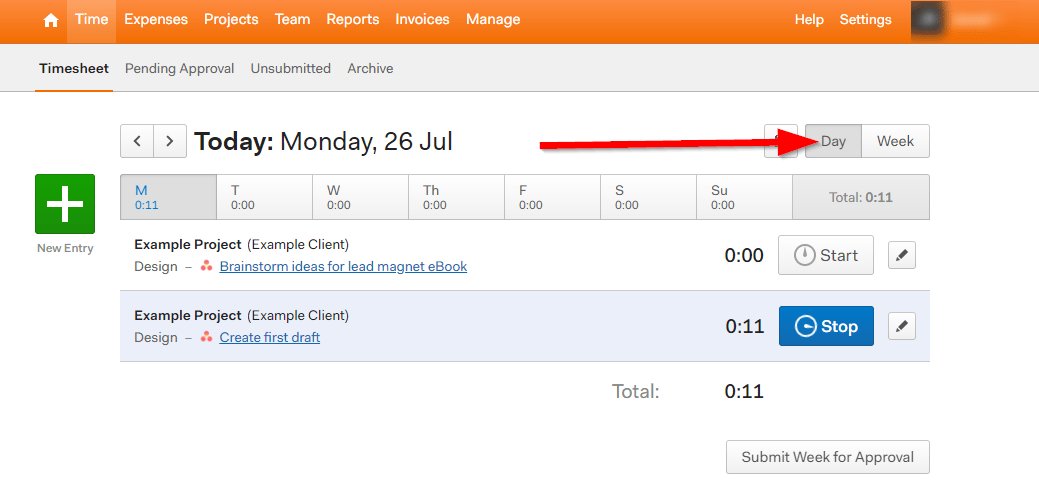
View Recorded Tasks In Harvest
Step 1: Log in to your Harvest account
Step 2: Click on the Time tab at the top of your screen.
Step 3: View the list of all active and inactive task timers in the dashboard.
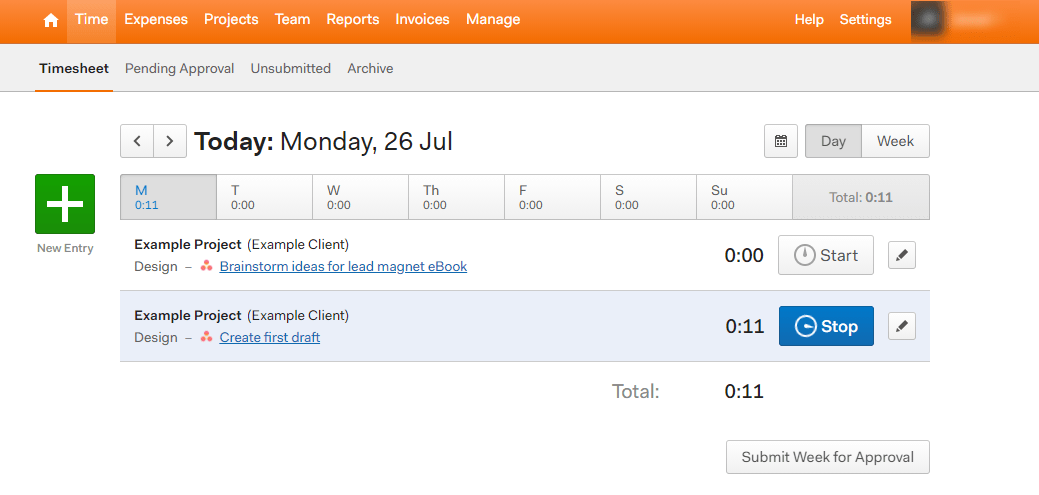
Step 4: Switch between daily and weekly task views by clicking on the relevant buttons.