The Ultimate Manual to Airtable Formulas
Airtable is a versatile relationship database tool. You can use it to manage workflows, track inventory, collaborate with teams, and so much more.
But to get the most out of Airtable and its functionality, you need to understand Airtable formulas and how they work. This guide will explain everything you need to know about Airtable formulas.
What Are Airtable Formulas Anyway?
Formulas are arguably Airtable’s most powerful features. You can use formulas to manipulate data, calculate different metrics, or make it easier to understand the information in a database.
Airtable formulas can best be compared to formula functions on a traditional spreadsheet, like Excel or Google Sheets. But the formulas in Airtable are far more advanced, allowing you to use this functionality for a wide range of potential use cases.
When most people see or hear the word “formula,” they automatically associate it with math or numbers. But Airtable formulas can be used for other purposes as well. In addition to creating advanced calculations in a database or automatically managing a budget, you could use Airtable formulas to set and assign recurring events for project management.
The formulas can involve logic, text, numbers, conditional statements, and functions. Formulas give you the opportunity to use Airtable in creative and inventive ways.
Airtable formulas are applied to an entire column, as opposed to a single cell. You can include information from other tables and resources within Airtable to improve your formulas and get the most out of this platform as a database tool.
How Airtable Formulas Work
At its core, an Airtable formula is simply a field type. When you’re working in an Airtable base, you can just choose a formula from the available options in the table.
To write a formula, you can select a pre-existing function or write one of your own. The formula will ultimately yield an output of a date, number, or string. Then you can adjust your formatting preferences to select how you want the output displayed.
Date formats give the option to include a field for a time. You can also select a time zone for the collaborators. Number outputs are typically decimals, percentages, integers, durations, or currencies. You’ll likely see a mix of both dates and numbers with a string output.
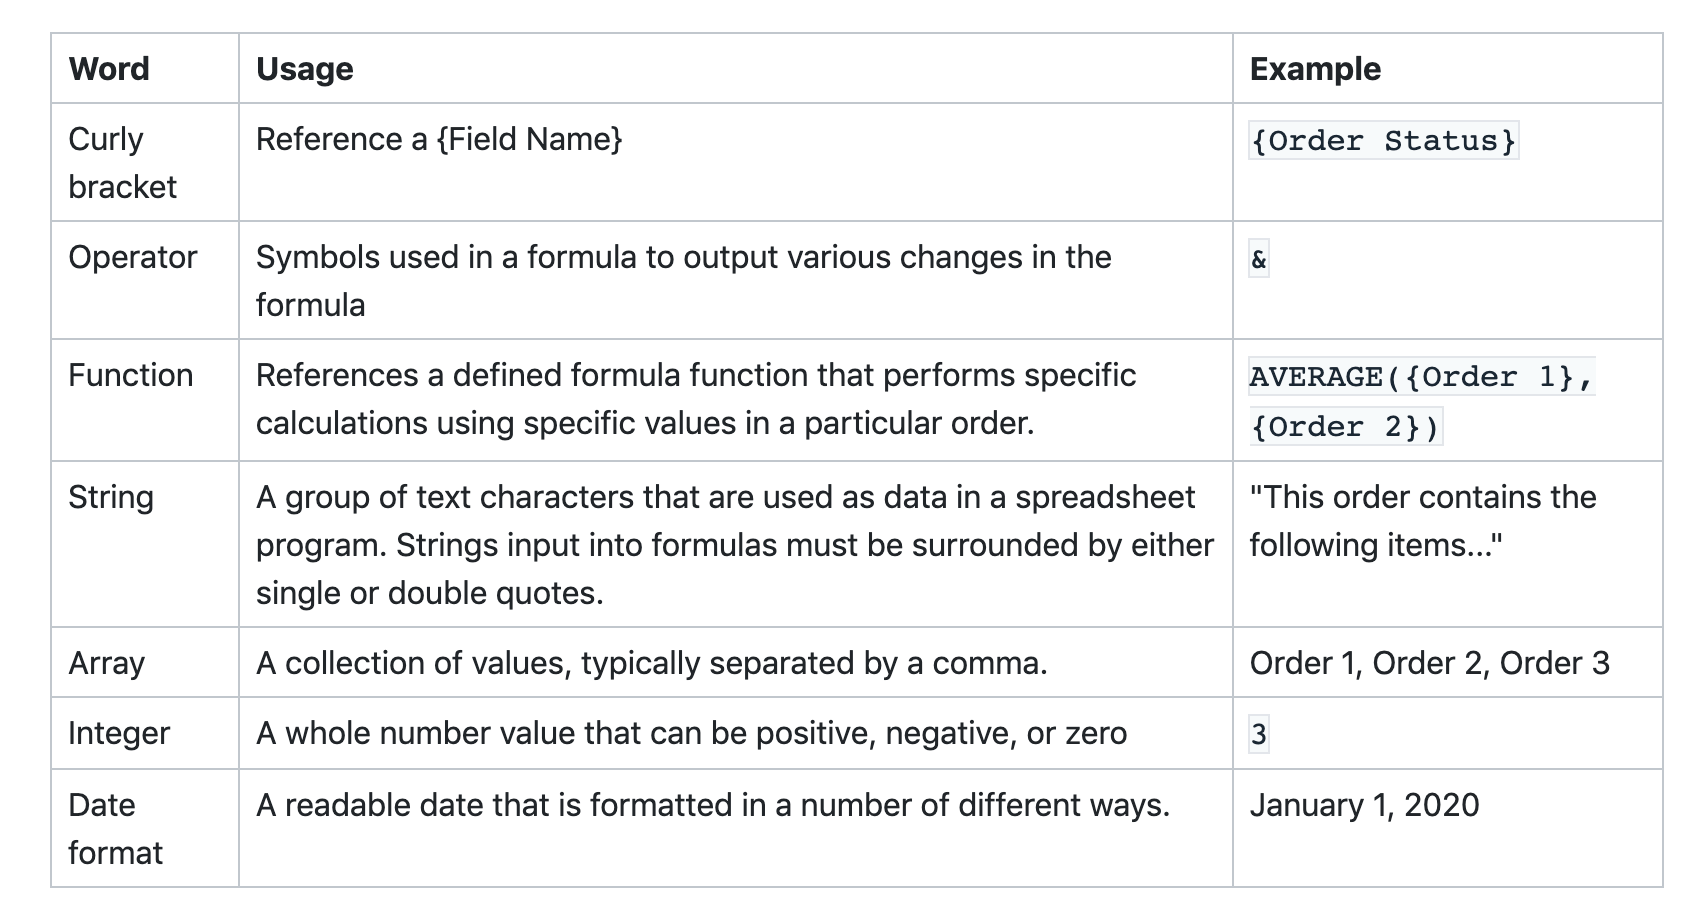
To help provide some clarity, here’s a table that shows the common terms associated with Airtable formulas, what they’re used for, and examples:
As previously mentioned, Airtable is often compared to other spreadsheets, like Excel. So if you’re familiar with Excel, the learning curve with Airtable and Airtable formulas won’t be quite as steep. Airtable has similar spreadsheet functions, but the platform just uses slightly different terminology.
Let’s take a look at some other common Airtable terminology you need to understand. This foundation will make it easier for you to use and apply Airtable formulas.
- Base — Airtable bases are essentially the Excel equivalent of a workbook. It’s a file that contains all of your tables.
- Table — Tables are Airtable’s version of an Excel worksheet. They contain separate sets of data. But you can link tables to each other and use multiple tables for your formulas.
- View — Views are the different ways you can organize and view data within a table. Options include forms, galleries, grids, calendars, and Kanban.
- Field — Fields are Airtable’s version of an Excel column. They’re used to display different types of data for all records within the table.
- Record — An Airtable record can best be compared to an Excel row. This is a single record of information containing data stored within your fields.
- Cell — This is terminology you should already be familiar with, as it’s the same term used in Excel. Cells are individual records in a table.
Now that you have a firm grasp of the basics, let’s take a closer look at some real-world examples of Airtable formulas and how you can use them. We’ll start with some simple examples and slowly get a bit more advanced.
Example 1: Calculating Length Using LEN(string)
The LEN(string) is a straightforward way to show how Airtable formulas work. But the formula also has lots of practical use cases. The LEN(string) shows the exact length of the characters within the formula.
For example: LEN(“jump over the rope”) => 18
What’s the purpose of seeing how many characters are in a string of text? There are actually several practical use cases for this formula.
- Automatically display a message if a new password doesn’t have the minimum required characters
- Ensure a social media post doesn’t exceed a character limit (280 characters for Twitter)
- Make sure a meta description falls within your desired character limit range
Let’s stick with that last bullet for a moment. Let’s say you were using Airtable to manage your blog post workflow. When meta descriptions are added to a table, an Airtable field could display a warning like “Too Long!” if the character limit exceeds your desired threshold for metas.
Example 2: Locate Characters With Find() and Search()
This formula uses a combination of two different functions. It allows you to find specific characters within a string. Here’s the syntax:
FIND(stringToFind, whereToSearch, [startFromPosition])
The “startFromPosition” is optional and set to zero by default.
An example of this syntax put to use could look like this: FIND(“rope”, “jump over the rope”)
Using the example above, this Airtable formula will find “rope” within the sentence. While this may not seem like a practical or important task, it’s actually useful for a variety of different purposes:
- Find the file name of an attachment
- Isolate a specific portion of a paragraph or document
- See whether or not a name is included within a body of text
This formula is handy when you have dozens, hundreds, or thousands of fields in a table that you want to search through immediately.
Example 3: Date Formulas For Monitoring Deadlines
Dates formulas are some of the most versatile tools in an Airtable base. They’re extremely useful if you’re using Airtable for project management when tracking deadlines is crucial.
There are more than a dozen different data formulas within Airtable. These formulas allow you to do things like:
- Adjust the format of a date
- Set recurring events
- Calculate the difference between one date and other
- Change the formatting between dates and times
- Add to a date
Calculating the difference between two dates might be the most used date formula within Airtable. The syntax is DATETIME_DIFF([date1], [date2], ‘units’)
Now let’s input a real example so you can see how this works:
DATETIME_DIFF({due date}, TODAY, days)
This formula will show the remaining days left until a certain task or part of a project in your workflow is due.
Example 4: Combining Text Strings With CONCENTRATE()
The CONCENTRATE() formula makes it easy for you to take multiple strings of text and combine them into a single cell or value. This is really useful if you want to take a table with lots of information and just summarize two different variables in one location.
For example, let’s say you have a table that contains all of the information taken from customer surveys. But you just want to see the first names and home states of each respondent in a single column. You could apply the following formula:
CONCENTRATE(Name, “-”, State)
The output here can give you: Colin – Oregon
Note: If you want to use static text like “-” as shown in the example above, be sure to surround it with double quotations. Otherwise, Airtable will use it as an operator.
Example 5: Conditional Statements Using IF() Formulas
Now let’s look at an example that’s a bit more advanced. While IF() formulas might not be quite as straightforward as some of the others, they’re arguably the most powerful way of leveraging formulas in Airtable.
I’ll show you an easier version of the syntax and logic so you can understand how this works:
IF(expression, value1, value2)
Now let’s put this formula to use with: IF({SatisfactionScore}, “>=90”, “Very Satisfied”)
This formula will look at customer satisfaction surveys and results. If the score for each survey is greater than or equal to 90, then Airtable will display “Very Satisfied” for that customer.
You can replicate this process with different ranges for customer sentiment, like Somewhat Satisfied, Neutral, or Unhappy.
How to Get Started With Airtable Formulas
Now that you understand how Airtable formulas work and you’ve seen some real examples, I’ll show you how to get started using Airtable formulas on your own. Here’s what you need to do:
Step 1: Map Out Your Formulas and Practice Them Before Using
I’m sure you’re eager to jump right in and start applying formulas within your Airtable bases. But I urge you to take a step back and practice before you start applying them to real databases and tables. If you make mistakes on your databases, it can get really confusing and be somewhat difficult to correct, especially if you’re a beginner.
So before you write anything or start working directly in Airtable, map out exactly what you’re trying to accomplish.
This could be as simple as handwriting what you want to achieve. For example, you can say “I want to calculate the difference between the due date and today’s date to show me how many days are remaining before a deadline.”
You could even take this a step further by drawing your logic on a piece of paper to help you visualize the formula.
Once you understand the concept of what you want to accomplish, you can play around with the formulas using Airtable’s Formula Playground.
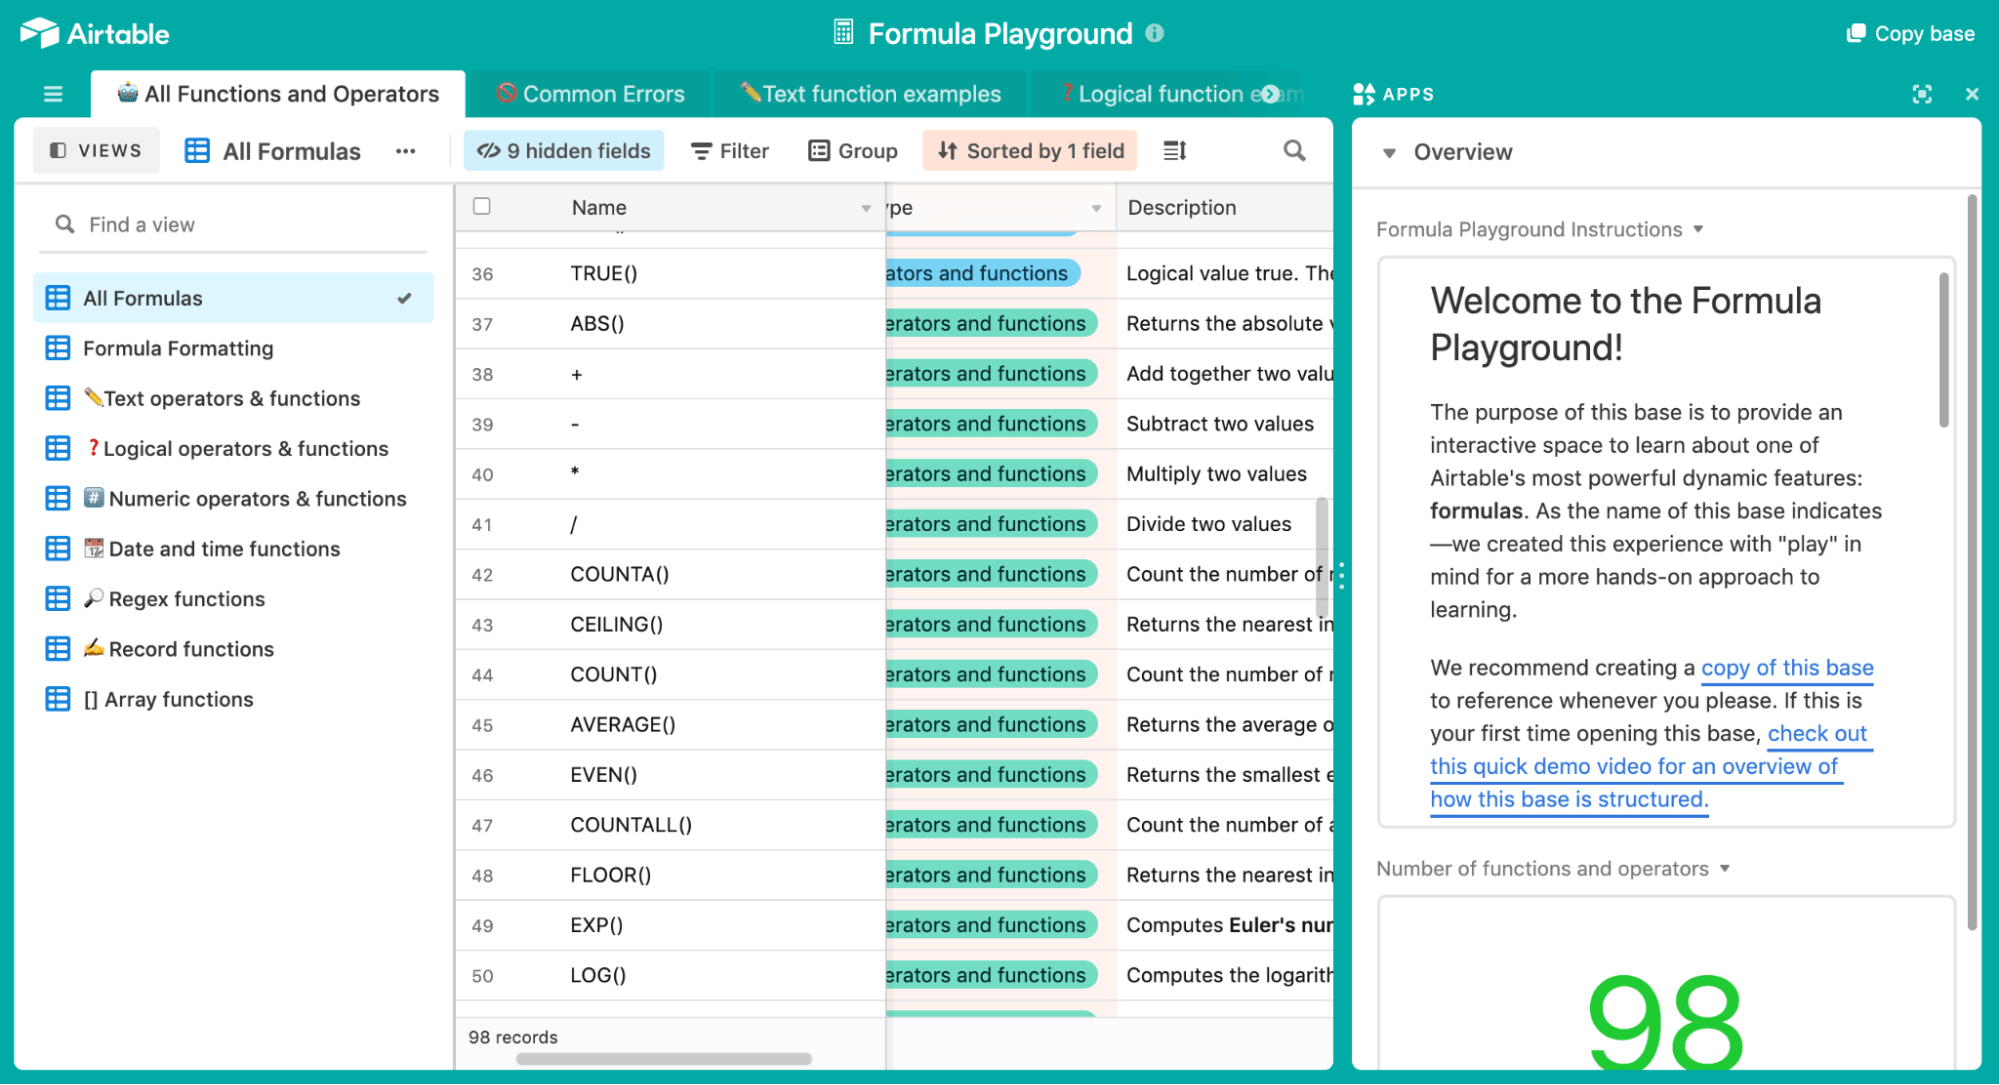
This interactive formula tool gives you a hands-on learning experience for using formulas within Airtable.
It’s definitely in your best interest to play around using this tool before you start messing with your own databases.
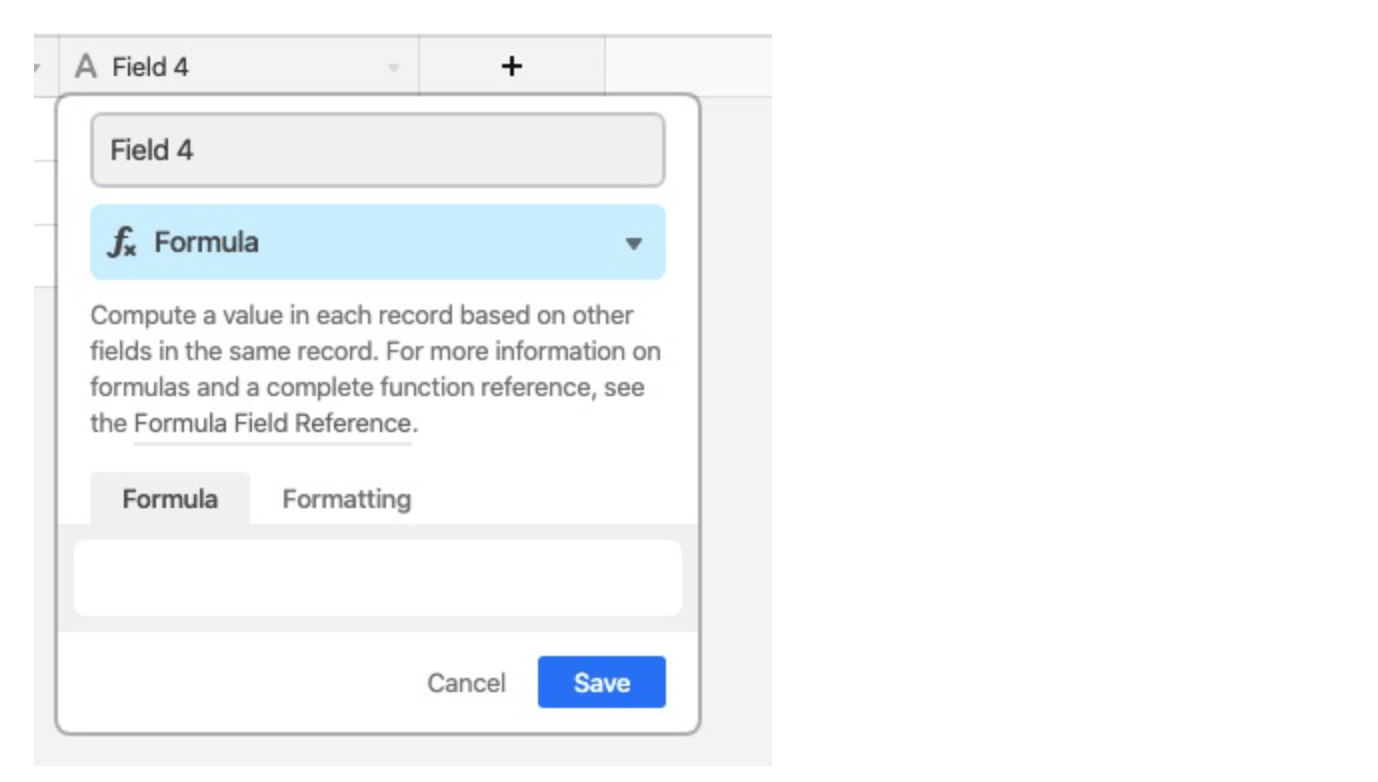
Step 2: Add a New Field and Create a Formula Type
Now you’re ready to head into your Airtable base. Open the desired base you want to manipulate with a formula, and ask yourself what exactly you want to accomplish.
Refer back to the mapped-out version of this task that you’ve already identified in the previous step.
When you’re ready to proceed, add a new field. Remember, fields are essentially like a column on a spreadsheet. After adding a new one, you’ll be able to select a specific field type from a dropdown menu.
Make sure you choose Formula from the list to proceed.
Step 3: Write Your Formula
Now it’s time to actually write the desired formula.
The possibilities here are seemingly endless. It’s just a matter of getting the syntax right and ensuring the formula pulls the right data from your desired source. You can use as many different functions within a formula as you need.
Just know that the more you add, the more complex this will be. This could also lead to more mistakes, especially if you’re a beginner. So I’d recommend starting with some simpler formulas when you’re first starting out. Even if the output isn’t a high-level priority, this can help you get started and build momentum.
The more you practice and see positive results from your formula, the easier it will be for you to move on and work on higher-level outputs. But it takes some practice and confidence when you’re just getting started.
Step 4: Ensure the Formulas Are Easy to Read
As formulas get longer and more complicated, you should re-format them to make sure they’re easy to understand. Rather than displaying everything on a single line, you could separate the formula into multiple lines.
This makes it easier to identify missing parentheses, quotation marks, or other errors.
Here’s an example formula that we used earlier:
IF({SatisfactionScore}, “>=90”, “Very Satisfied”)
You could rewrite the same formula to look like this:
IF(
{SatisfactionScore}, >=90,
“Very Satisfied”,
IF(
{SatisfactionScore} <=65,
“Not Happy”)
As you continue to add more conditions to a formula, it’s easier to read when you break it up line-by-line. Otherwise, spotting a mistake within a long formula can be really challenging.
Step 5: Format the Results
Finally, you need to decide how the output of your formula will be formatted within the table.
The formatting depends on whether or not the results are a date, string, or number. For example, if the results are a number, you’d have the following formatting options to choose from:
- Decimal
- Integer
- Currency
- Percentage
- Duration
Let’s say you were using a formula to calculate how much money is left within a budget. You could use the currency format for one output to show the dollar amount. Then you could use a percentage format for another formula to show the remaining funds as a percent of the total budget.

