7 Steps to Add Fonts to Word (Mac and Windows)
Microsoft Word is an incredible app used by several people around the world. It has tons of features to make it a well-rounded writing and editing platform.
The fact that it comes with so many fonts is another one of its excellent features. However, despite the wide choice range, you may not find the right match at times. Sometimes you may want a more formal-looking font; sometimes you may need something funkier to achieve that “wow“ effect.
The good news is you can do this. All you have to do is find and download the font you like and then add it to Word.
Sounds simple, right? It is if you know the right way to do it.
In this guide, I’ll show you how you can add fonts to Microsoft Word on Windows, Mac, and directly from your web browser.
Using Third-Party Services to Download Fonts for Your Microsoft Word
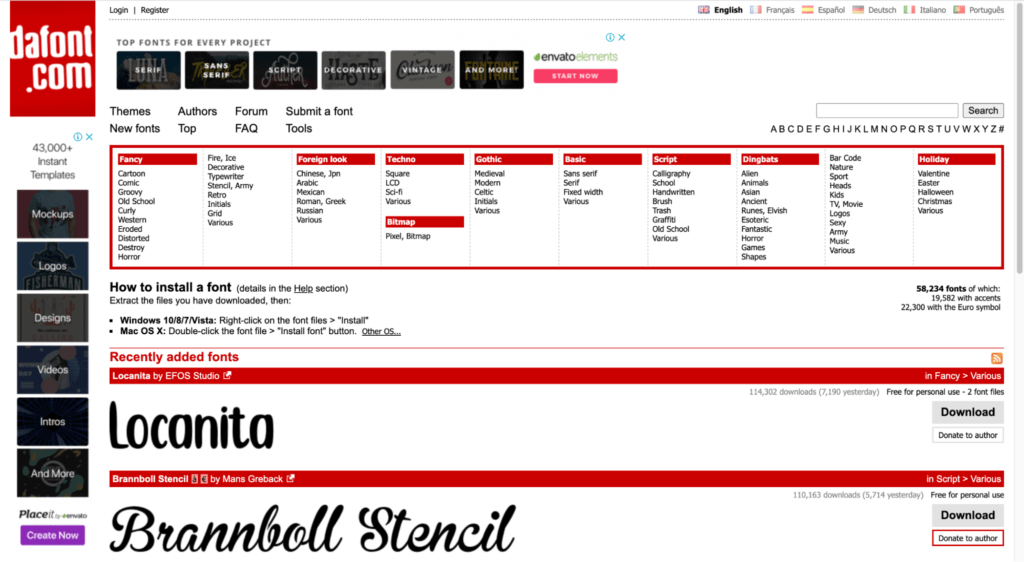
Start by downloading the font from a trusted website. You must be extremely careful while doing this as fonts are one of the most common ways to transmit viruses. Make a point to only download fonts from trusted sources, and avoid any fonts that come in EXE format.
It’s very common for all fonts to come into ZIP files, in addition to the TTF or OTF formats. Below, we have a compiled list of some of the most popular font sites that contain hundreds of varied and unique fonts:
You can select a font size that suits your requirements best from these sites The good news is that most of them offer free fonts. Therefore, you can be sure to find what you’re looking for.
How to Add Fonts to Microsoft Word on Windows
Before adding a font to Microsoft Word, you have to first download the fonts. Let’s take a look at how you can achieve this.
Step #1 – Go to the font manager on your Windows desktop. Click on Start, followed by Control Panel.
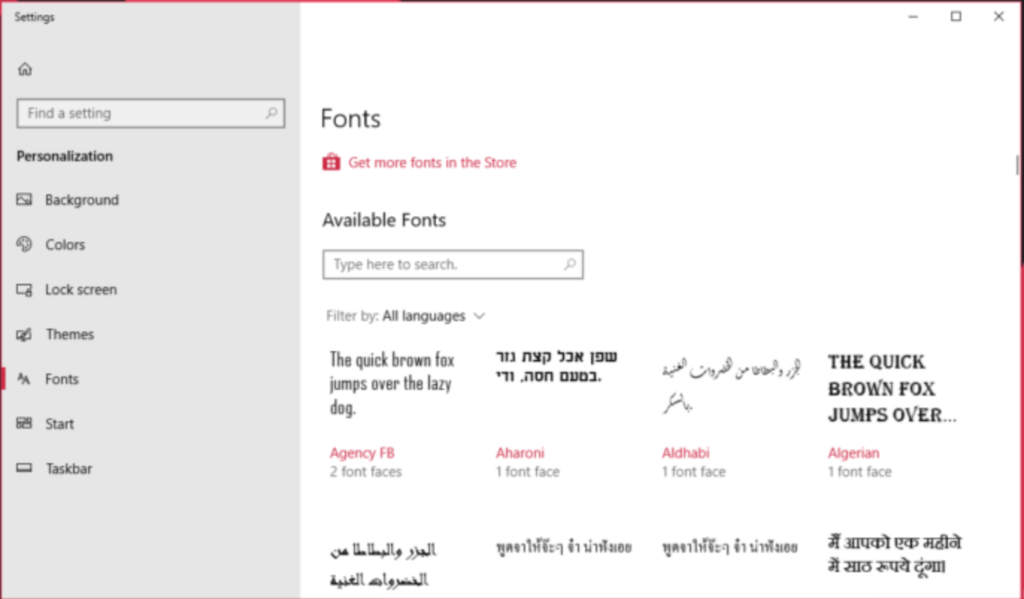
Step #2 – Select Fonts. A Font menu will appear.
Step #3 – Choose the font that you want to add to Microsoft Word and then download it.
Step #4 – The font will be saved to the folder on your Windows desktop once the download folder is complete. The file will then be saved in a TTF or OTF format.
Note that if it’s a zip file, you’ll have to extract it.

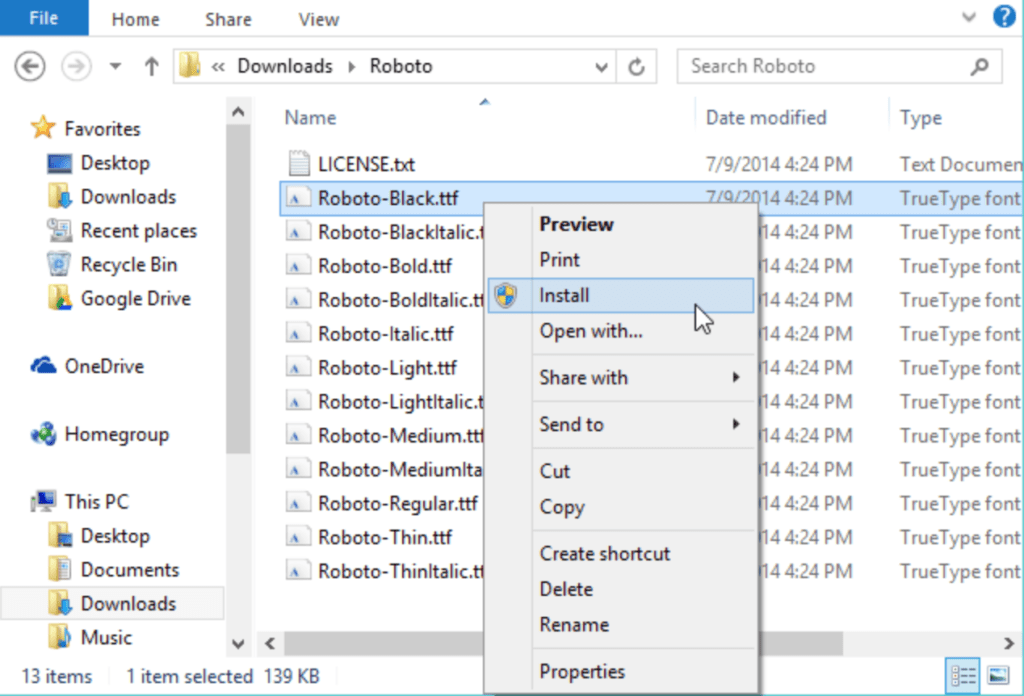
Step #5 – At this stage, you’ll have to add fonts to Microsoft Word. Since you’ve already downloaded the font file, you can proceed to open the font control panel on Windows again.
Step #6 – Drag the font folder to the font control panel. This will successfully add the font to your system.
Once the font is added, it’ll be automatically installed as well.
If the added font fails to function properly, you‘ll have to install it manually by opening the file and clicking on the Install button. So keep this in mind when proceeding.
Step #7 – Once the font is installed on your Windows, it’ll be automatically added to your Microsoft Word. Therefore, you don’t need to do much here.
You can then open the Word software and use the font by selecting it in the font menu.
How to Add Fonts to Microsoft Word on Mac
The process of adding fonts to Microsoft Word on a MacBook is typing different from that on Windows. That said, the difference is slight and not hard to comprehend.
Here’s what you need to do:
Step #1 – The first step is to download the font. On the Mac system, users have to install a font manager before all. We highly recommend using Font Book for this purpose.
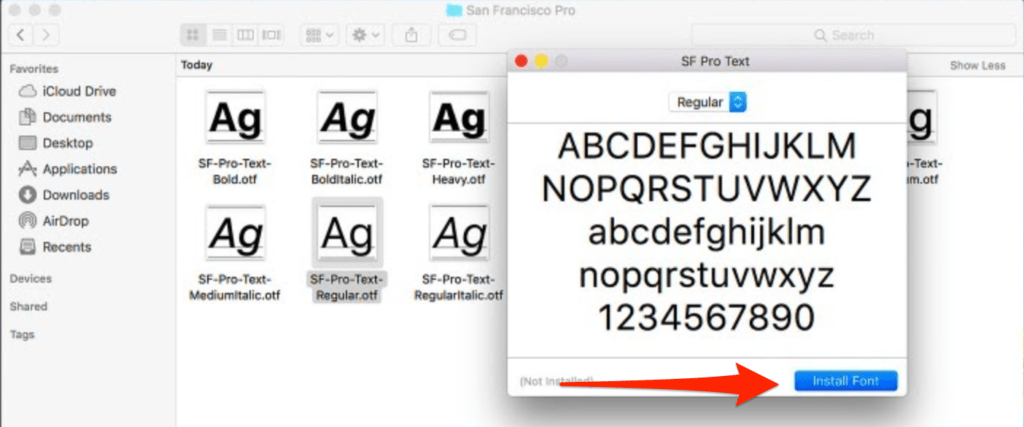
Step #2 – Look for the font file you want to add to Microsoft Word once the Font Book is done getting installed. Open it in the font preview window on your device.
Step #3 – Once you’ve finalized the font, click on the Install Font button located under the bottom of the font preview window. Click on it, and send the font to the Font Book software. This way, the font will be saved on your MacBook.
Step #4 – Open Font Book on your device and find the installed font you just added to the manager.
Step #5 – On the left side of the Font Book software, you’ll find a Windows Office Compatible field. Add the installed font here.
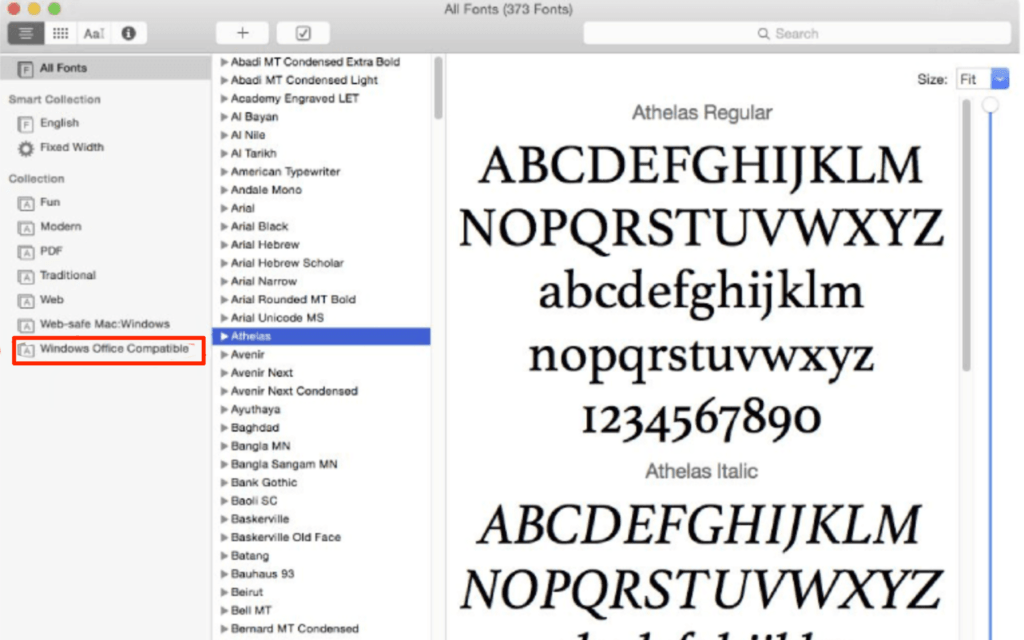
Once the font is added to the Windows Office Compatible field in Font Book, all that’s left for you to do is restart your device.
Step #6 – Scroll your cursor to the top of your Mac’s screen and click on the Restart button after selecting the Apple icon. The font will be automatically added to Microsoft Word once your Mac reopens.

Moreover, once you install a font on your MacBook, you can use it across all applications installed on the device.
How to Add Fonts to Word Online
You can use any of the fonts installed on your system if you’re using the Microsoft Word online app as part of Microsoft 365. All you have to do is type the name of the font file minus extension, and it’ll be done.
Let’s discuss the steps in more detail below.
Step #1 – Install the new font you want to use on your device.
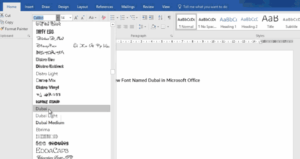
Step #2 – Open Microsoft Word Online directly from your web browser. You should see the installed new font in the Home toolbar section.
Step #3 – Click on the Font tab on the presented toolbar. Follow this by clicking on the box that is indicating the font that’s currently active.
Step #4 – Type in the name of the new font in the display box.
Step #5 – Hit the Enter button. The font will then be applied to the document or your current text selection.
Alternatively, you can click on the downward-facing arrow and scroll through the presented list. This is only applicable when you want to test the available font options. Otherwise, you can simply type in the name of your desired font if you know what it’s called.
Disclaimer: If Word Online is already active while you’re installing the font, the changes won’t be applied, due to which you won’t be able to see the new font on the present list. In this case, you’ll restart Word Online, after which the new font will be added to the selection.
Keep in mind that you must change the font every time you start a new document. You see, the change in the font will only apply to the current document – and not the future documents.
The Bottom Line
Your fonts can play a crucial role in enhancing the personality of your documents and text. So don’t be afraid to play around with them to make your content more effective.
Even if you don’t like the current font selection of your device, you can always add new ones that suit your requirements better.
Hopefully you find this guide useful and can download and add fonts to your Windows, Macbook devices, and the online version of Microsoft Word.

