How to Set Up HTTPS Personal Access Tokens for GitHub
Personal access tokens can be used as a password alternative for GitHub authentication.
This in-depth guide will explain how to set up and use GitHub personal access tokens using HTTPS. We’ll also cover some common problems with this process and how to troubleshoot them accordingly.
Step 1: Understand the Purpose of Personal Access Tokens
This step might seem a bit redundant for some of you. But a clear understanding of what personal access tokens are, how they work, and why you need them will add a lot of clarity to this process as you continue through each step.
Having the proper background information is essential, as every action will make much more sense. It can also make it easier to troubleshoot common problems in GitHub, which we’ll discuss in greater detail later. If you already have a firm grasp on personal access tokens, you can skip to the next step.
GitHub requires authentication when you’re using GitHub APIs, the command line, and any integrations. Personal access tokens can be used as an alternative to entering a password when going through this authentication process.
Why are personal access tokens better than passwords for GitHub authentication?
For starters, personal access tokens are more secure than passwords. They’re unique, revocable, limited, and random—making it much harder to be compromised or hacked from brute force attacks.
GitHub actually removed support for password-based authentication in August 2021, forcing users to use alternative authentication methods.
Even if you could still use password-based authentication, personal access tokens are much easier. Many different GitHub actions would require you to enter a password, which can really slow down your workflow. Personal access token authentication is seamless and non-intrusive once it’s set up.
When you configure a personal access token, you’ll also configure its permissions. This authenticates your use and permissions for different parts of GitHub without having to enter a password every time you want to do something.
Step 2: Verify Your Email Address
Make sure you have a GitHub account set up. You cannot create a personal access token in GitHub as a guest or without an account.
For existing GitHub users, it’s really important that you verify your email address before you proceed.
You will not be able to generate personal access tokens if you skip this step.
Failure to verify your email address also restricts you from forking repositories, creating issues, authorizing OAuth applications, using GitHub actions, and so much more.
Even if you think your email address is already verified, it’s worth double-checking before you attempt to create a personal access token.
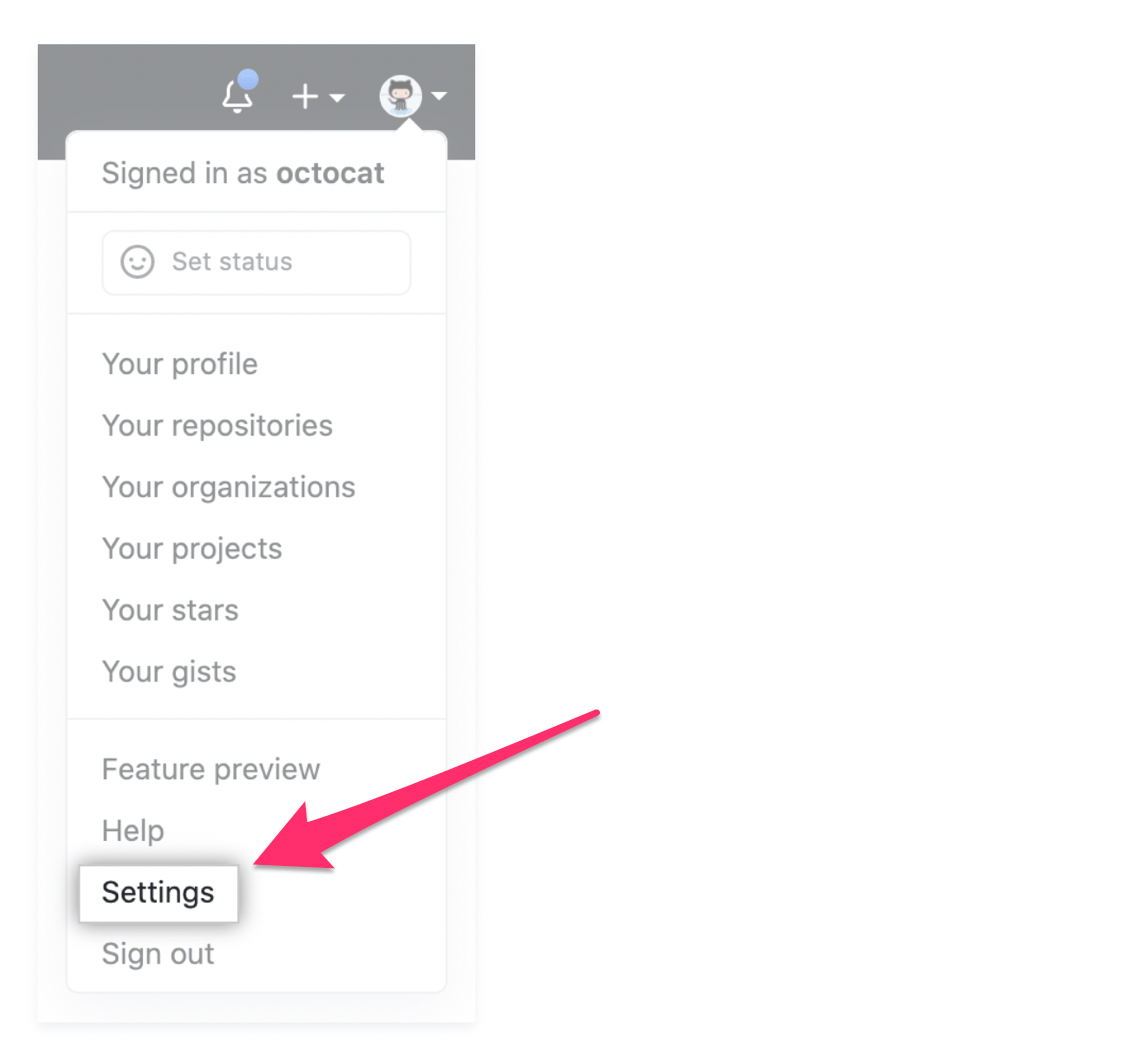
Navigate to the Settings page of your GitHub account. This can be accessed by clicking your profile picture on the top right of the screen.
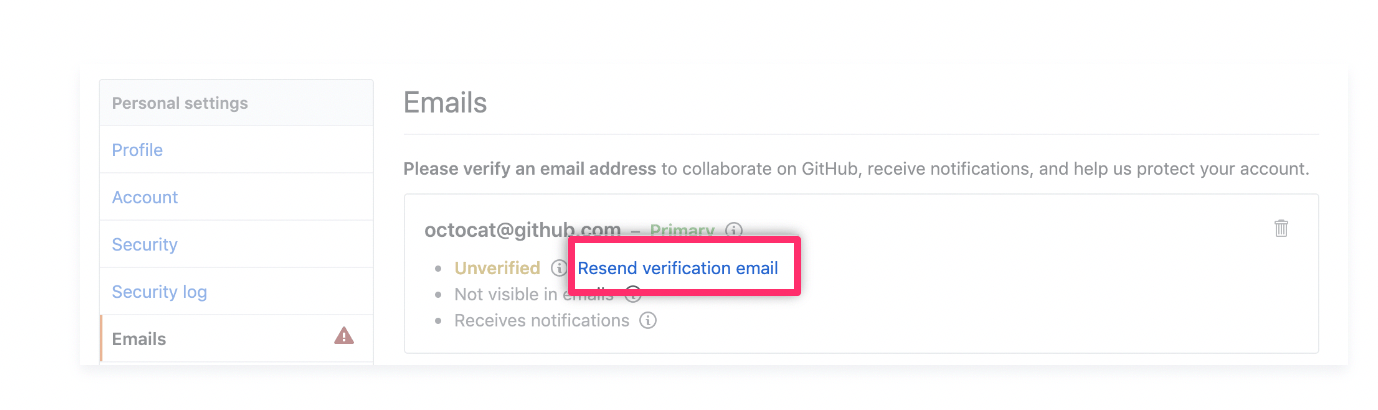
From here, click the Access section on your sidebar. Then navigate to Emails. If the primary address on file has not been verified, there will be a yellow “unverified” message below the address.
Click Resend verification email to proceed.
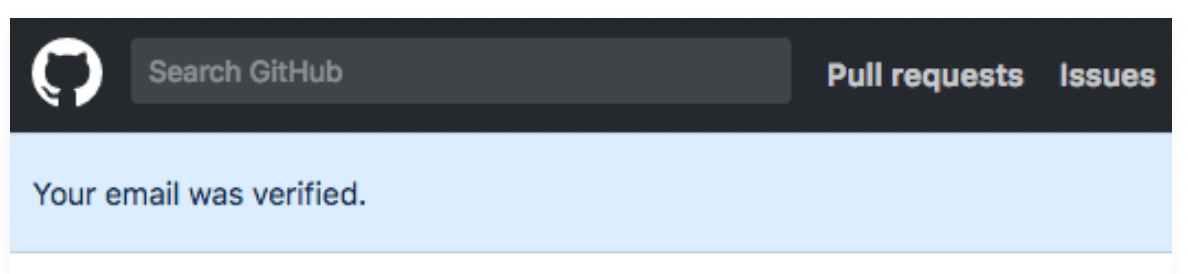
You should receive an email from GitHub with a link.
Click the link and follow the instructions. This will take you to your GitHub dashboard. You’ll know the email address has been confirmed when you see this message:
Step 3: Create a New Token
From your GitHub dashboard, navigate back to your Settings page. Click your profile picture on the top right side of the dashboard to find this menu.
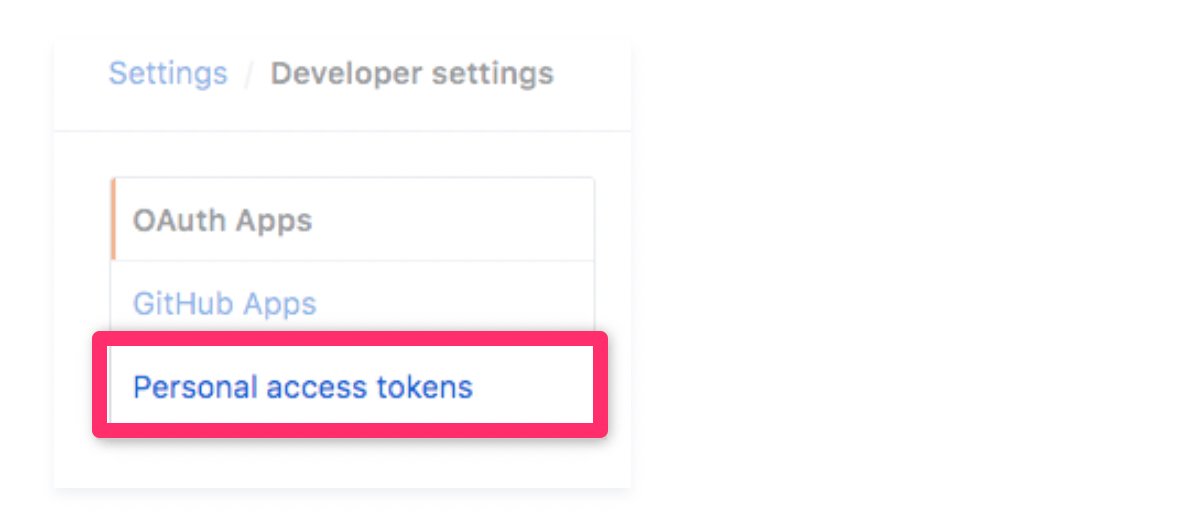
From here, click on your Developer settings and select Personal access tokens on the left side of the screen.
On this screen, click the button that says Generate new token to proceed.

Next, you’ll be prompted to give your personal access token a descriptive name.
Be specific here. Naming it something like “Token 1” or “My PAT” is not advisable.
While you might only have a single token right now, vague names can be really confusing as you start to add new tokens and have several to manage. So a full description is definitely in your best interest, or you can set yourself up for some serious confusion down the road.
You’ll also be asked to set an expiration date for your personal access token. For security reasons, it’s in your best interest to use new tokens on a regular basis.
Setting up a new token every day or every week probably isn’t necessary. But you can set them to expire in a month or every six months to err on the side of caution.
Creating a new token is not difficult. So you’ll just need to repeat these steps when the token expires.
You do have the option to set no expiration. But GitHub will give you a warning error first. While it’s not the worst thing to have a permanent token, it’s generally safer to switch them every so often.
Step 4: Select Scopes and Permissions
Now it’s time to configure the token. This step will allow or disallow the token’s use in different repositories from the command line.
Here’s a quick overview of what permissions you can grant:
- Full control of private repositories
- Access commit status
- Access deployment status
- Access public repositories
- Full control of orgs and teams
- Read and write org and team membership
- Read org and team membership
- Full control of user public keys
- Write user public keys
- Read user public keys
- Full control of repository hooks
- Write repository hooks
- Read repository hooks
- Full control of organization hooks
- Create gists
- Access notifications
- Update all user data
- Access user email addresses (read-only)
- Follow and unfollow users
- Delete repositories
You can always modify personal access tokens after the creation. So you don’t have to overthink this too much.
Step 5: Generate and Copy the Token
Once you’ve enabled the permissions for your token, click the Generate token button to proceed.
The token will appear on the screen with an option to copy it. This is your only chance to copy the new personal access token. For security reasons, you will not be able to see it again.
Make sure you treat your token like a password and keep it a secret. If you’re working with the API, it’s best to treat the token as a variable as opposed to hardcoding it into your programs.
For organizations that use SAML single sign-on, you can authorize that token as well. This is only necessary for GitHub Enterprise Cloud users.
Common Problems When Setting Up HTTPS Personal Access Tokens For GitHub
While setting up an HTTPS personal access token in GitHub should be pretty straightforward if you follow the steps above, you still may run into some stumbling blocks as you’re going through this process.
Don’t worry—you’re not the only one. We’ve identified the top errors, questions, and problems that people face when using HTTPS personal access tokens for GitHub. The sections below will cover those scenarios in greater detail and explain how to troubleshoot or work around them.
Even if you haven’t started the process yet, you should still read this section to help you avoid these problems altogether.
Problem 1: SSH vs. HTTPS
When you’re connecting to a remote repository in GitHub, you’ll have two different connection options—HTTPS and SSH.
Many GitHub users are confused by these options, as they don’t know if the HTTPS token interferes with the ability to use SSH or vice versa.
The authentication method you choose for connecting to a GitHub repo has to do with your remote URL configuration. By default, GitHub uses HTTPS to communicate directly over the web.
Even though this is the default option, you can still use SSH. This process won’t open interactive shells and execute commands, but the format works the same as if you were using a Linux server that’s enabled with SSH.
For the most part, HTTPS is simpler than SSH. Using HTTPS won’t force you to manage multiple SSH keys across multiple devices.
It’s also worth noting that HTTPS uses port 443, which is open in nearly every firewall that accesses the internet. SSH doesn’t always have that option.
By default, GitHub tokens get added to your cache, but they’re not permanently configured. Whereas SSH keys always use the file on your disk.
There’s a common misconception out there that SSH is more secure than HTTPS. But both protocols will protect you from man-in-the-middle attacks. Both of these protocols can also use public key-based authentication and can both be configured for MFA or 2FA.
SSH keys are typically longer, making them harder to leak. However, they’re stored on your hard drive in a user-accessible file.
Data breaches aside, SSH keys will never be reused or stored on another server. You’re only letting GitHub access the public key, and the private key remains stored on your device—reducing its risk of exposure.
In short, there are pros and cons to both SSH and HTTPS. But using one now doesn’t restrict your ability to use another in the future. You can still set up a personal access token in GitHub using HTTPS and use SSH keys for other purposes.
HTTPS is generally easier for beginners. It’s secure and easy to understand.
Problem 2: Support for Password Authentication Error
As of August 13, 2021, GitHub removed its support for password authentication. This means you can no longer push code to GitHub using your username and password.
The switch away from password-based authentication has caused lots of GitHub users to get the following error:

GitHub’s reasoning for this is simple—enhanced security.
By eliminating password-based authentication and forcing personal access tokens, it makes the platform more secure. Compared to passwords, GitHub says tokens are superior because tokens are:
- Unique
- Revocable
- Limited
- Random
Every personal access token is specific to GitHub, and it can be uniquely generated per device or per use. They can also be revoked at any time without having to update or change other credentials. You can configure tokens to only access specific areas of GitHub or a repository for certain use cases.
Due to the random nature of tokens, they’re less susceptible to brute force attacks compared to passwords that a user would be forced to remember.
But here’s where the trouble occurs. Some GitHub users are still getting this error even after they’ve set up a personal access token. How is this possible?
In most cases, the fix is very simple. There’s a good chance your password is cached somewhere, and GitHub is still using the cached password instead of the access token.
Simply navigate to your credentials manager, where your usernames and passwords are stored. If you see a GitHub password here, just delete it. Then try pushing your commits back to GitHub and use your token when it asks for a password.
Problem 3: Expired or Revoked Personal Access Tokens
Expired GitHub tokens can no longer be used to authenticate API requests and Git.
It’s impossible to restore tokens that have expired or been revoked. Instead, you need to create a completely new token.
Each time a new personal access token is created, GitHub recommends setting an expiration token. The token will automatically get revoked upon expiration.
Some GitHub users are confused to find that a personal access token has been revoked, even prior to its expiration date. As a security measure, GitHub automatically revokes personal access tokens for lack of use. If your token hasn’t been used in one year, it will expire.
If you’re using the OAuth app to manage personal access tokens, you could have a token revoked due to the scope. Only ten tokens can be issued based on a combination of user, application, and scope. If more than ten tokens have been created for a single user and scope, the older tokens with the same combination will automatically be revoked.
For user-to-server tokens in a GitHub app, these expire after eight hours. While eight hours is the default expiration for this scenario, owners of a GitHub app could change the settings so that the user-to-server tokens don’t expire or have a longer length of validity.
In every scenario where a token has expired or been revoked, regardless of the reason, there’s always the same solution—you must create a new token.

