The Ultimate Manual for Managing Teams and Organizations in GitHub
GitHub is the go-to platform for most distributed software development projects. But administrators may have difficulty managing access control and protecting sensitive code. GitHub Teams and Organizations make managing large and complex collaborative projects easier.

What are GitHub Teams and Organizations Anyway?
Every Github user starts with a personal account. Here, you own the repositories in the personal account. With GitHub Organization, a company owns the GitHub account and repositories. However, contributors, such as employees and freelancers, can access the organization’s repositories using their personal accounts.
You can think of GitHub’s Organization as a company. GitHub also allows you to sort members of an organization into groups called Teams. These teams live within the organization.
So, following the same example, Teams are like departments in an organization. Similarly, the team members are like employees in a department within an organization.
In short, an Organization in GitHub mirrors the structure of real-world organizations. GitHub also lets you create more than one organization in the company account.
You can set up teams based on projects or subject-matter focus. For example, you can create a dedicated GitHub team for your technical writers, a separate one for your test engineers, and a third for your DevOps.
How GitHub Teams and Organizations Work
It’s worth reiterating that a GitHub Organization account is different from a GitHub Personal account. Either way, you’ll need to create a Personal account to use GitHub. This account contains your personal resources, including projects, packages, and repositories.
However, say you own a company or open-source project that uses GitHub to collaborate on projects. Inviting collaborators to your personal account means mixing your private and public projects. It’s also challenging to separate these projects.
Instead, you can create a GitHub organization account from the settings page. Now, the company or project owns its resources, including repositories, projects, and packages. You have a dedicated space to work with others on the project.
Next, you can invite employees or collaborators to join the GitHub organization. The invited members will have access to the company resources. The members are a loose collection of contributors with no defined structure.
Now that you have members in your organization account, you are ready to collaborate. However, everyone in the organization repository gets write access by default. From the developer to the billing manager and freelancer, this means everyone can push changes to a repository.
This structure may work well in a startup or small company. In this case, everyone is free to contribute to multiple projects within the organization. This model is also suitable for a high-trust environment.
However, most companies and projects aren’t set up this way. Instead, they have separate business divisions with specific membership. Creating teams allows you to sort the organization’s members into relevant groups.
Here, you can create separate teams for your developers, operations, and interns. This structure allows you to assign access permissions appropriately. For instance, you can give your developer team write access to your frontend and backend-related repositories. Similarly, you can offer your intern team read-only access to the same repositories and block them from accessing other sensitive repositories.
Here are a few examples of how GitHub teams and organizations work:
Example #1 – Creating an Organization on GitHub
Creating an Organization on GitHub is an excellent way for a group to share ownership of a project. So, if you’re a company or want to create an open-source project, organizations are the way to go.
You can create an organization from any GitHub page. Simply click your profile photo in the upper-right corner of the page. Then, click Settings.
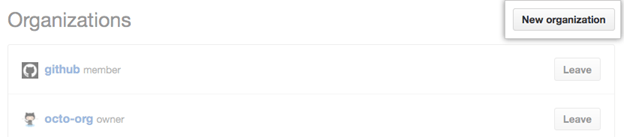
Next, Click Organizations. You’ll find it in the Access section of the sidebar. Then click New organization.
Finally, follow the prompts to create the organization. You’ll also need to choose your plan. There’s a free organization option. However, it has limited features for private repositories. The paid plans include GitHub Team for $40 per user per year and GitHub Enterprise for $210 per user per year.

However, your new organization won’t have repositories. You’ll need to add your repositories to the organization. Your options include creating one from scratch or transferring an existing repository.
Now you can start inviting users to join the organization you created. They’ll have access to an organization dashboard to keep track of recent activities, such as pull requests or issues. The invited users also access all of the organization’s repositories you created.
Remember, all the members you invited have “writing” access by default. This means that they can participate in discussions, redact comments, and create teams. It’s helpful to take an extra step, which is creating Teams.
Example #2 – Creating Teams With GitHub
You’ve invited members to join your organization. You can see them under the People tab. But you’ll need to manage their access individually. This access includes the repositories they can interact with and the specific permissions they should have to change the organization’s settings.
This process can be exhausting and monotonous even for a handful of members. Alternatively, you could change the default permission for every new member to the bare minimum. Still, you’ll need to adjust the permissions for members who require more access manually.
GitHub Teams quickly get around this problem. First, you can create a team and assign members to it. Then, any permissions you give to that team apply to all its members.
So, you can create a team for contributors that need write access and another for read-only access members. Similarly, you can create a team for your close contributors, such as lead developers, admins, and project managers. This team might have admin access which offers complete control of the organization and its resources.
You can also specify the projects and repository each team is allowed to access. To create your team:
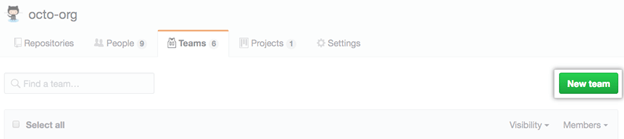
Go to your organization and click Teams under your organization name.

Click New Team.
Add your team name and description in the relevant fields.
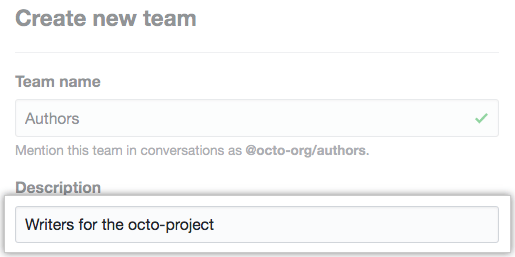
Finally, click Create to complete the process.
Now it’s just a matter of adding the organization members to their relevant teams. You can do this by choosing the team, and clicking Add a member. Then, type their username and click Enter to add them to a team.
You can also invite non-organization members to join your team. They’ll receive an email with the invitation to join the organization. Finally, they’ll be added to the relevant team within the organization as soon as they accept the invitation.
Simply repeat these steps for as many teams as you’d like to create. Again, GitHub offers granular control of your team. An admin can add members to the team, specify the repositories and projects the team can access, and set default permissions for all members within the team.
How to Get Started With Managing Teams and Organizations in GitHub
As you can see, organizations and teams help keep tabs on your collaborators. Moreover, they mirror the structure of a typical company. Therefore, managing projects is more intuitive.
Here’s how to get started managing teams and organizations on GitHub.
Step 1 – Limit the Number of Organizations
It is tempting to create a new organization for every project. However, maintaining multiple organizations is challenging. You’ll need to manage permissions across many organizations, which is difficult and time-consuming.
Additionally, multiple organizations create silos. For instance, you cannot communicate across organizations. The @mention feature works for teams but not organizations. You also can’t share private repositories between organizations.
Teams are far more helpful for collaboration. Again, the @mention feature is critical for encouraging communication across teams. It’s also much easier to manage access for teams compared to organizations. For instance, you can limit repository access to specific teams in an organization.
Step 2 – Configure Your Organization Settings
Your organization comes with a default setting. These settings may not necessarily reflect your workflow or your organization’s hierarchy. At the very least, browse through your organization settings to see what you can adjust for your individual use case.
First, get familiar with the organization’s roles. You’ll need to understand how these roles work before implementing access management for your organization. Organization roles include:
- Organization owners – these users have complete administrative control of their organization. Ideally, you want to limit access to this role. For example, you can have two organization owners just in case one is absent when you need to change the billing information or change a member’s permissions.
- Organization members – these users can create repositories and project boards, among other permissions. You can also adjust the default permissions for organization members. For instance, you can give the member role read-only or write access. It will apply to everyone in the team with this role.
- Organization moderators – These users have additional powers compared to the members. For example, moderators can set interaction limits and block and unblock non-member contributors.
- Outside collaborators – This role is typically granted to external collaborators such as freelancers, consultants, and temporary employees. This role helps you separate users who aren’t full members of your organization for security purposes.
Other organization roles include billing managers and security managers. You may also want to limit who can create, delete, or transfer the organization’s repositories.
Finally, configure other organization settings such as:
- Member privileges
- Third-party access
- Installed GitHub Apps
- Two-factor authentication
Step 3 – Consider Nested Teams
Your organization may have multiple teams, which can be challenging to manage. The disparate teams may also not accurately represent your organization’s structure. GitHub solves this problem with its nested teams feature.
Nested teams are like having a team within a team. Here, a parent team can have multiple child teams. Conversely, a child team can only have one parent team. This design makes your organization’s permissions easier to manage.
For example, say your team structure is Employee > Engineering > Application Engineering > Identity. First, you can designate Employee as the parent team. Then, you’ll have Engineering, Application Engineering, and Identity as the child teams.
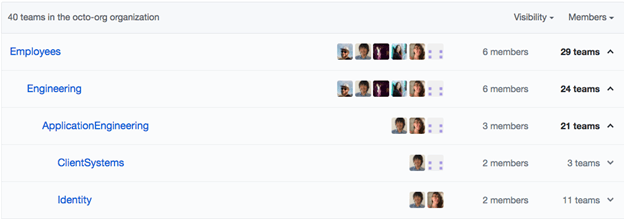
Here, you can @mention the Identity team from any nested team in the organization. Only members of the Identity team will receive the notification in this case. Finally, child teams inherit permissions from the parent team. So if you grant Employee write access, this access level applies to all the other teams in the hierarchy.
Consider also assigning dedicated team maintainers for all teams. After all, team members know more about the team’s dynamics than a general admin. Maintainers get a host of permissions for managing teams, including:
- Deleting team discussions
- Editing team discussions
- Adding and removing members from the team
- Changing the parent team
Step 4 – Secure Your Organization
It’s essential to perform a thorough audit of all contributors before assigning them to teams. This process ensures that everyone has the appropriate permissions. Equally, be sure to grant your teams only the necessary permissions they need to work within the organization.
GitHub organizations offer several security features. For instance, it’s good practice to require all the organization members to enable two-factor authentication (2FA). This adds an extra layer of security besides the default GitHub security features.
GitHub also provides an audit log that lets you track what the organization members are doing. For example, an admin can review the specific actions that a member performed, including when they performed the action.
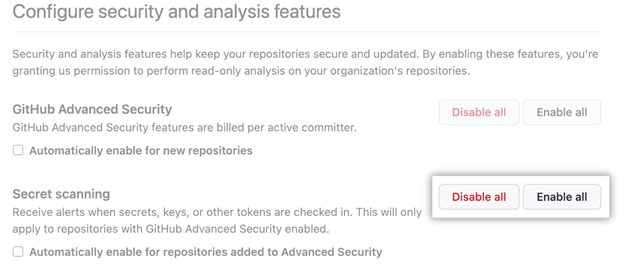
You can also manage your organization’s security and analysis settings. This feature helps to secure the repositories in your organization, including future repositories that don’t yet exist.
Finally, it’s good to have a security policy for your organization. This policy should define access controls, such as who can create repositories, fork branches, change a repository’s visibility, or delete a repository.
Step 5 – Assign Code Owners
GitHub offers a handy CODEOWNERS feature to help manage your organization and teams. The code owner is responsible for the code in an organization or repository. The specific code owner’s responsibilities include reviewing pull requests and approving them before merging.
The code owner automatically gets a notification when someone opens a pull request for the code they own. You can also designate an individual or team as the code owner. You can also enable branch protections to give code owners more oversight of the repository.
For example, a protected branch may require pull requests before merging. Additionally, you can also require that the branches are up to date before merging. Finally, you can restrict force pushes and branch deletions, among other controls.

