Remote Desktop Protocol (RDP) Security: The Complete Guide
Remote Desktop Protocol (RDP) is a tool to simplify the process of making changes to remote machines on your network. Through RDP, you can make changes to files or applications on the remote machine, while also updating its settings and software.
Remote Desktop Protocol allows you as an administrator to fully access a remote machine. This simplifies helping a remote user who needs technical support. To make this process work safely, you will want to deploy Remote Desktop Protocol security measures.
What Is Remote Desktop Protocol Security Anyway?
Without the proper RDP security measures in place, gaining remote access to another machine could leave your network open to hackers. Rather than using RDP for its intended purpose, hackers could gain access to the remote machine and, then, the entire network.
RDP security measures work to prevent hackers from gaining access. These security measures can involve encrypting data before sending it, requiring authentication of the machine that is requesting access, and involving the use of complex passwords and multi-factor authentication to secure accounts.
Network Level Authentication
When running Remote Desktop on your Windows network, the most common security protocol in use is Network Level Authentication (NLA).
NLA works by forcing the machine that is requesting remote access to prove its identity. With NLA, this authentication process occurs without any need for user intervention and before the remote computer grants access to the computer making the request.
Windows makes use of NLA as the security protocol for the RDP process in part because it does not require a lot of computer resources to operate. This preserves more of the resources for managing the movement of data across your remote connection smoothly.
How Remote Desktop Protocol Security Works
The Remote Desktop Protocol has had a number of security holes and vulnerabilities in the past several years. To avoid problems with these holes, you need to routinely install patches and software updates to ensure you always have the latest versions in place.
Over the past few years, a few of the most common ways hackers attack Remote Desktop include:
- BlueKeep: One of the most dangerous vulnerabilities for RDP became known in 2019. Called BlueKeep (or CVE-2019-0708), it allowed hackers to take over the remote computer, unless the remote computer had a patch installed.
- Denial of service vulnerability: The CVE-2020-0660 vulnerability is another highly publicized problem for RDP. A system patch fixes this vulnerability.
- Password hack: The most common ongoing hack for RDP involves using a brute force attack to steal passwords and usernames.
You can take a number of steps to provide a more secure environment for making use of Remote Desktop Protocol, including the following.
Example 1: Do Not Use RDP Over the Open Internet
The security measures associated with Remote Desktop Protocol work best when used inside a LAN. Using RDP involves setting up a peer-to-peer connection between the two machines, which requires direct access.
By default, RDP makes use of port 3389 to operate the connection between the two machines, whether over a LAN or the internet. Consequently, hackers will run random scans on computers using the internet through port 3389, looking for potential vulnerabilities related to RDP. They then may run a denial of service attack on that open port or may attempt a brute force attack through the port to try to steal RDP passwords.
If you must run Remote Desktop over the internet, you could use either port forwarding or run the connection through a Virtual Private Network (VPN).
Port Forwarding
Through port forwarding, you will create an association between the port on your router that contains your public IP address and the port and IP address of the remote machine you’re trying to access through RDP.
Port forwarding ensures that the data you are sending back and forth across the internet between the requesting computer and the remote computer will only go to the requesting computer. The router knows to forward this data directly to the correct computer.
Port forwarding especially protects against denial of service attacks. It also simplifies the use of RDP on a network with a strong firewall.
VPN
For many remote users, making use of a VPN may be the easier option. In a basic sense, the VPN creates a secure tunnel between the remote machine and your network.
Even though the connection is occurring across the open internet, the VPN encrypts the connection, as well as all the data moving across the connection. It basically hides the connection from anyone else using the internet, including hackers.
A home-based remote user could use the VPN all the time to connect to the company network over the internet, making the connection secure. Then, should you ever need to use RDP to access the remote user’s machine, the VPN is already in place, so you can use RDP securely.
Example 2: Set Up an RDP Gateway
With newer versions of Windows Server, you have the option of creating an RDP gateway server. This type of server can serve as a single source to manage multiple RDP connections. This is a simpler and more secure process than having separate requesting machines manage each remote machine.
With fewer machines involved in the connections, the chances of having an error or a vulnerability on any single machine will be lower.
Example 3: Restrict Access for RDP
One way to enhance the security in use with RDP is to limit the number of machines on your network that are able to use RDP. By limiting the number of machines involved, you will be able to better monitor and manage the machines that are using Remote Desktop. It becomes easier to make sure they have all of the software updates and patches they need. Some options for restricting access include the following.
Reconfigure the Firewall
You can set up your network firewall to restrict access to Remote Desktop to only particular IP addresses. When only certain IP addresses can use RDP to gain access to a remote machine, it limits the potential security vulnerabilities. Windows Firewall has a specific option for setting rules regarding the use of RDP and IP addresses.
Don’t Allow Storing of Credentials
When making use of RDP, the remote machine typically will store the credentials of the requesting machine. This speeds up the Remote Desktop connection the next time. However, having the credentials stored on the remote machine could lead to a security breach if a hacker steals those credentials. With Windows, users can choose to run RDP in restricted admin mode, which eliminates the storing of the credentials.
Limit Access to RDP
By default, all administrators on your network will be able to use RDP to access remote machines. However, you should remove this access for administrator-level users who do not need it, minimizing security risks. With fewer accounts involved with RDP, you will have fewer accounts to monitor for security issues related to RDP, simplifying its management.
Isolate Any Server Using RDP
If possible, set up the network to isolate the server that makes use of RDP from the rest of the network. Should some sort of breach occur through Remote Desktop, hackers would then only have access to the single server, rather than using the Remote Desktop hack to access the entire network. Using this isolation technique is not always feasible, however.
Example 4: Set Up MFA
You may want to require users to set up and use multi-factor authentication (MFA) to be able to access Remote Desktop. Through MFA, users would need to use at least two forms of identification to be able to access the network.
A user might enter a username and password for one form of identity. The user then would receive a security token, such as a passcode, on a type of communication unique to that person, such as a smartphone text message or an email message. MFA may even require biometric verification.
Through the use of MFA, if a hacker is able to steal an RDP username and password, the hacker would not gain immediate access to the network. The hacker would also need to have access to that user’s smartphone or email account to finish the login process successfully.
Example 5: Require Stronger Passwords
Because brute force attacks are so common for hackers trying to take advantage of lax security measures with RDP, you should always require users to create extremely strong passwords.
Hackers know that people using RDP often do not make use of complex passwords. (Because of the frequency of this problem, some security professionals joke that RDP is short for really dumb passwords.)
When people use Remote Desktop to fix a quick problem, they may decide to go with a simple password to speed up the process. Instead, you should force anyone making use of RDP on your network to follow the same password complexity measures they use for any other password, including:
- A mix of uppercase and lowercase letters
- Use of numeric characters
- Use of non-standard characters and symbols
- Avoid character patterns or simple words
- Use of 12 characters or more
How to Get Started With Remote Desktop Protocol Security
To make use of Remote Desktop securely on your Windows network, you first will need to set up the network to allow for remote access.
First, establish a secure connection. Here’s how that works:
- Starting the connection: The machine requesting access initiates the communication through the X.224 protocol.
- Establishing the parameters: Next, the two machines establish the rules for the connection. They determine how to interpret keyboard and mouse inputs, as well as determining the screen resolution settings on both machines, so it is possible to mirror the screen of the remote machine on the requesting machine.
- Establishing security protocols: The machine requesting access to the remote computer now must verify its identity. The machine making the request will transmit a security token that identifies it. The two machines will also establish the data encryption protocols they will be using for the connection.
- Exchanging settings data: With the security protocols in place, the two machines can now begin sharing key information about each other using encrypted data. They will share things like usernames, passwords, directory configurations, operating system versions, fonts available, graphics in use, and other required information before data transfers can begin.
As you are enabling Remote Desktop using the steps listed here, you will want to be certain to force the use of Network Level Authentication for the connection. With NLA, you are requiring that the device making the connection and taking over the remote machine must authenticate itself before Remote Desktop will function.
The use of NLA limits the number of vulnerabilities that Remote Desktop could create. By forcing authentication from the computer requesting access, it limits the potential success for hackers trying to mimic a requesting computer.
Enabling Remote Desktop on Windows 11 Through Settings

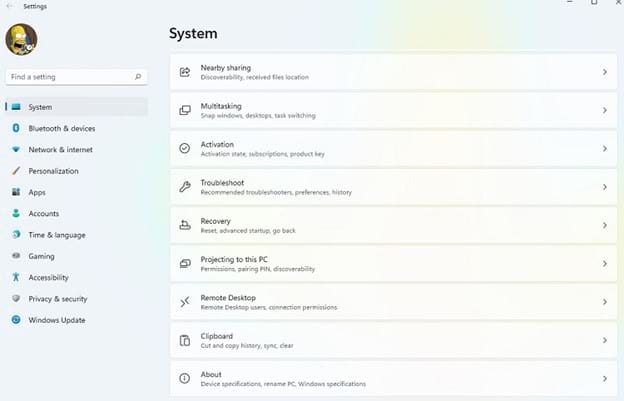
Open the Settings window by clicking on the Windows icon and the Settings icon in the popup window. (If you don’t see the Settings icon, type settings in the search bar at the top of the popup window to gain access to the Settings icon.) Scroll down the list of System items and click on Remote Desktop.
In the Remote Desktop window, slide the toggle switch to the right to activate Remote Desktop. Place a checkmark in the Require Devices to Use Network Level Authentication checkbox. Then click the Confirm button. You now are able to use Windows Remote Desktop securely with NLA.
Enabling Remote Desktop on Windows 10 Through Settings

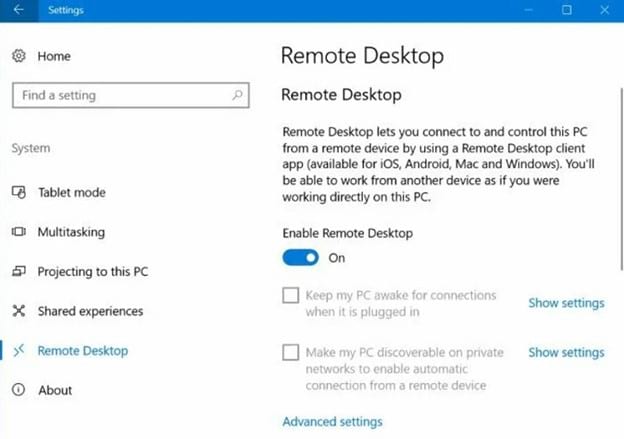
Open the Settings window by clicking on the Start menu icon and the Settings icon (which looks like a gear). Click on System in the Settings window, followed by clicking on Remote Desktop on the left side of the window.
In the Remote Desktop window, slide the toggle switch to the right for Enable Remote Desktop.
To activate NLA, click Advanced Settings toward the bottom of the window. Add a checkmark to the Require Network Level Authentication checkbox. Then click OK.
Enabling Remote Desktop on Windows 11 or Windows 10 Through Control Panel

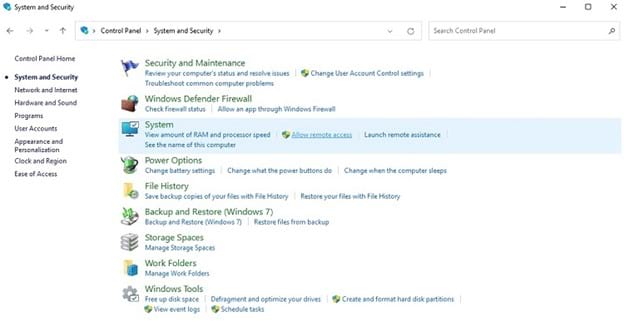
In Windows 11, open the Control Panel window by clicking on the Windows icon and the Control Panel icon in the popup window. (If you don’t see the Control Panel icon, type control panel in the search bar at the top of the popup window to gain access to the Control Panel icon.)
In Windows 10, click the Start menu. In the Search bar, type control panel. Then click on Control Panel in the list of search results.
In both Windows 10 and Windows 11, click on System and Security in the Control Panel window. In the System section in the following window, click on Allow Remote Access. In the System Properties window, click the Remote tab along the top of the window.
In the Remote Assistance section of the window, add a checkmark to the Allow Remote Assistance checkbox. In the Remote Desktop section of the window, activate the radio button for Allow Remote Connections. Add a checkmark to the Network Level Authentication checkbox in the same section. Then click the OK button.

