The Ultimate Manual to GitHub SSH
GitHub SSH simplifies the process of pushing changes to a user’s GitHub remote repository. This means you can use SSH with GitHub to add a layer of security to the system during automated processes without having to remember extra passwords.
What Is GitHub SSH Anyway?

By making use of SSH (Secure Shell) protocol with GitHub, those with a GitHub account can make an automatic connection each time. Even though the connection occurs automatically, users deploying GitHub SSH do not have to sacrifice security protocols.
What Is SSH?
The SSH protocol gives you the ability to connect to remote servers in a secure manner without having to manually enter a user name and password each time. Many GitHub users make use of the SSH protocol, but SSH will work with a wide range of software packages.
Commonly, users of many different software packages will deploy SSH to automatically log in with a password to a remote server or computer. This also is a common use of SSH for GitHub users.
However, SSH is not an exclusive part of GitHub. SSH simply makes GitHub easier to use. As you make the connection to a remote server through SSH, all of the data remains encrypted. Even on networks that don’t have the highest levels of security, the data passed through the SSH protocol remains safe.
As another option, some systems may choose to transfer data from one computer to another securely while using SSH.
SSH provides a higher level of security than older key types. You may be using some of these older keys, such as DSA and RSA keys. However, GitHub is in the process of phasing out support for these keys. Making use of SSH keys now and going forward will ensure you still have support for your keys inside GitHub.
What Is GitHub?
GitHub is a cloud-based, for-profit service through which users and developers are able to store code. You also can manage and track any changes to your code through GitHub. You can collaborate with a team on code through GitHub. It’s especially useful for a remote team.
GitHub helps developers manage different versions of their code, protecting original copies of the code while they make editing changes. On a big software coding project, developers can work on a portion of the code, while GitHub protects the other segments of the code.
The GitHub service works with Git, which is an open-source system developers use for managing each version of their code projects. Developers could use Git on their own to manage their code, but GitHub provides a framework that greatly simplifies the process.
Those who don’t have a lot of experience coding will appreciate GitHub, while advanced coders also can use GitHub to save the time and effort required to manage coding projects.
Although making use of GitHub simplifies managing and working with code, having to log in multiple times during a project can be a time-consuming challenge. Pairing SSH with GitHub eliminates this issue without sacrificing security.
GitHub Pricing

GitHub offers three different subscription tiers, two of which carry a fee. All of the tiers will work with SSH.
- Free: The Free tier in GitHub is not a free trial. It provides the ability to use it for free forever. It allows up to 500 MB of package storage and up to 2,000 automation minutes per month. You can set up an unlimited number of private and public repositories in the Free tier.
- Team: The Team tier costs $4 per user per month. It contains all of the features in the Free tier, as well as the ability to access multiple reviewers for pull requests, protect branches, and make use of web-based support. You can have up to 2 GB of package storage and up to 3,000 automation minutes per month.
- Enterprise: The Enterprise tier costs $21 per user per month. It includes everything in the Team tier, as well as advanced auditing, automatic updates to security protocols, automatic version updates, and SAML single sign-on capabilities. You can have up to 50 GB of package storage and up to 50,000 automation minutes per month.
For an add-on cost in the Enterprise tier, users can add features for things like code scanning or premium support options.
How GitHub SSH Works
Making use of SSH with GitHub requires taking a few steps to set up the process. Because SSH greatly simplifies the process of accessing your GitHub repositories, though, these steps represent time well spent.
GitHub SSH makes use of an SSH key to gain access to your GitHub account. Through the SSH key, you do not have to enter a user name and password each time you want to access your GitHub account. The SSH protocol performs this step for you.
As an added advantage, because you do not have to remember the password each time, you can make the password incredibly complex and long. The SSH key will hold your password for you, and, of course, it will never forget an extremely complex password like you might.
Pushing and Pulling With GitHub
When using GitHub, developers will frequently use the push and pull commands to send content they create locally to the GitHub repository.
Each time you push data to GitHub, you will need to enter your user name and password to gain access to your GitHub account and to store the changes you’re making to the code. When you issue the pull command, you will be letting others know about changes you made to your code, and you must enter the password and user name again.
SSH automates both of these processes, so you do not have to enter the user name and password each time.
To begin using the GitHub SSH, you will need to perform a few preliminary steps.
Example 1: Check for Any Existing SSH Keys
Before you attempt to generate a new SSH key, you should check to see if any SSH keys already exist in your GitHub account. If so, you may already have the ability to use the GitHub SSH feature to automatically enter your user name and password.
Windows users should start by opening Git Bash, which is a terminal window where you can issue commands for Git. Enter the command ls -al ~/.ssh at the Git Bash command prompt to look for a public SSH key.
If you have a public SSH key, you should see an entry in the listing that begins with id. You then can add that SSH key to your GitHub account to begin using SSH with your GitHub account.
Should GitHub provide an error message or give you a message that the SSH key or directory does not exist, you will need to create your own SSH key, as we’ll describe in the next example.
Example 2: Generate a New SSH Key for Windows
When generating a new SSH key to use with your account, you will have a few different options, depending on your local computer set up and on the way you normally use GitHub. Here are the most common steps to follow.
Open Git Bash and enter the following text:
ssh-keygen -t ed25519 -C
Add your email address after the text phrase. If you are using a system that cannot recognize the ed25519 text string, you can try substituting rsa -b 4096 in place of it. This may happen for those who are using an older system.
You should see a message that GitHub is generating a private/public key pair. Eventually, GitHub will ask which file you want to use to save the key. GitHub simplifies this process by generating a file for you automatically that you can use. Just hit the enter key to save the key to the default file. This is the easiest way to complete this step, although you have the option of creating your own file location if desired.
Now GitHub will request that you enter a password. You can hit enter to skip adding a password, but this would defeat the purpose of using GitHub SSH, as using no password reduces the level of security for your account significantly.
After entering the password, hit enter. You then will need to enter it a second time to verify that the two passwords match.
Example 3: Generate a New SSH Key With a Hardware Security Key
For those who are making use of a hardware security key, generating the new SSH key requires a few different steps. You may need to install a new SSH client or update an existing SSH client before you will be able to create a new SSH key.
With the hardware security key inserted into the local computer, open Git Bash. Then enter the following text string at the command prompt:
ssh-keygen -t ed25519-sk -C
Type your email address after this text string and hit enter. You should receive a message that tells you to activate the hardware security key. If you complete this step successfully, you’ll see a new message that asks you to save the key to a file. Just hit enter to accept the default file location and name.
The next message will request that you enter a password. You will need to enter the password twice.
If you receive an error message after entering the text string listed above, you may be using a hardware security key that does not support ed25519 protocols. You may be able to substitute the following text string instead:
ssh-keygen -t ecdsa-sk -C
Example 4: Add the SSH Key to the SSH-agent
Some users will need to make sure the newly generated SSH key is part of SSH-agent, which allows you to manage your SSH keys.
You can choose to have SSH-agent automatically launch each time you open Git Bash or the Git shell. You will need to enter code into your profile in the Git shell that tells the software to start SSH-agent automatically.
Otherwise, you can manually run SSH-agent whenever you want. Use the eval command in Git Bash to start SSH-agent. You then will need to add the SSH private key generated earlier into SSH-agent.
Make sure you add the proper file name and location for the key. If you generated your own file location for the key earlier, rather than accepting the default location for the key, you’ll need to enter this specific location.
How to Get Started With GitHub SSH
Once you generate an SSH key locally, you will be able to begin using GitHub SSH. Here are the basic steps you can follow.
Step 1: Copy the SSH Public Key

Windows users should start by launching Git Bash. You will be copying the public key to your computer’s local clipboard, so you can make use of it later. Use the clip command inside Git Bash to copy the SSH key to the clipboard.
Step 2: Add the SSH Key to Your GitHub Account
Open your GitHub account window and click on your GitHub profile photo. From the popup menu, select the Settings command.
In the popup window, you can select SSH and GPG Keys to copy the SSH key to GitHub.
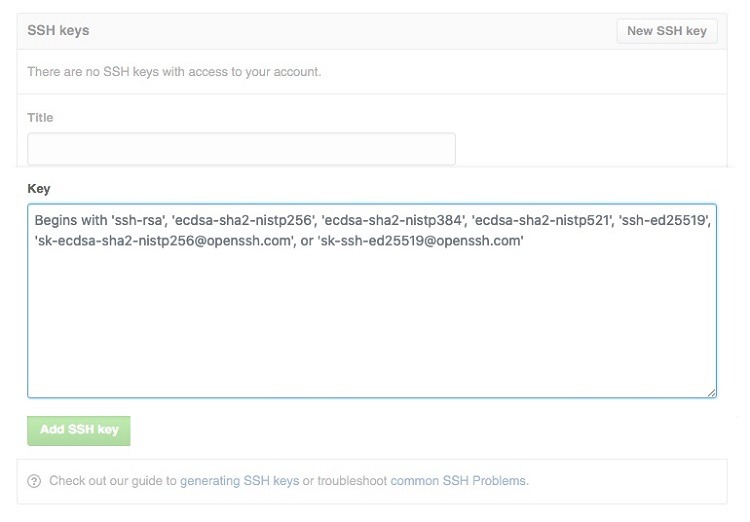
In the next window, you may see a list of any SSH keys already associated with your GitHub account. To add your latest SSH key, click on the New SSH Key button.
Now add a unique label for the SSH key in the Title text box. This should be highly descriptive, especially if you have several keys, so you can find the SSH key again when you need it.
Scroll down to the Key text box. Paste the SSH key you copied earlier into this box. Then click the Add SSH Key box to save the key into GitHub. You may need to enter your GitHub password to complete the process.
Step 3: Test the SSH Connection

After uploading the SSH key, you can test the connection to be certain it is working properly and that your password is ready to use automatically.
From within Git Bash, use the ssh command. GitHub may generate a warning message for you, asking you to verify that GitHub is using the proper RSA key fingerprint. If the message is displaying the correct fingerprint, type yes and hit enter.
GitHub will return another message that should contain your user name. If so, you properly set up the SSH key and you can begin using this feature with GitHub.
When you don’t see the desired message, a common explanation may be that you made a typographical error when entering your information.
Another potential error involves failing to copy the SSH key properly in step one. From within Git Bash, use the ssh-add command to have Git Bash display the private key, which consists of a mixture of letters and numbers. This will be a long alphanumeric string of characters. If you do not receive this string, you need to start over with step one again and copy the SSH key.

