The Complete Guide to Slack Markdown
The ongoing pandemic has only accelerated the rate at which remote workforces have adopted Slack, making it one of the most commonly used tools for easy collaboration and communication.
Slack is essentially a team messaging and collaboration application that has gained widespread popularity in the business and freelancing world. If you don’t know where to start when adding formatting to your messages or are keen to learn more about Slack markdown, we’ve got you.
Read on as we discuss markup formatting in Slack in greater detail.
What is Slack Markdown Anyway?
Before jumping into anything Slack-related, let’s understand what we mean by markdown, plain and simple.
Markdown is a plain-text formatting syntax that was designed to make writing for the internet easier. The aim here is to make sure that plain text documents become more readable without tags messing up the text, as well as providing text modifiers like bolding, italics, lists, and so on.
Think of markdown as the alternative to What You See Is What You Get (WYSIWYG) editors. The latter uses rich text that is later converted to proper HTML.
Also, note that markdown and markup are not quite the same, though they often get used interchangeably. Markup is general changes in text formatting, while markdown is a specific syntax for that formatting.
Think of it like squares and rectangles: All markdown is a type of markup, but not all markup is specifically markdown.
Now let’s focus on Slack markdown.
In November 2019, Slack updated its message box with a WYSIWYG interface, which simplifies adding bold, italics, and other features to the text you type.
You can use Slack markdown to add more structure and form to your message by giving it a visual hierarchy that not only promotes readability but makes the message clearer too.
How Slack Markdown Works
You’ve already encountered markdown if you have an account on Facebook Messenger, Skype, and Reddit. All these three platforms use different flavors of markdown similar to Slack’s.
Slack allows you to work with a form of markdown formatting that enables you to complete more complex tweaks through one of the oldest methods of text formatting on the internet, but there’s still a learning curve that you have to overcome.
Precisely the markdown formatting in Slack is better suitable for users with technical proficiency or who prefer working with keyboard buttons. So yes, you can add formatting to Slack messages through keyboard commands.
Let’s explain how Slack markdown works with the help of two examples:
Example #1: Making a Specific Part of Your Text Bold
We often use bold formatting when we want to emphasize a specific part of our message. This is to communicate urgency to the reader or highlight the most important part of the message.
You have two ways to add bold formatting to a text other than using the formatting toolbar: Either use the keyboard shortcut to format the selected text or surround your text with specific symbols associated with every format.
Since we’re only concerned with using the markdown formatting, we’ll be adding symbols around our text.
Suppose you want to type the following message:
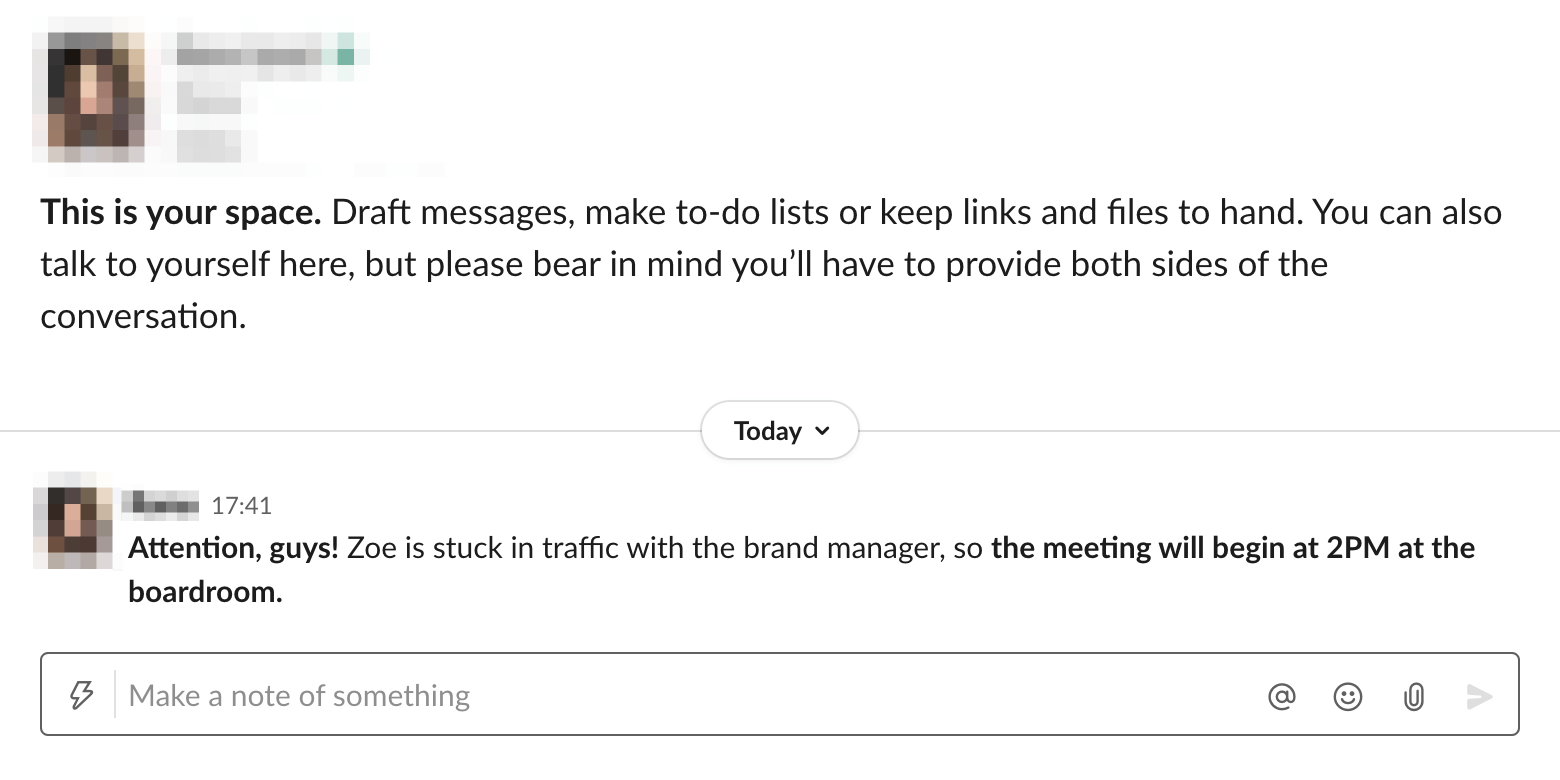
Attention, guys! Zoe is stuck in traffic with the brand manager, so the meeting will begin at 2 PM in the boardroom.
In your Slack message box, you’ll type the message as follows:
*Attention, guys!* Zoe is stuck in traffic with the brand manager, so *the meeting will begin at 2 PM in the boardroom.*
After pressing Enter, the message will look something like this:

Example #2: Adding in-Line Code to Your Message
This is slightly more complicated than adding basic level formatting like italics or bold to your message. So make sure you pay attention here.
Posting in-line is a good way to post a code block or snippet (or to add color to a text!) to make it more interactive and eye-catching.
To add in-line code to your Slack message, you have two options again: Either add the code to one word or one line or to blocks of text.
Suppose you had the following text to wish you want to add the in-line code:
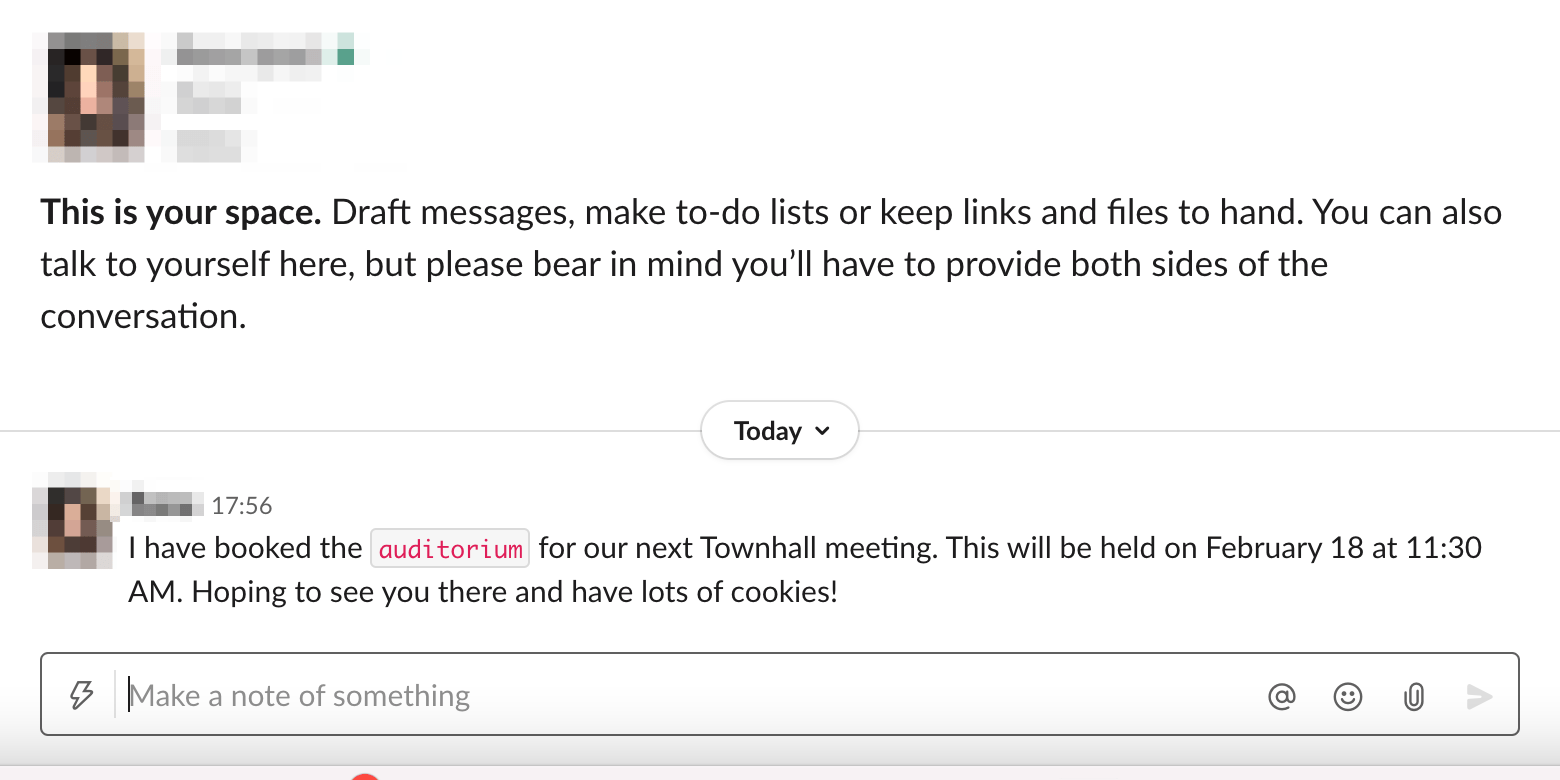
I have booked the auditorium for our next Townhall meeting. This will be held on February 18 at 11:30 AM. Hoping to see you there and have lots of cookies!
In your Slack message box, you’ll type the message as follows:
I have booked the `auditorium` for our next Townhall meeting. This will be held on February 18 at 11:30 AM. Hoping to see you there and have lots of cookies!
After pressing Enter, the message will look something like this:

Although this feature is enabled by default for all users, you also have the option to disable the WYSIWYG interface.
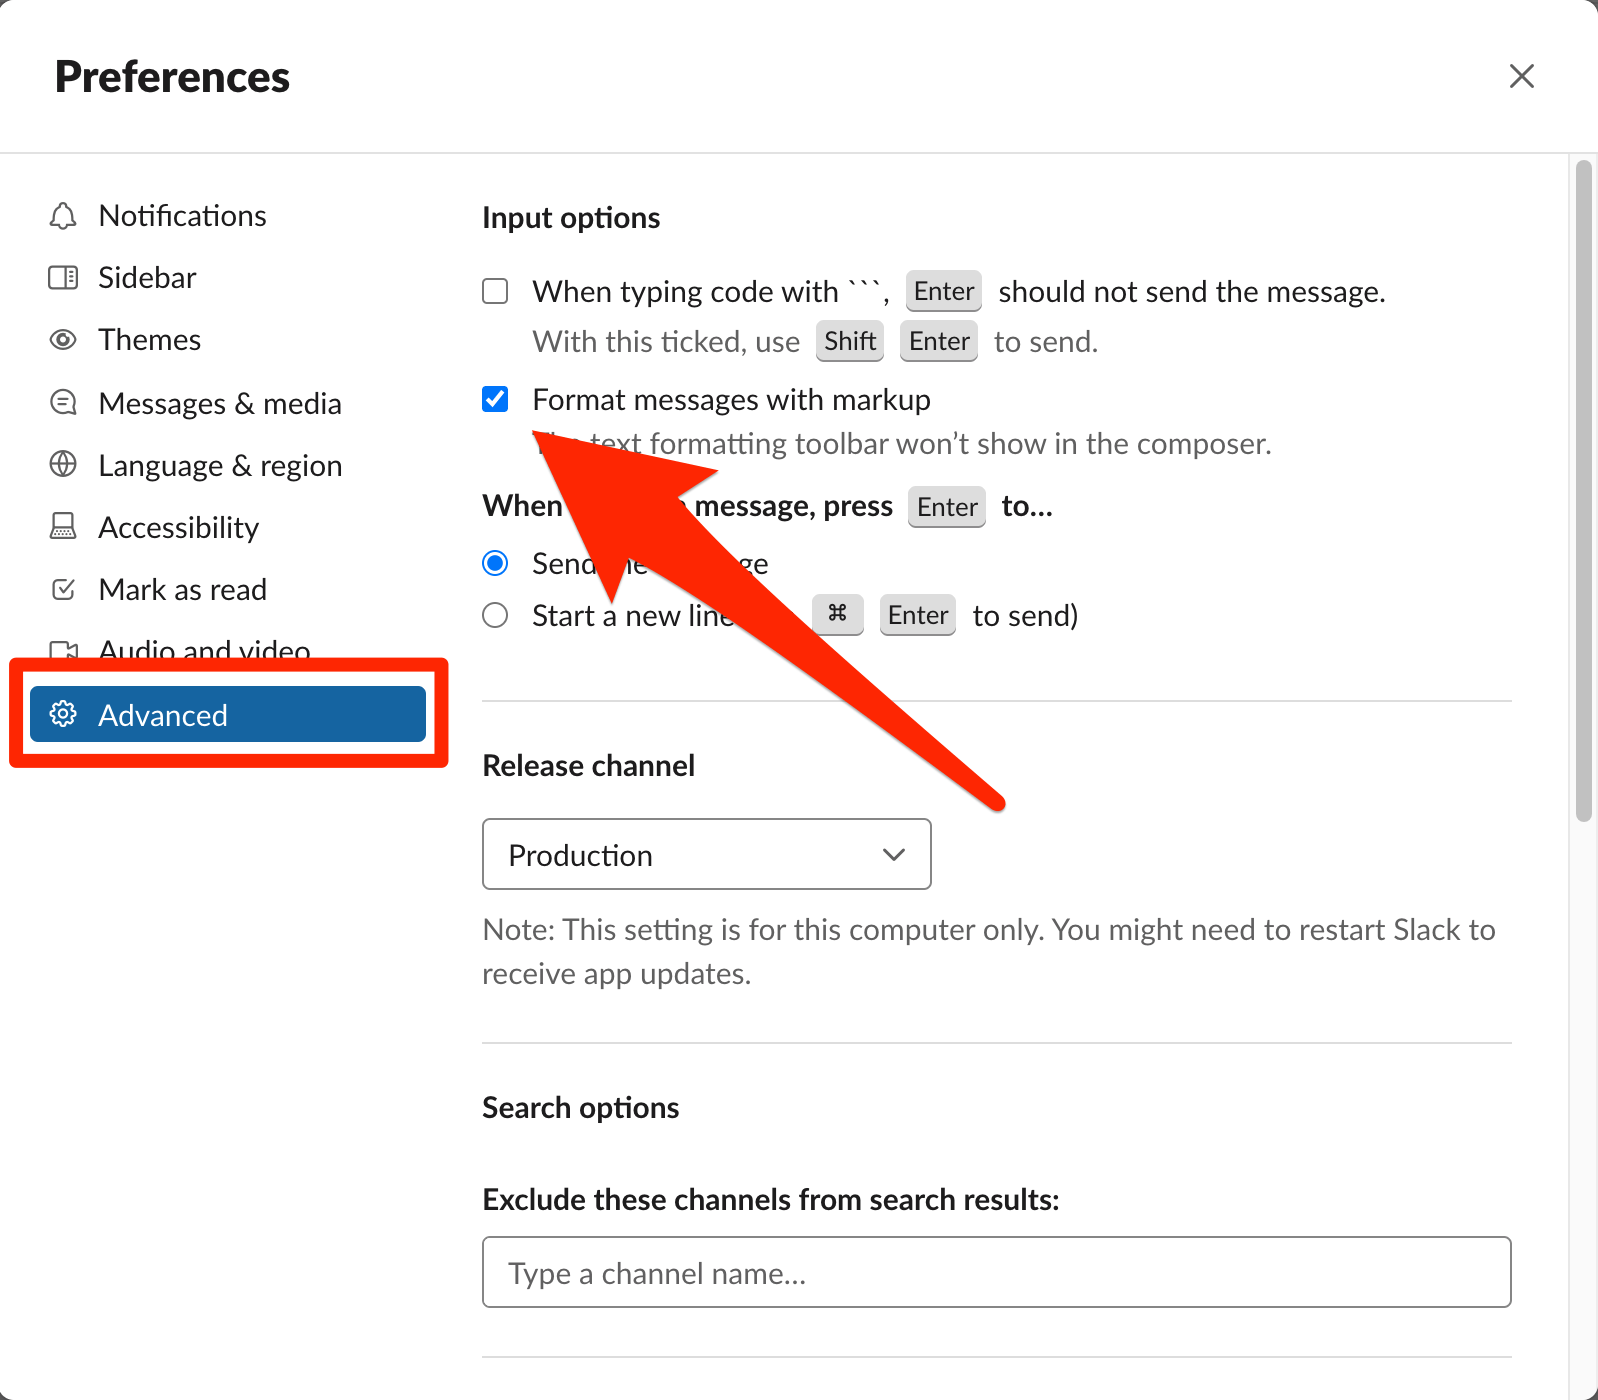
Just go to Preferences, and click on Advanced followed by Input options. Select the Format messages with markup option to hide the WYSIWYG formatting button and disable the live editor. You can then see the markdown formatting as you type it.

After changing the default settings, the text formatting toolbar will vanish, and your Slack message box will look something like this:

If you want to continue, which we’re assuming you do, leave the Format messages with markup box unchecked.
How to Get Started With Slack Markdown
Slack markdown is essentially adding formatting to your text messages to make them more readable for the viewer. This formatting helps the readers understand the tone by adding emphasis and clarity to your messages.
But how do you use a Slack markdown effectively? It all boils down to the kind of formatting you want to add to your text.
Since we’ve already covered how you can add the bold formatting and in-line code (by adding asterisks {*} and backticks {`} around your text, respectively), we’ll discuss the other forms of formatting you can play with.
Let’s take a quick look.
Step #1 Add the Basic Visual Formatting
The basic visual styles include italicized text, bold text, and strikethrough text.
Since we’ve already covered bold, here’s how you can produce italicized text and strikethrough text:
For using italics in Slack:
Use underscores (_) around your text to italicize it. For instance: I _really_ need coffee, Sam!

For using strikethrough in Slack:
Use tildes (~) around your text to strike it out. For instance: He will join us or ~be struck off the list~.

While you’re at it, you can also add line breaks to your text. If you use multi-line text in an auto-generated text, you can insert a new line including the string ‘/n’ in your text.
Step #2 Add Lists and Quotes
The whole purpose of using lists, quotes, and in-line code blocks is to organize and differentiate text for different purposes. Let’s take a look at how you can go about this.
For creating lists in Slack:
While there’s no specific list syntax in a published text, you can mimic the list formatting by regular text and line breaks. Alternatively, you can also start your message with 1 or 1. or begin it with a bullet point by adding an asterisk.
For adding a Quote in Slack:
You can play around with quotes in the Slack message box to ensure the right person gets the credit. For this, you’ll have to quote some text within your message by adding angled brackets (>) at the beginning of one or more lines.
Suppose you type the following into the Slack message box:
This is unquoted text\n>This is quoted text\n>This is still quoted text\nThis is unquoted text again
This will then end up looking like this:

Step #3 Include Links in Your Slack Messages
You can casually link to URLs in your Slack conversations by adding the URL directly in markdown text. The text will be auto-transformed by the server into a link.
Alternatively, you can quickly create hyperlinks as well. Copy a link, then select text in Slack and then press Command + V (for Mac users) or Control + V for Windows/Linux users.
Step #4 Add an Emoji to Your Message
You can add emojis in their full color and fully illustrated form directly in your Slack message. For instance, if you type:
It’s Fridyay, team! 🙂
It’ll automatically be converted into emoji format and look something like this:

If you’re publishing text with emojis, don’t worry about having to convert them—just include them as it is.

