How to Migrate from Dropbox to Google Drive
Cloud storage services have become increasingly popular for businesses. Since all the data is online, owners and employees have any time, anywhere access – provided they have a reliable internet connection.
Out of all the cloud drives, Dropbox and Google Drive are the most popular. Both platforms offer unique features to make file organization and management simple and effective.
Last year, though, Dropbox doubled the available storage, followed by a $2 hike to the monthly subscription, up to $11.99 per month.
2TB storage undoubtedly is excessive for most users, and the price hike, expensive. Due to this, many users have started migrating off Dropbox to Google Drive, which offers a more competitive package and is just as efficient.
Read on as we discuss how you can make the leap from Dropbox to Google Drive – a step that would have otherwise been slow, costly, and frustrating – easily and effortlessly.
How to Migrate From Dropbox to Google Drive: The File Syncing Way
This method is definitely one of the faster ways to migrate your Dropbox files and folders to Google Drive.
You have to start by downloading the respective applications, set up Google two-step verification (not necessary, but recommended), and prepare both the applications. Once done, you can proceed with syncing your Dropbox files and folders to Google Drive.
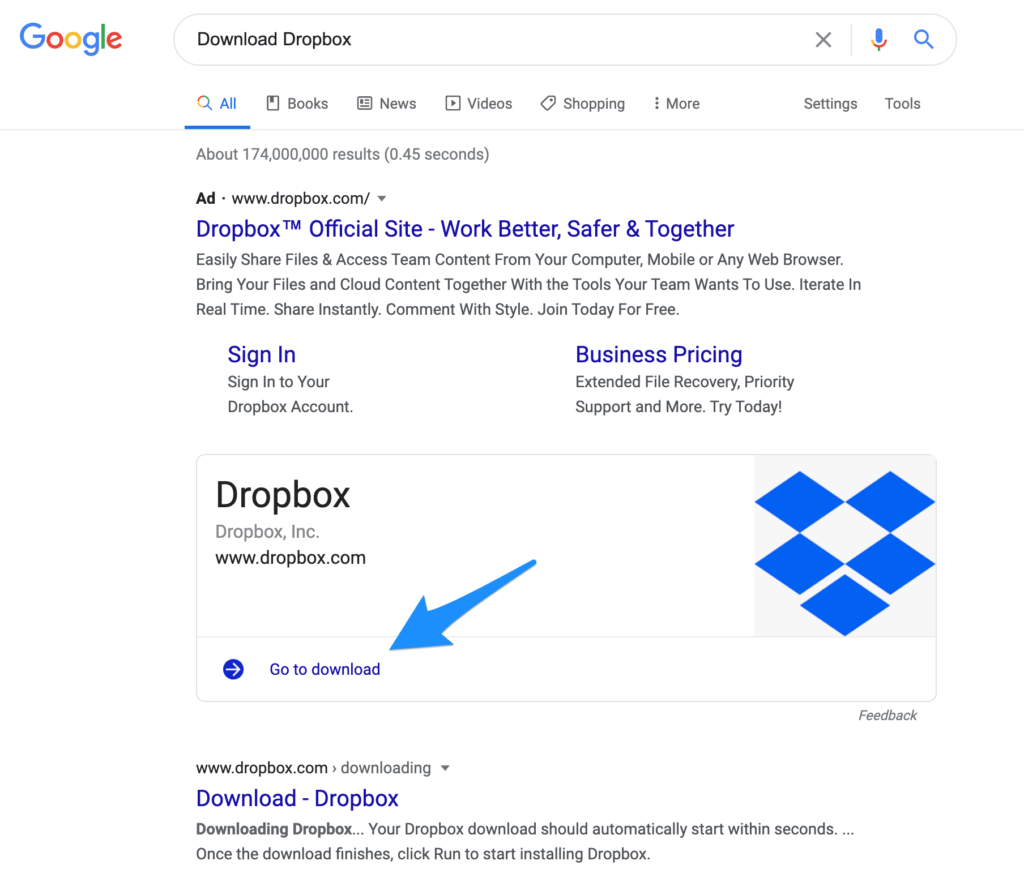
Step #1 You obviously must have a Dropbox profile since you want to migrate files from it to Google Drive. But if you don’t have the app on your current device, make sure that you download it directly from your web browser.
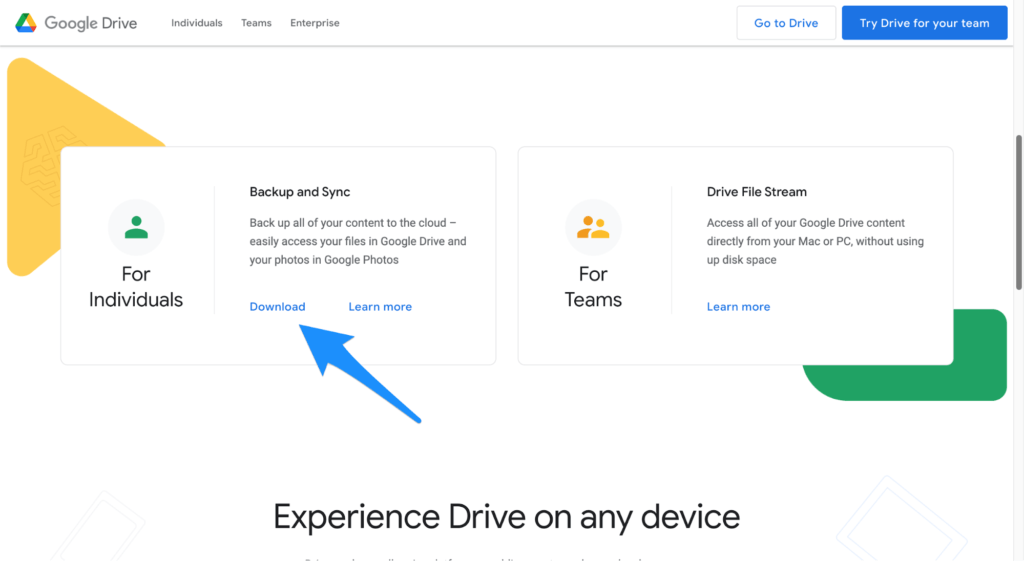
Step #2 Next up, go to the Google Drive download page and hit the Download button under the Backup and Sync tab.
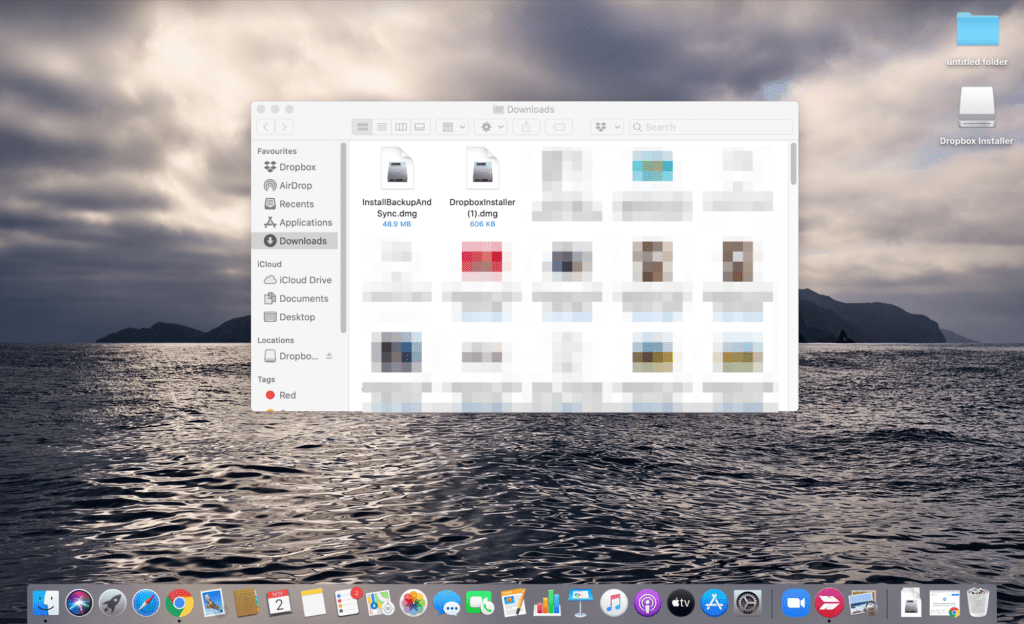
Step #3 Go to your default download folder on your device. Double click on DropboxInstaller and InstallBackupAndSync files, respectively. Follow the on-screen phone prompts to set up both Google Drive and Google Photos.
Step #4 Although not necessary, we highly recommend setting up two-step verification for your account. After all, with the increasing number of data breaches and malicious hacking cases, there‘s no harm in taking the extra step to protect critical data.
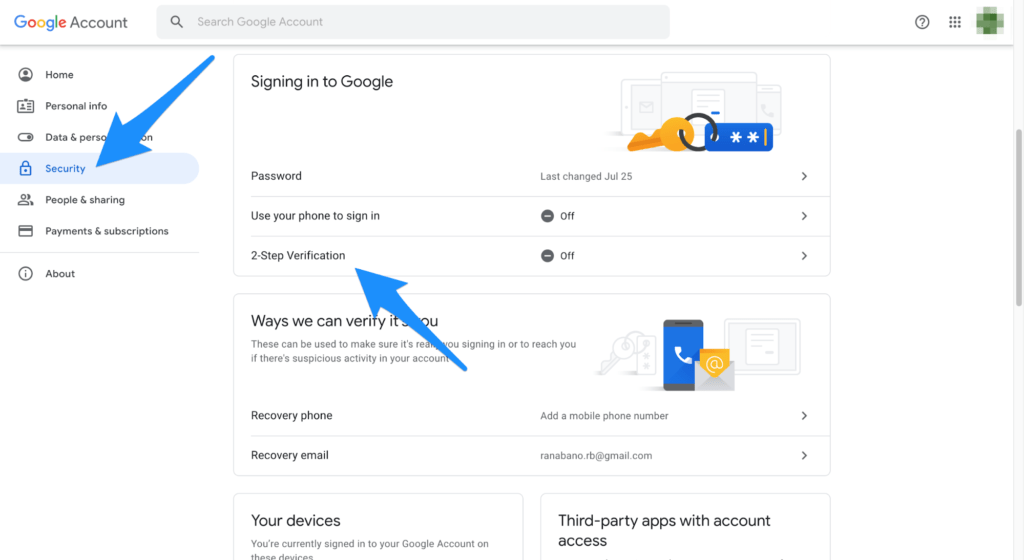
Click on the nine small dots on the upper right-hand corner of the screen and then Account. Go to your Google account‘s Security page and enable 2-Step Verification as per your preferences.
Step #5 Sign in with your Dropbox username and password to open the app. If you haven’t synced your files and folders before, you’ll have to do it now.
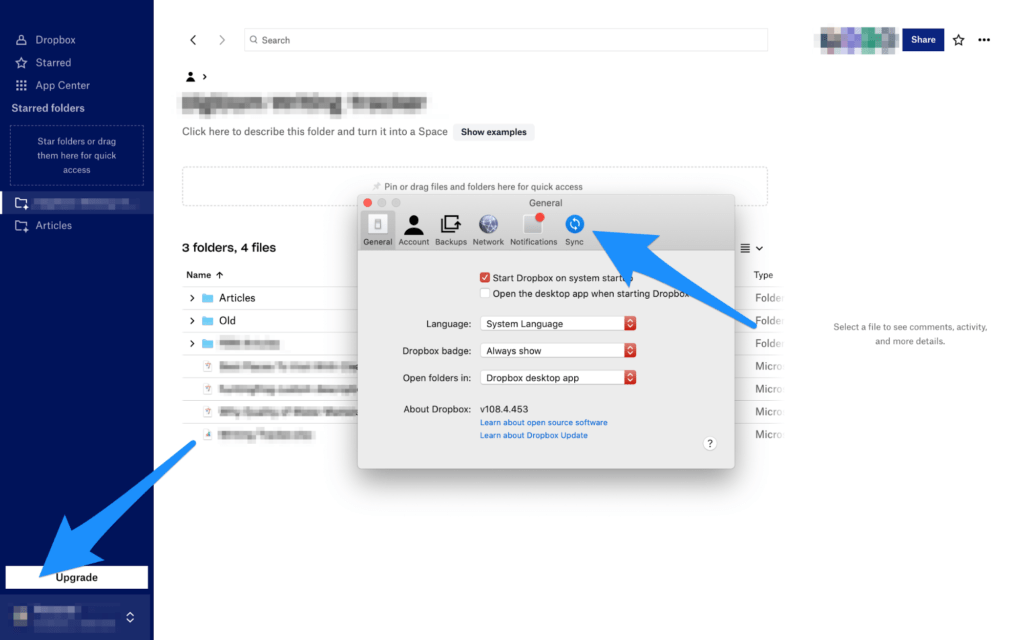
Click your profile picture on the lower left-hand side, and then choose Preferences. Select Sync, and then Choose Folders. Once done, click Update and click on Update again when prompted.
Wait until your Dropbox is fully synced with your computer. Or until the syncing icon has disappeared from the Dropbox app.
Step #6 Select the Backup and Sync icon in your computer system tray and sign in. If you have more than one Google account, make sure you choose one where you want to keep your Dropbox files and folders.
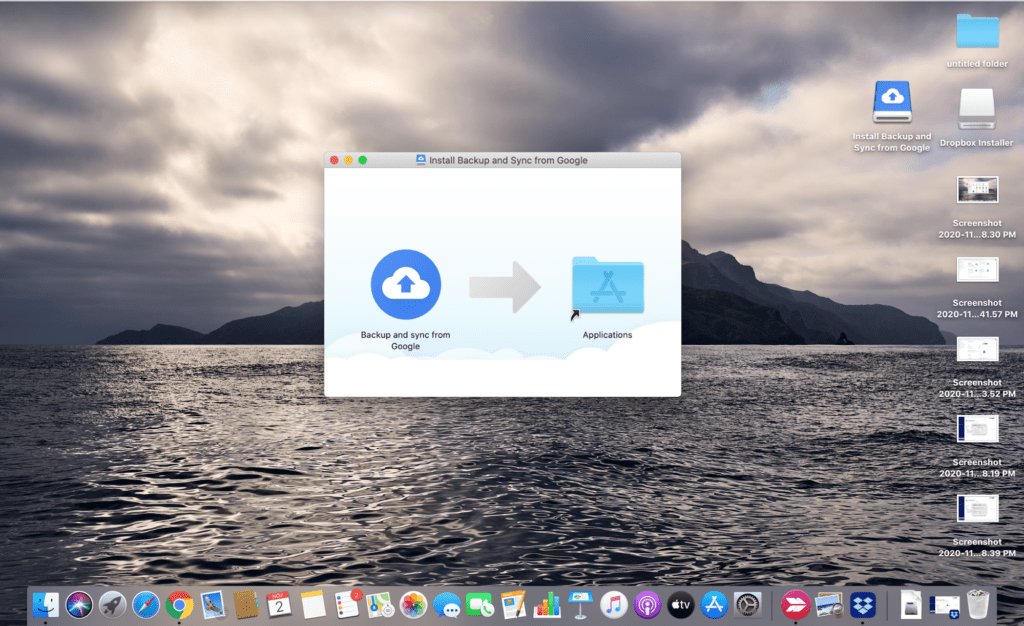
Click OK when the app asks for permission to access your files and system. Once you’ve signed in, select the Settings icon on the three vertical dots on your top-right side. Choose Preferences and then My Computer (or whatever name is shown on your device).
Step #7 Select the folders, photos, and videos on your computer that you want to upload to Google Drive. Once you made your choice, click OK again.
You can also cross-check whether the migration is complete by going to your Google Drive and checking the migrated folders and files.
Step #8 With all your files and folders transferred, we’re going to assume you want to unsubscribe from Dropbox‘s paid plan. If that isn’t the case, you can skip this step, but if it is, read on.
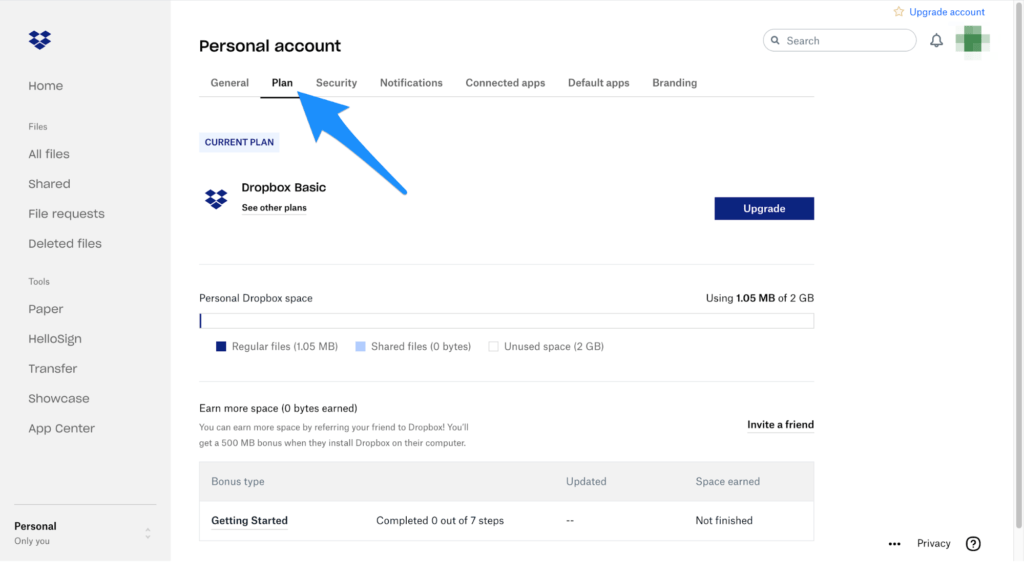
Sign in to your Dropbox account directly on your web browser. Select your profile picture on the top-right hand and then click Settings. Select the Plan tab from the top navigation bar, and click Cancel Plan.
Follow the online screen prompts.
And that’s it! This is how you can migrate from Dropbox to Google Drive by syncing your files and folders – first from Dropbox to your computer and then from the computer to your Google Drive.
How to Migrate From Dropbox to Google Drive: The Traditional Way
Remember how we describe moving files from Dropbox to Google Drive as slow and frustrating?
Well, this is that method.
Nevertheless, it can still be useful if you want to move a selected number of files. In this case, you need to download files from Dropbox to your desktop or laptop and then re-upload them to your Google Drive.
Here‘s how you do it:
Step #1 Login to your Dropbox account and click All Files.
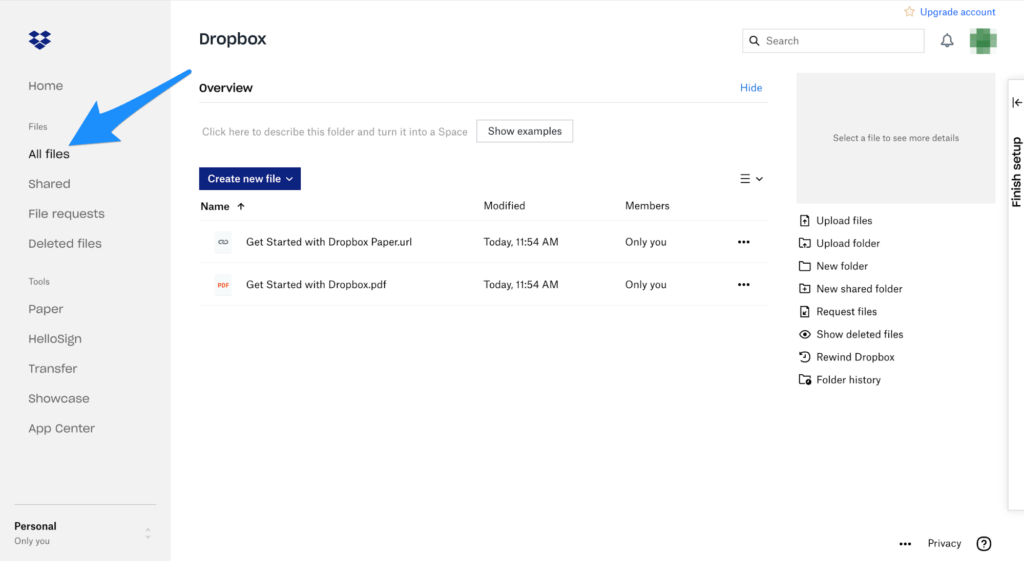
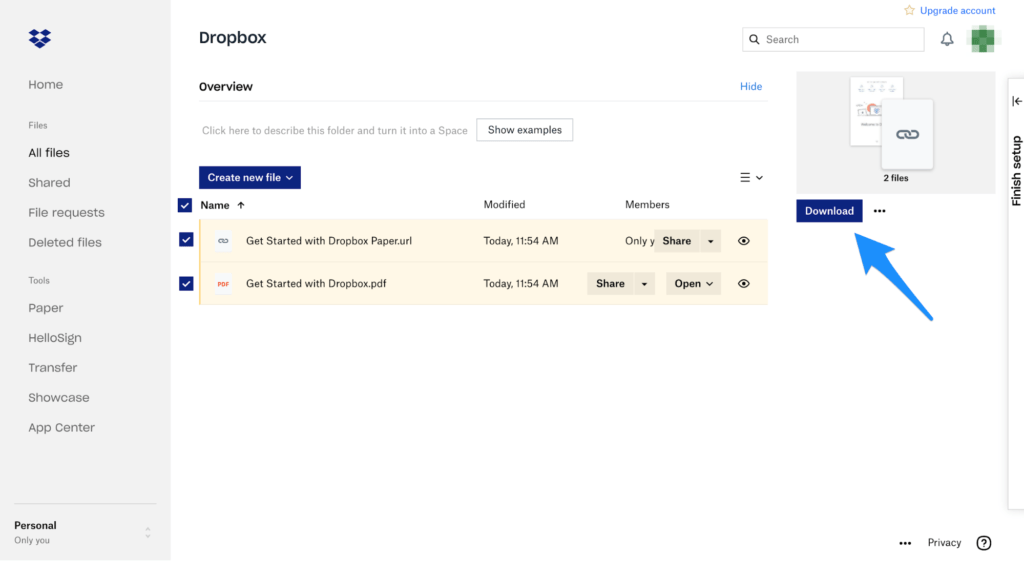
Step #2 Select the files that you want to download and click Download. Your files will start to download to your device.
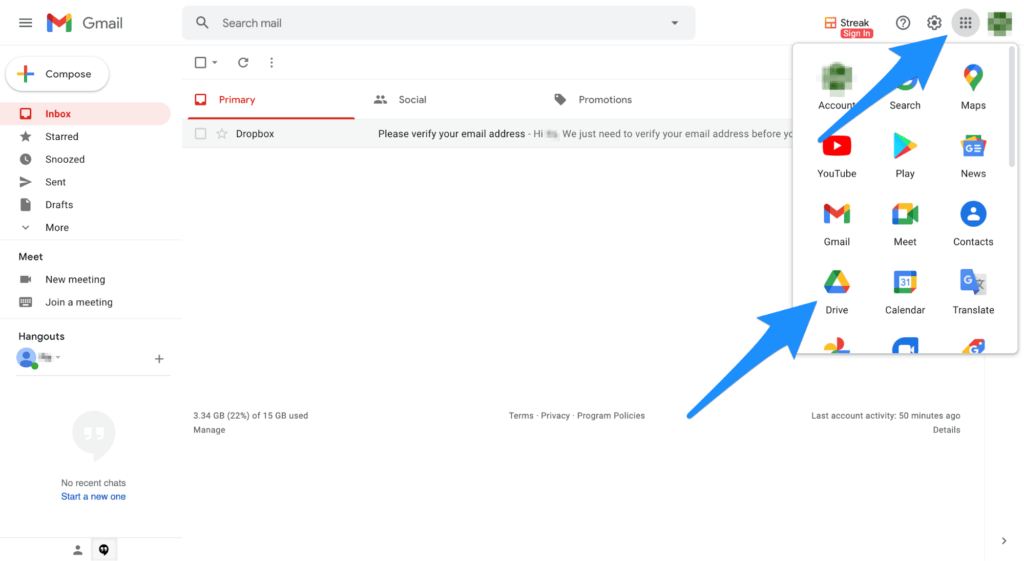
Step #3 Open your Gmail account and click on nine small dots you’ll find on the upper-right corner of your screen. Select Drive.
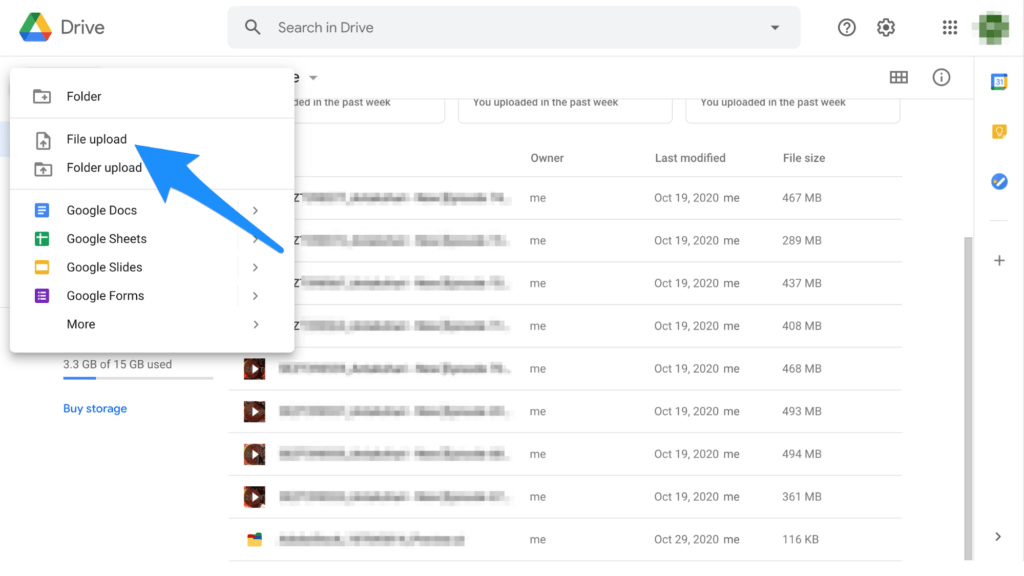
Step #4 Once Google Drive opens, click My Drive, followed by New and Upload Files. Select the downloaded Dropbox files, and they’ll start to upload automatically to the Drive.
The entire migration process is highly dependent on your data size and the speed of the internet. If your files are small and you have fast Internet connectivity, the whole process will be faster, and vice versa.
How to Migrate From Dropbox to Google Drive: The File Sharing Way
Another way to migrate data from your Dropbox account to Google Drive is to share the files and folders. Again, this method is best suited for situations when the data isn’t too big.
You can use the following steps to sync your Dropbox to Google Drive by sharing files:
Step #1 Login to your Dropbox account. Select the file or folder that you want to share from the home screen.
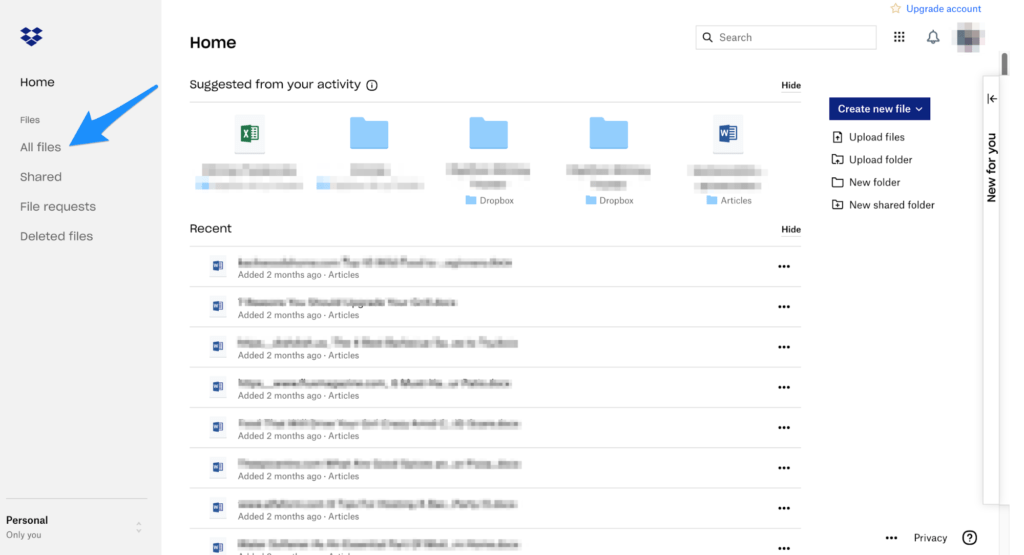
Step #2 Click on All Files that you’ll find on the left-hand side of your device screen.
Step #3 Select the files or folders you want to share and then select Share.
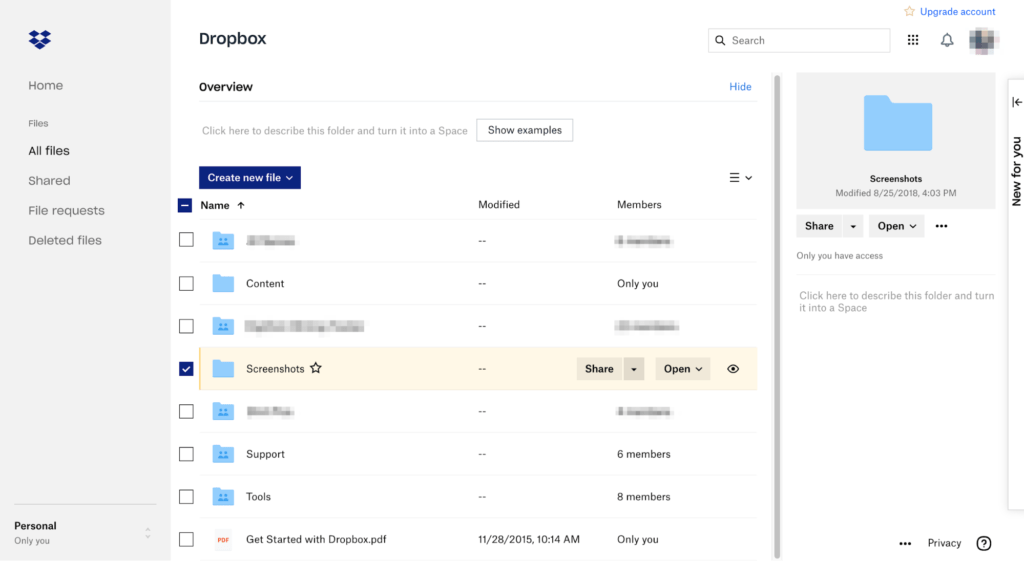
Step #4 Type the email address of the recipients with whom you want to share the Dropbox files or folders in the To section.
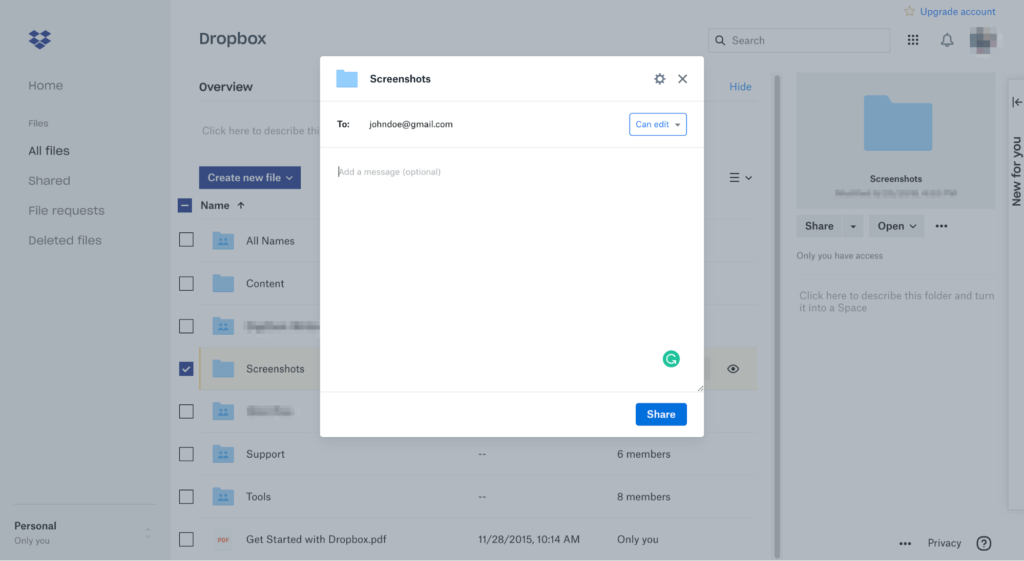
Step #5 Select Share again. A link to the Dropbox files or folder will be shared with the entered email addresses.
Step #6 If you want, you can also share the link to the file or folder personally by clicking on Create Link followed by Copy Link.
Then paste the copied link in an email, instant messenger, or text message – wherever you want.
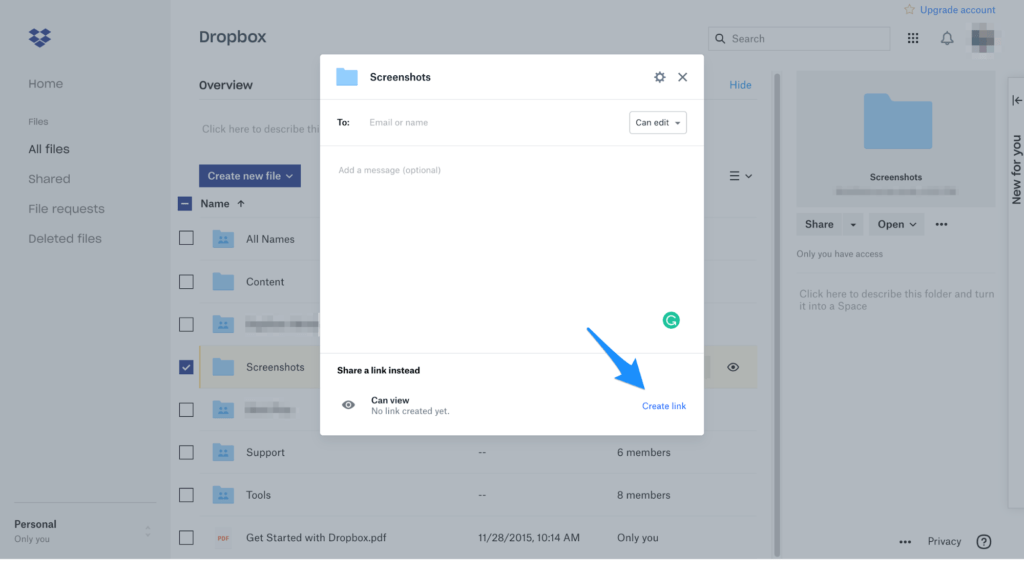
Step #7 The person who receives the link can then download the file or folder and then upload it on Google Drive.
While this sharing of files was done directly from the web browser, you can also share Dropbox files and folders from your mobile phone or through the Dropbox app.
How to Migrate From Dropbox to Google Drive: The Dropbox Transfer Way
Dropbox has an exclusive Transfer option that allows you to move files and folders from Dropbox or Google Drive.
That said, while you can transfer files up to 100MB by having a basic Personal account, but any larger and you’ll have to upgrade to the Professional account.
The following are the steps to use the Dropbox Transfer feature:
Step #1 Open your Dropbox account and click on the nine small dots on the top right-hand side of your screen. Click on Transfer.
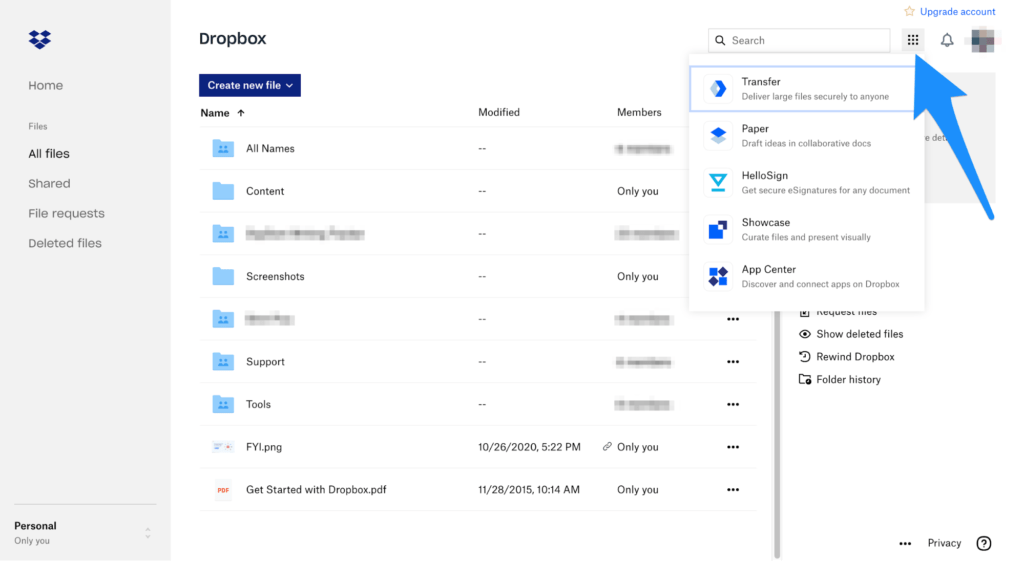
Step #2 A new tab will open. Select Create Transfer. This will then direct you to the Transfer page of Dropbox.
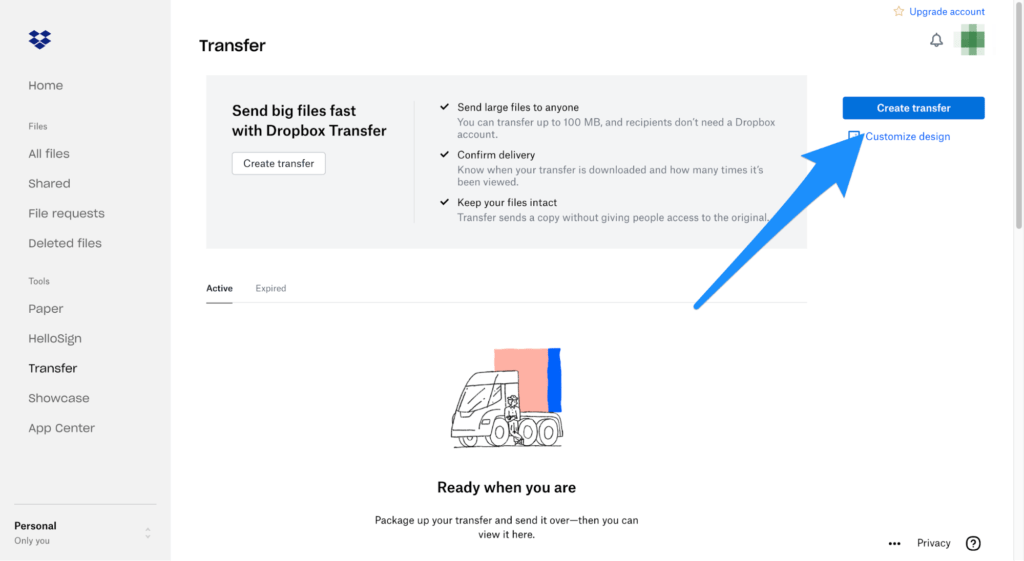
Step #3 Select the files or folder that you want to transfer. Once done, the next window will display the link that you will only have to copy to complete the data transfer.
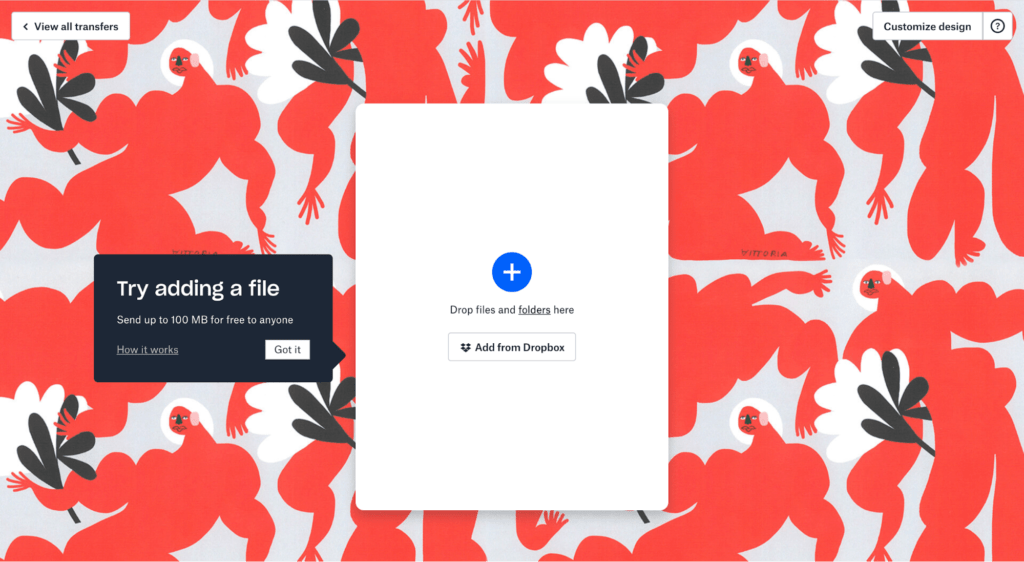
Enter your email address or the email address of the recipients that you want to send the files or folder to. You also have the option to manage the transfer by setting an expiration date or a password.
You (or the recipients) can download the sent files either through the link or directly from the email account. Once done, all that would be left is to save the transferred files to Google Drive.
How to Migrate From Dropbox to Google Drive: The FYI Way
Disclaimer: This isn’t the traditional way of migrating between cloud services, but if storing your files in one place is what you want, you should definitely consider FYI.
You see, FYI takes the hassle out of documentation by bringing all your documents in one place, irrespective of the number of apps or accounts you store them in. You can connect plenty of apps to the platform – Dropbox and G Suite being one of them.
There are no restrictions on the number of app accounts you have on FYI – plus, your documents are protected and completely secure.
Here’s what you need to do to get started with FYI:
Step #1 Go to www.nira.com and click Sign in with Google. Select the Gmail account you want to connect to your FYI account.
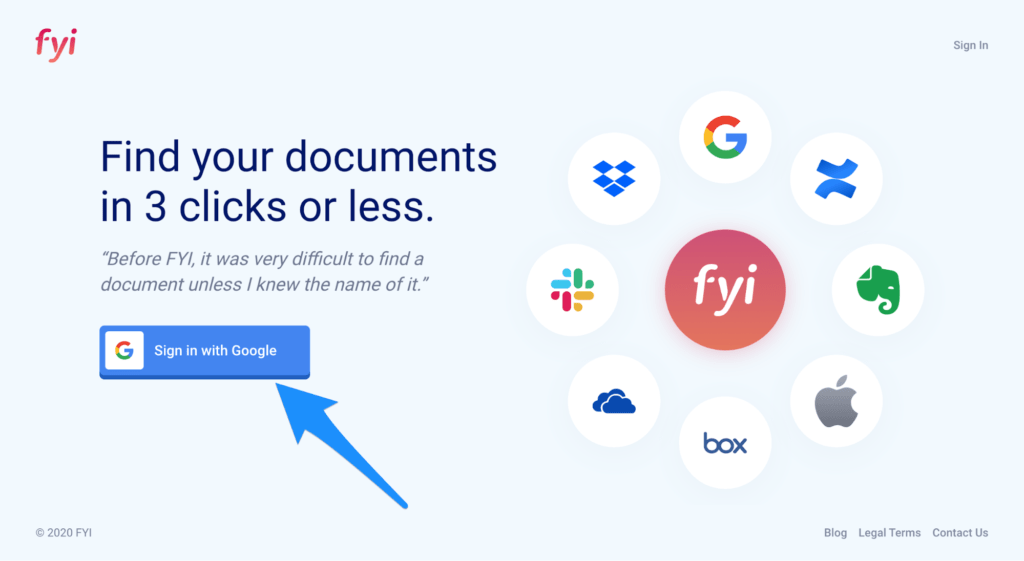
Step #2 Give the software permission to access your Google account and other required data. This will automatically integrate your Dropbox and G Suite, along with any other application you may have connected to your Gmail account.
Don’t worry! It’s super safe.
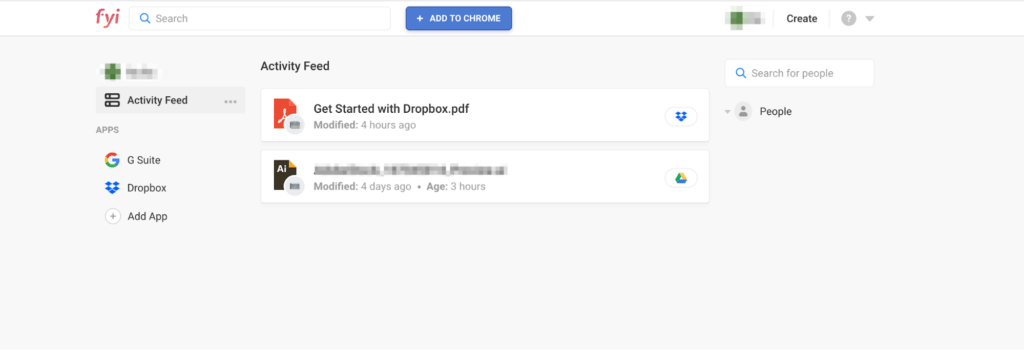
Doing this will show your documents on a single platform, making it easier for you to access them. Not only will this be less time-consuming, but it’ll also be very functional for all workspaces.
The Bottom Line
Google Drive versus Dropbox is an ongoing debate, with each app having its fair share of pros and cons. But if there’s one thing common between the two, it’s excellent cloud storage facilities with plenty of space to access documents any time.
Still, if you do decide to migrate from Dropbox to Google Drive, you can follow any one of our above steps to make the whole process convenient and easy – just to make sure all your files and folders are properly backed up and synced (where needed) to minimize any errors.

